» Joysticks, gamepads, steering wheels
Editor's Choice
Bogdan Vyazovsky 04/16/2018
Xbox firmware is essentially the operating system with which the gadget operates.
The software shell of the console is called Xbox One 360. Its main task is to organize quick user access to your account in the Xbox Live game store.
Externally, the system resembles Windows 8 with reduced functionality.
Services and programs are managed using tiles and a search field.
Note that the main feature of the official firmware for Xbox is that almost all games on it are paid. The user can only run or download genuine copies of the software.
If you want to be able to install any games from the Internet or use pirated discs on the console, you need to flash your Xbox.
Warning:
- After flashing your Xbox yourself, you lose the right to receive warranty service from the manufacturer. All responsibility for the actions taken and their consequences lies only with the owner of the gadget;
- The instructions describe in detail all steps of the flashing process and are recommended to be performed only by experienced users who understand how to disassemble the device and can choose the appropriate firmware version for themselves.
Last warning
The instructions are written using the example of a Lite-On DG-16D2S drive with FW Ver 83850c V1 . It is assumed that the set-top box has standard factory firmware installed. For other models, the procedure may differ. For example, the firmware of some consoles requires replacing the drive board. In this case, it is better to contact a special workshop .
Also, replacing an older version of unofficial firmware with LT+ 3.0 is done differently.
Xbox 360 firmware is produced in our workshops . You can confidently trust the many years of experience of our specialists. Call and make an appointment!
If, despite all these warnings, you are still ready to flash your Xbox yourself, read these instructions.
How to flash Xbox 360
We will consider the process of flashing Freeboot and IXtreme LT 3.0 for Xbox 360.
Dashboard update
To protect yourself from a console ban, we recommend downloading updates from a flash drive or external drive. To get the latest version of Dashboard, go to the official Microsoft website and download the update to a USB flash drive. Next is required:
- unzip the downloaded file to a flash drive;
- insert the USB drive into the Xbox 360;
- Restart your console and updates will be installed automatically.
Before installation, do not forget to format the flash drive. It is important that the USB drive uses the FAT file system.
Required Tools
The procedure will require the following tools:
- screwdriver to unscrew the top cover of the console;
- SATA cable for communication between PC and console;
- Personal Computer;
- Jungle Flasher program ;
- USB connector.
Determining the drive version
Before flashing an Xbox 360 at home, you need to determine the drive model. You need to move the top cover of the console and carefully remove it. There should be a sticker on the case with detailed information . It is necessary to highlight the manufacturer's description. Four companies were used on the Xbox 360:
- Samsung.
- BenQ.
- Lite-On.
- Hitachi.
Connecting to a computer
Remove the protective cover of the PC to connect to the SATA connector. It is important to ensure that all devices work properly and do not turn off during the process. The user is required to:
- Connect SATA to an unused connector on the board.
- the second part of the wire to the Xbox 360 .
- We connect the power in the same way .
- Don't forget to connect the VGA video output to your console.
- If you use HDMI instead of VGA , then you will need a TV.
Installing Port I/O 32
Once you've connected your console to your PC, open Device Manager and look for Xbox components. Right-click (RMB) on the “Xbox 360” line and select “ update ”. Next, use manual installation of updates.
The system will require you to specify the location from which the files will be installed. Download and unzip the driver on your PC. When selecting a directory, select the location where these files are saved.
Working with Jungle Flasher and Drive
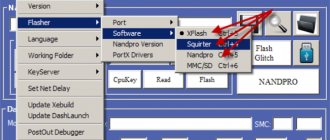
In order to flash the Xbox 360 console, you will need the Jungle Flasher program and auxiliary software. After installing the program, find the icon called “ MTK Flash 32 ”. Next, find the drive model.
5 Major Microsoft Failures
If you click on the “ drive settings ” button and the entry “ Drive in Vendor Mode ” appears, this is a sign that the optical drive has been successfully connected and the program recognizes it. If any problems occur, update the Dashboard version. Most likely the firmware version was not updated correctly.
Processing the drive key
The last step is to find out the authentication key for the drive. To complete the task, you need to complete the following steps:
- open the program and find the “DVD Key” option;
- select the drive used on the console;
- Next you need to click on the command I\O Port ;
- Click on the “ LO83info ” button.
The resulting key will be saved in a separate directory. The user will need it during the installation process.
Check that the firmware is correct!
This completes the Xbox 360 firmware. Now check its functionality. Insert the disk with the game recorded on it (the game must be recorded on the disk specifically for the LT+ 3.0 firmware) and run it. If the game loads, then you installed the firmware correctly.
If you have any problems, contact our workshop - specialists will flash your Xbox 360 and provide a guarantee for their work.
Xbox 360 firmware is produced in our workshops . You can confidently trust the many years of experience of our specialists. Call and make an appointment!
Most popular versions
Today there are four popular firmwares. Each of them has its own advantages and disadvantages, so let’s take a closer look at each version separately.
Xkey
Xkey is the most expensive way to get free games, requiring the purchase of additional software. In order to implement the firmware, you will need XK3Y - a set of tools, the main component of which is the branded x360key motherboard. Additionally, for convenience, you can purchase:
- Control panel , which allows you to control some processes.
- Xk3y WiFi Dongle is a proprietary tool in the form of a USB adapter. With its help, ISO images are launched using a special interface.
- Xk3y Gecko is an adapter that allows you to create ISO images of licensed video games on a USB or hard drive.
The operating principle of Xkey is quite simple. The user is presented with a DVD drive emulation function. With it, you can run games from a flash drive or gray disk. The main advantage of Xkey is that gamers still have access to the Xbox-Live service . Thanks to this, you can fully enjoy online on the Xbox 360. It is worth noting some disadvantages:
- Xkey is the most expensive on the market.
- Not all devices support Xkey. For example, models released after 2012 will not be able to be flashed using this method.
Freeboot
Freeboot is the most popular custom firmware for the Xbox 360. From a technical point of view, Freeboot offers a modification of the standard control interface - Dashboard. The main advantage of Freeboot is the ability to record games on a hard drive , flash drive or third-party HDD or SDD drive. Using Freeboot opens the right to run video games without a licensed disc. Using Freeboot 3.0 you won't need it at all. Now let's highlight the disadvantages of the firmware:
- New interface (DashLaunch and XeX Menu) that you need to get used to.
- Inability to use official Xbox Live online services, otherwise you will be banned. The problem is partially solved by the presence of unofficial LiNK servers.
Dual Nand
Dual Nand is not a particularly popular type of Xbox 360 firmware, since it requires the user to have knowledge in electronics. Probably, the complexity of the procedure and the high probability of damaging the console are the main disadvantages. In addition, for flashing you will have to buy an additional chip (for example, Squirt Dual NAND).
Google Nexus Event 2020 presentation: summing up the results
One of the trump cards of Dual Nand is its versatility. Gamers receive two systems: a modified Freeboot and licensed software. This opens up the opportunity to use Live services with impunity by running any pirated software.
IXtreme LT 3.0
IXtreme LT 3.0 for Xbox 360 involves flashing the drive , which gives access to the use of not only licensed discs, but also pirated fakes, images downloaded from the Internet, as well as simple discs recorded on blanks. Consoles with the latest version of IXtreme LT 3.0 have support for Xbox Live without the risk of a ban.
IXtreme LT 3.0 allows you to play video games that were not originally available in your home region. IXtreme LT will perform especially well among fans of Japanese exclusives. Among the shortcomings, we can note the inability to play arcade games in the company store.
Important information ! Microsoft has a revision of the Xbox 360E console called "Winchester". Unfortunately, at the moment these models are not susceptible to any hacking .
Console firmware methods for various drives
Samsung
For Samsung devices:
- check that the disk is successfully connected to the utility;
- go to the tab called “ MTK Flash ”;
- By clicking on the “ Sammy Unlock ” button, unlocking the drive is activated.
When installing the firmware for the first time, click on “ OK ”. A window will open with a standard form, which will tell you that all actions are performed at your own peril and risk. Follow the launcher commands.
Once the unlocking is complete, you will return to “ MTK Flash 32 ”. Here you need to click on “ Read ” for the application to start reading the firmware. The program will offer to make a backup copy of the proprietary OS. Don't skip this step so you can return to the default settings in the future.
As soon as the program reads the firmware, an option will open that allows you to write modified firmware . To start the process, click “ Write ” and in the window that opens, select the folder where it is located.
Having received a message about successful recording, the user is required to press the “ Outro ATA Reset ” button. This procedure will allow you to correctly stop the firmware process.
ATTENTION! If you forget to press this button, then when you start the console you will automatically receive a ban!!!
BenQ
For the Benq manufacturer, first connect the drive, open “ MTK Flash ” and select the partition where the drive name is.
After this, all actions are carried out by analogy with drives from Samsung:
- click on “ Read ”;
- save a backup copy and installation key on your PC;
- use “ Write ” (in Explorer, select the location where the firmware is saved);
- followed by the “ Outro Ata Reset ” button, which will launch the installation;
- disconnect the drive from the computer and connect it to the set-top box.
Hitachi
Owners of a console with a Hitachi drive need to know not only the manufacturer’s brand, but also the serial number of the device. If the serial number begins with the numbers 78 or 79, then the user will have to burn an additional disc with the serial number. This procedure is necessary to unlock the drive. The Jungle Flash utility has a tab with the name of the Hitachi drive. You need to open it and click on the “ Insert 79 Audio CD ” column. A direct link to download the recording file will open. After downloading, you need to burn it to a CD-R disc.
In the window, click on the “ Send Mode-B ” command and follow the installation instructions. When exiting “ Mode B ”, the user needs to insert a disc with a previously recorded file. If the drive is number 79, use the “ 79 Unlock ” command. Next, disk reading will start. After a couple of seconds, you can pick up the disk (the drive will open on its own). After this, the standard flashing method will open using the “ MTK Flash ” command.
What is an XSD file and how to open it
Lite-On
The most problematic drive is Lite-On. Please note that only newer drive models sync seamlessly with Jungle Flash. If the utility does not synchronize, you will have to disassemble the drive . Right down to the printed circuit board. The task is to find a point on the board called MPX01 . The location of the point is indicated in the image below. You need to make sure that the point found is correct, since they are tightly located. It is extremely easy to make a mistake and confuse the numbering.
You will need to bring a probe or probe to point MPX01 until the firmware is written. To make a probe, we take a sharp object and solder (or screw) a mass (ground) to it from the device to which the drive power is connected (computer power supply, or set-top box). Such actions are a necessity. Otherwise, the drive will automatically block the installation of the modified OS. Now let's move directly to the firmware process:
- Open the utility in the “ MTK Flash ” section by clicking on the button with the name of the drive.
- In the new window, find the “ PhatKey ” command.
- Wait while the utility processes the information . Don't close the windows. Wait for the keys on the toolbar to become active again.
- Upon completion of the process, the following will be displayed on the screen in the properties window of the optical drive: “ MTK Vendor Intro failed ” - a sign that the user can start using the probe on the drive.
- Turn on the probe, and then touch it to point MPX01 . After a couple of seconds, release it.
- If everything was done correctly, a message will appear in the utility that will allow you to start the process.
- Click " OK " and restart the drive.
- Resyncing will greet the user with a message telling them to save the new product key.
- Now the task is to select the directory where it will be written.
- After completing the recording, go to the “ Firmware Tool ” panel, where you need to press the “ Manual Spoofing ” button. The button will be clickable, recognizing the newly connected device.
- Afterwards, the “ Load key bin ” window will open, where the user needs to select the location where the key is saved. As a result, the modified firmware will use a working product key.
- In the main menu, go to the section called " MTK Flash ".
- Click on the “ Read ” key to start the process of reading the firmware from the file.
- During installation, the utility will require a product key . Specify it using Explorer.
- By clicking “ Write ” the recording process will start (the procedure itself will take a quarter of an hour).
- Finally use the “ Outro ATA Reset ” command. The inscription “ Verified ” is a notification that the operation was successful.