Recently, there has been a rapid growth in the popularity of the Teamviewer 13 program. Not all users know how to remove the 5-minute limit. This failure occurs if commercial use is detected during installation and subsequent launch of Teamviewer. The app automatically closes sessions every five to six minutes. We will describe in detail below what a user should do in this situation.
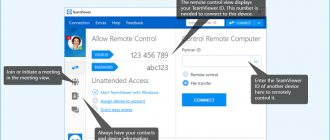
The user has the right to use Teamviewer without restrictions if he has paid for a commercial license or does not exceed the time limits for launching the utility for personal purposes. The application is designed for remote administration. A user from one computer remotely connects to another PC. Communication is established regardless of the distance between devices. The user can download and install Tim Weaver for free without restrictions only for personal purposes.
The developers have provided important nuances:
- the use of the software product is controlled and monitored;
- restrictions are introduced when the utility is launched frequently.
Why is this happening
If Teamviewer turns off after 5 minutes, experienced users will tell you what to do. A time limit occurs if the utility suspects a commercial launch. To remove the restriction, the user must pay for the licensed version. If software is needed in rare cases, then users look for workarounds.
Attention! Before running the utility on two devices, you should make sure that in both cases the application is installed for personal purposes. If the commercial version of Teamviewer is installed on the first PC and the free version is installed on the second, the message “Commercial use detected” will appear.
By commercial use, the application means organizing a workflow in 4 cases.
- Providing computer support to company employees or clients.
- Connect to a device in your organization or to servers from your home computer.
- Providing assistance to private enterprises and government organizations.
- Connecting to a computer on which the paid version is installed.
For personal purposes, the application starts if it connects to a home PC without consequences.
How to remove the message about commercial use of TeamViewer
If it was not possible to avoid restrictions due to suspicion of commercial use of TeamViewer, then do the following. The algorithm of actions is simple, but requires a careful approach so as not to accidentally delete anything unnecessary from the computer and to carry out everything as correctly as possible. So, what needs to be done to remove the restriction on using the TeamViewer program.
- Close the application of the same name.
- Open the Task Manager by pressing ctrl + alt + delete simultaneously.
- Go to the “Processes” tab. We select all the processes that belong to TeamViewer and end them (click on the button at the bottom of the screen “End task” or End process, or call the menu via RMB).
Stop TeamViewer processes in Task Manager
- Now we completely remove the program from the computer. We do this either using built-in tools (section “Programs and Features” in the Control Panel), or using special uninstallers that destroy the “tails” of unnecessary software - such as AIDA 64 or Revo Uninstaller.
- Right-click on the “Start” button and call up the “Run” line. Enter %appdata%. A window appears in which we see the TeamViewer folder, which we also delete.
- Call the “Run” line again, but this time we enter regedit in it, thereby opening the registry. We carefully review all branches, find those that relate to TeamViewer, and delete them.
- Open Program Files on drive C and from here we also delete the folder of the same name.
Now that we have removed everything related to TeamViewer, we change the MAC address by entering any value in the Network Address. After this, run the Attribute Changer program and change the creation date of the Program Files directory. We restart the computer, reinstall the necessary software and get to work.
Careful completion of all steps will allow you to continue to use TeamViewer for personal purposes without restrictions.
The fastest and easiest method
If commercial use of Teamviewer 13 is detected, you need to know how to quickly remove the time limit.
- Close the utility.
- Open Registry Editor:
- load "Start";
- enter the command “regedit ” in the search bar;
- press "Enter".
or
- press “WIN (Windows button) + R”;
- specify the command " regedit" ;
- confirm the action.
- In the “HKEY_LOCAL_MACHINE” category, find the folder with the utility (SOFTWARE\Microsoft\RADAR\HeapLeakDetection\DiagnosedApplications\TeamViewer.exe).
- In the right block of the window, select the “LastDetectionTime” option.
- Double click on this line.
- In the window that opens, enter the value “0”.
- Confirm action.
- Launch the application.
- Make sure the utility is working without interruption.
How to reset the restriction?
You can reset the limitation in the operation of the utility using the methods below.
Official purchase
For commercial use of the software, a license is required , which must be purchased annually. Depending on the number of accounts used, connected devices and channels, users are offered several types of licenses to choose from.
Business is a version for one user that can be used on three devices and connect from them to other devices without restrictions. With its help, you can work from only one PC . Additionally, you can activate the license on your phone for free and connect to your computer using it.
Rainmeter application for the design of the Windows operating system
The license can be used on three devices: computer, tablet, phone.
Premium - this license type can be used on up to 50 computers from which you plan to connect to other devices. It includes one simultaneous channel ; in other words, only one user can work with it at a time. If necessary, you can purchase an additional channel and then several people can simultaneously work with the program.
Corporate is also a multi-user license, which includes three simultaneous channels (3 people can use it online). This license is suitable for large companies that help their clients remotely. Additional channels can be purchased as needed to expand the organization's capabilities.
a license key into the program , which the user or organization receives at the time of purchase.
The license is activated as follows:
- In the program menu you need to select the “ Advanced ” tab.
- Next, in the list that appears, you must select “ License Activation ”.
- Then you need to enter the key received when purchasing the license.
Reset limit
If the restriction is turned on for no reason, then you can reset it in several ways. But you can use such methods only if the restriction was turned on for no reason. Otherwise, it is recommended to purchase a licensed version.
Changing a value in the registry
To remove the time limit, you can try making changes to the registry:
- We close the program.
- Open the system registry . To do this, click “Start” and enter “ regedit ” in the search, then press “Enter”.
- In the registry section LOCAL_MACHINE you need to find the program folder at SOFTWARE\Microsoft\RADAR\HeapLeakDetection\DiagnosedApplications\TeamViewer.exe.
- In the right window of the registry, you need to select the “ LastDetectionTime ” parameter, as indicated in the bottom picture and double-click on it with the mouse, then put “0” . Then you need to confirm the change.
- Next, you need to open the software and make sure that it works without interruptions.
Reinstalling the utility
Often it helps to bypass the time limit and reinstall the utility:
- Close the application.
- It may be located in open processes , so all processes with the name of the program must be closed in the “ Task Manager ”, which opens by pressing the key combination Ctrl + Shift + Esc.
- In the manager window, you need to select the “ Processes ” tab, where you need to find and close all processes that contain the name TeamViewer.
Android emulators for computer
They need to be completed with the “ End task ” button, which is located at the bottom of the screen window. You can also right-click the dialog box and terminate the desired process.
- Now you can uninstall the utility using standard system tools or special software. In the first case, go to the “ Control Panel ” and open the “ Programs and Features ” section. In the second case, software and residual files are removed using special utilities. These include AIDA64 and Revo Uninstaller.
- Next, you need to delete all folders left by the application in “ AppData ”. To do this, open the “ Run %appdata% in it . After which a list of folders will appear in which you need to find the “ TeamViewer ” folder and delete it.
- In the next step, you need to open the “ Run regedit in it to open the system registry. In it, you need to carefully review all the branches and, if there are records remaining from TeamViewer, delete them.
- Next, you need to click “ Start ”, open the “ Computer ” tab, go to drive C and open the “ Program Files ” folder in 32-bit systems, and in 64-bit systems it is installed in “ Program Files (x86) ”. In this folder you also need to delete the remaining folder from the program.
- After uninstalling the program, you need to change the computer's MAC address to any value that does not start with two 0s and ends with the characters 2, 6, A or E. To do this, open the “ Device Manager ” again using the “Control Panel” and the “System” tab. You can also launch the Run and enter devmgmt.msc . Here we select the network adapter used for connection, right-click on it and open its “ Properties ”. Next, in the new window you need to select “ Advanced ”, where in the empty line “ Value ” you need to specify a new network address.
- Then you need to install the Attribute Changer utility on your PC and use it to change the creation date of the Program Files section. In it you just need to specify the path to the folder and change the date to a later or earlier one.
- Next, restart the PC and reinstall the program.
Resetting ID using special software
In this case, you will need the program “TVTools_AlterI”:
- First of all you need to download it ;
- Next, you need to copy or move its installation folder to the “TeamViewer” directory;
- run this utility;
- select the item “Trial” , as indicated in the bottom picture;
- after which you need to click on “Start” ;
- The ID of the remote control program will change, as a result of which it should work without interruption.
Choosing a program for modeling and designing in 3D
Do Not Track ID
To prevent developers from tracking IDs, you need to do the following:
- Open Start .
- Go to “ Control Panel ” and open “ Network and Sharing Center ”.
- Next you need to open “ Change adapter settings ”.
- Then right-click on the network connection you are using, and then select “ Properties ” in the new window.
- Then select " Customize ".
- Next, in a new window you need to select “ Network address ” and enter any 12 digits .
- Download and install the “VolumeID” program.
- Next, you need to open the command line as an administrator using the key combination “Win + R” and enter the command “ vol .
- Then change the volume series . To do this, you need to enter “ E:\name of the object in which the program is located\Volumeid.exe c: 2E63-C017 ” (English letters and numbers).
- Launch the registry and go to the next branch “ HKLM\SOFTWARE\TeamViewer\Version[X] ”, where X is the version of the utility, relevant for an 86-bit system. Find and delete the “ClientID” parameter. In 64-bit Windows, for this you need to go to the following path “ HKLM\SOFTWARE\Wow6432Node\TeamViewer\Version[X] ”.
- After this, you can reboot the PC , launch the software and check if the ID has changed.
Reset restrictions in MacOS
If the program runs for five minutes on MacOS, then you need to:
- Close the utility.
- Download a special script for changing TeamViewer ID (it is written in Python).
- Next you will need a “ Terminal ” in which you need to enter sudo python ./TeamViewer-14-id-changer-for-mac.py.
After installing the script, you must reboot the device , after which the ID will change in the program. Now you can use the software again without restrictions.
Using the web version
Regardless of the type of device and operating system, the problem of a five-minute limitation in the operation of the program can be quickly solved using the web version. For example, in the Google Chrome browser store you can install a special extension, after installing it you can immediately get down to business.
Feature of the problem
The reason for the lack of communication between two devices is:
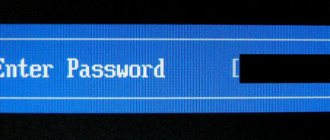
- Incorrect password;
- application version conflict;
- incorrect sequence of steps;
- blocking the utility by an antivirus or firewall;
- lack of internet connection;
- technical work on the server.