Diagnostics
To quickly fix the problem, simply find your network connection in the lower right corner. And it doesn’t matter what operating system you have: Windows 7, 8, 10 or XP. Find the wave icon and right-click on it. After that, select diagnostics.
The Windows operating system itself must find the problem and solve it programmatically. After this, you should see a message that the adapter has been disabled and the operating system has reactivated it.
But sometimes you can see this message: “Wireless disabled - Not fixed (With a red cross).” But you shouldn’t be scared, it’s just that the system itself couldn’t turn on the transmitter on the laptop, and we’ll do it manually.
How to check your wireless connection status
If everything is fine with the drivers, then the next step is to check the wireless connection. It can simply be turned off. Testing is carried out differently on different operating systems. But it all comes down to one thing: you need to get into the “Network Control Center”.
There is a universal method. You need to press Win+R, after which a window with a line will appear. In the line you need to type the command control panel and press Enter. This will open the "Control Panel". Here we go to “Network and Internet”, then to “Network and Sharing Center”. In the “Center” we will be interested in the “Change adapter settings” section located on the left. Clicking there will allow you to see the status of all connections that are available on the computer.
“Wireless connectivity” is what will be important to us. If the label is not colored but gray, it means there is no signal. You can start the connection by double-clicking the left mouse button. After startup, the computer begins to search for all available connections.
If they do not appear, then you can try to perform system diagnostics. It is carried out through the “Network Center” and the “Change adapter settings” item. You need to right-click on the “Wireless Connection” shortcut. In the window that opens, click the “Diagnostics” field. The computer runs the test on its own. Based on the result of the check, the user receives advice on further actions.
Using buttons
On 50% of laptops you can find a separate button or switch that turns the Wi-Fi network on and off. For starters, I'd look at the extra buttons next to the main keyboard. You need to find a button that will show: an antenna, a computer - with waves emanating from them.
If there is no such button, then you can look for it on the side of the laptop. Sometimes laptop companies put power buttons there. But as I wrote earlier, not all laptops have such a button. But you can enable it in another way; to do this, you need to find a similar icon on the main keyboard in the row of F keys.
To activate, you must simultaneously press the auxiliary key “Fn” and this key. On my laptop this is the combination “Fn+F2”, but sometimes the keys F3, F5, F9, F12 are used.
| Laptop | Fn+ |
| Samsung | F9 or F12 |
| Asus | F2 |
| Lenovo | F5 |
| Acer | F3 |
| MSI | F10 |
| HP | F12 |
If nothing happens when you press it, it means that you do not have the drivers installed on your machine that are responsible for these buttons, so we will turn it on differently.
Enable via control center
- Press the Win (May look like a window) and R keys simultaneously. You already know how to do this.
- After this you will see a window like this. You need to enter the command ncpa.cpl in one field and click on the button below “OK”.
- Find the wireless connection with the ladder icon, right-click on it and select “Enable.”
Windows 8 and 10
If you have an eight and a ten, then you may have Airplane mode turned on. Then you will not be able to turn on WiFi while it is working.
- You need to go to “All parameters”.
- Next, enter the section with the planet icon.
- Click on the airplane and turn off the mode. You can also move the bottom sliders to “On” mode. Then, even if you have Airplane mode enabled, the wireless network and Bluetooth will not be disabled.
general information
Windows services (system programs) are applications and software that are responsible for the operation of the computer. Most of them start automatically (unless otherwise specified in the settings) when Windows starts and are executed regardless of the user's status.
Each service regulates a specific process in the operation of the OS. Which one is responsible for the operation of Wi-Fi on Windows 10 and younger? That's right, WLAN autoconfiguration service. Its main functions are setting up, detecting, connecting and disconnecting wireless networks in the 802.11 standard. It is this program that is involved in creating a virtual access point (this is when we enable Wi-Fi distribution, for example, on a laptop).
In addition to the Wi-Fi module, WlanSvc regulates the operation of the Bluetooth wireless adapter. That is, the service controls the operation of wireless communications on the computer.
There are situations when the PC does not see the Wi-Fi network or it is not possible to enable Internet distribution. The adapter is turned on, but the required action cannot be performed. The reason for this is that the WlanSvc wireless network automatic configuration service has not started.
When we try to connect to the network, we will receive the message “No connections available,” although other devices can connect without problems. And if we try to turn on the mobile hotspot (access point), we will see the message: “The WLAN auto-configuration service could not be started.”
In general, WLAN Autoconfig is always enabled by default, so most ordinary users have not even heard of it. But what if it turns out that the application is disabled?
The main thing is not to panic! I will simply and in detail describe how to enable WlanSvc on a laptop or desktop computer running Windows 10. The instructions are the same for all versions of the OS, starting with Vista. The only thing is that the names of sections and some steps may differ.
Comments are always open to our readers. If something is unclear or doesn’t work out, write immediately!
You can see the instructions clearly in the following video:
There are two ways to start the WlanSvc wireless network auto-configuration service:
- Through the "Control Panel";
- Through the Run dialog box.
The differences are only in the first steps; after we get into the list of system programs, the instructions will be the same for both methods. So, you can find the WLAN auto-configuration service on Windows 10 and younger like this:
- Through Start, go to “Windows Settings” and in the search bar write “Control Panel”. In the “Configure computer settings” window, open the “Administration” section. On the page that opens, click “Services”.
On Windows 7, to access the WLAN auto-configuration service, open the “Control Panel”, then “System and Security” - “Administration” - “Services”.
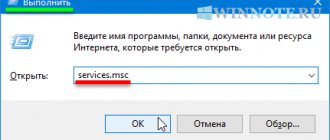
- Launch the “Run” command by simultaneously pressing Win + R and enter services.msc. Press Enter or OK. The Services (Local) page will immediately open.
Next steps are:
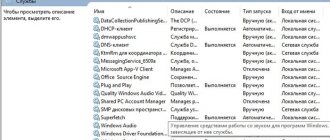
- In the large list we look for “WLAN Autoconfiguration Service”;
- Click LMB 2 times (you can RMB and go to “Properties”);
- A window will open where you need to click “Run” and select the startup type “Automatic”;
When the WLAN auto-configuration service on Windows is started, you need to restart your computer or laptop.
Sometimes when you try to start, you receive error 1068 “The child service could not be started.” What to do in this situation:
- In the “Run” window we write msconfig;
- The “System Configuration” window will open, where we select the “Normal startup” option;
- Then click “OK” and “Apply”.
Restart your PC and try running WlanSvc again.
Have you read this article because your PC or laptop does not see wireless networks, or you cannot turn on Internet distribution? If WLAN Autoconfig is running and the problem persists, here are some other reasons for this:
- The wireless adapter is not installed or disabled. If you have a laptop, the hardware is built in by default. You need to buy an additional USB adapter for your desktop PC and connect it. To enable the module, go to “Device Manager”, click on “Network adapters”. Find the desired device in the list, right-click and select “Enable...”.
- Drivers for the adapter are outdated or missing. You can update the firmware through Device Manager. In the same place as enabling it, click “Update Driver” and follow the system prompts. You can install the software from the official website of the laptop/network adapter manufacturer.
- Airplane mode is enabled. To disable it on Windows 10, click on the Wi-Fi connection icon and simply click on “Airplane mode”.
- Access point disabled. Log into the router's web interface and go to the wireless network settings section. Check if the “Enable access point” checkbox is ticked (it’s called differently on different models).
Check driver
- Press Win+R;
- We write the command devmgmt.msc;
- Go to the "Network Devices" section. Now look carefully to see if there is an icon with an arrow down. If it is there, then right-click on it and then select “Engage”.
Checking the WLAN function
I’ll say right away that this function automatically controls all network devices and, in theory, it should be enabled. But sometimes when installing some programs or due to damage from viruses, the setting may fail.
- Win+R;
- services.msc;
- The list will arrange the data in alphabetical order. So just scroll down to the bottom to the “WLAN AutoConfig Service” section. After that, select the properties of this section.
- In the line “Startup type:” set automatic startup. Then click “Apply” and “OK”.
Installing drivers
If I were you, I would reinstall the drivers for your WiFi adapter. They should be downloaded from the official website of your laptop company.
- To do this, connect your laptop to your router via a wire into any free LAN port. Or you can find where else you can use the Internet.
- After that, open any search engine and enter the company name. I have an Acer laptop, so that's what I'm entering.
- Next you need to find the support section or with drivers.
- Choose your product. Select the operating system version and then download the drivers for your wireless adapter.
If you did not find the necessary firewood on the site or are simply confused, then you can download the whole pack from the site - https://drp.su/ru/foradmin. You need to download "DriverPack Offline Network". After installing the driver, do not forget to restart the device.
Wi-Fi does not turn on. Wireless network is disabled
Wireless network is disabled Good afternoon, tell me what to do. Wifi doesn't work. I ran network diagnostics and it shows...
Wireless network In general, this is the case. I have a netbook AsUs Eee PC 1100. my sister arrived with a Toshiba laptop.
Wireless network in W7 there was such a problem: the home wireless network was no longer recognized on my machine.
wireless network Hello. When I try to connect to a wireless network, nothing happens.
wireless network I want to install a wireless network in a room where there are about 15 laptops, 2 shared printers, etc.
What to do on the computer?
Unfortunately, manufacturers of ordinary stationary personal computers do not install a built-in wireless network module. But it can be purchased separately. It looks like a regular flash drive. Sometimes an antenna is also installed in it to improve communication. Such external modules cost from 800 to 1800 rubles in any computer store. Drivers are quickly installed offline the first time you connect to the Internet.
Make sure your network card automatically receives IP addresses and gateway settings
Most wireless routers are configured with DHCP servers that allow computers and other client devices to join the network, so their IP addresses do not need to be manually configured. Check your wireless network adapter's TCP/IP settings to ensure that your adapter automatically receives settings from the DHCP server. If necessary, you need to set “Obtain an IP address automatically” in the network connection properties.