WLAN auto-configuration service. What is it and how to enable it in Windows
In the comments, questions are often asked about the fact that the laptop does not see the Wi-Fi network (although Wi-Fi is turned on), or it is not possible to start Wi-Fi distribution on the laptop.
Very often, such problems arise due to the fact that the WLAN auto-configuration service is disabled. There is such a service in Windows, it manages wireless connections. So, if the WlanSvc service is stopped, then you will not be able to connect your computer to Wi-Fi, or launch an access point on your laptop. If you just want to connect your laptop to a Wi-Fi network, then due to the stopped WLAN auto-configuration service, the laptop simply will not see available wireless networks. The status will be “No connections available”. And when you try to distribute Wi-Fi from a laptop, the error “Failed to start the WLAN autoconfiguration service (1068)” will most likely appear. In any case, this problem needs to be fixed somehow. You just need to check whether this service is running on your computer. And if not, then launch it and set automatic launch in the settings.
I will show how to enable the WLAN auto-configuration service in Windows 10. But, if you have Windows 7, 8 or even Windows Vista, then everything will be exactly the same. The process itself is no different.
ITGuides.ru
Today we will look at error code 1068, which prevents the computer from connecting to a high-speed connection. As a rule, after error 1068 appears, the system begins to display error code 711. Below we will try to figure out how to fix this problem.
Error 1068 is an infrequent guest of Windows OS, and it reports that remote access services were not running on the system.
The problem can be resolved in several simple steps.
Stage 1. First of all, let's try to start the necessary services. To do this, open the Run using the hotkey combination Win+R , and then run the command services.msc .
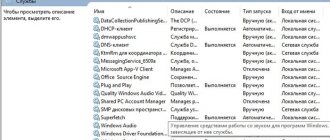
The Services window will open . In the form of a list, all system services are located here, sorted in alphabetical order. Find the Telephony , right-click on it and select Properties .
In the “Startup Type” , set the value to “Manual” . Now click the "Apply" and then "Run" .
Do similar actions with the following services:
Plug and Play device support
SSTP service
Automatic Remote Access Connection Manager
If error 1068 continues to appear, proceed to the second step.
Step 2: Now we will check the permissions of the system folders. To do this, go to the C:\ and call the context menu of the “Windows” by right-clicking on it, Select “Properties” . Go to the “Security” and in the “Groups and Users” , make sure that full access is granted to the “CREATOR-OWNER” , “System” and “TrustedInstaller” .
This information can be found by highlighting one of the items and looking just below in the rights column.
If any of the items do not have full access, select it with a mouse click, and then select the "Edit" . In the "Group Permissions" , check the "Full Control" . Click the "Apply" .
After completing these steps, be sure to restart your computer and try starting a high-speed connection. If error 1068 remains, proceed to the third step.
Step 3: In some cases, errors 1068 and 711 may occur because the Windows Event Collector may have stopped logging information to the Logfiles folder.
To check this, you need to restart your computer in safe mode. To do this, send the computer to restart and until the system displays the Windows logo, press the F8 . In the menu that appears, select "Safe Mode" .
With your computer booted, go to C:\Windows\System32 , find the “Logfiles” and rename it “Logfiles.old” . Restart your computer normally and check that your high-speed connection is working.
Stage 4. This method rarely copes with errors 1068 and 711, but it’s still worth trying your luck. To do this, open “Start” and enter “System Restore” . In the menu that opens, select the rollback point when the system did not generate an error. After the process is completed, the system will reboot.
And finally. If none of the methods are successful, the only thing that can help is reinstalling Windows.
What is WLAN AutoConfig Service?
Without complicated and boring terms, this service in the Windows operating system manages all wireless connections (via Wi-Fi and Bluetooth). That is, the WlanSvc service is responsible for searching, connecting, disconnecting and other operations that are necessary for the operation of wireless connections on a laptop. It is clear that if this service is stopped, then Windows will not be able to see available wireless networks and will not be able to connect to them.
There may also be a problem when trying to start distributing a Wi-Fi network in the Windows command line. If this service is stopped, an error will appear: “The Wireless Network Auto Configuration service (wlansvc) is not running.”
Basically, that's all we need to know about the WLAN auto-configuration service. In the system, this feature is always enabled by default. You may ask, why then does it need to be turned on? Everything is very simple, there are many instructions on the Internet where they advise disabling this service “to make the computer work faster.” Also, the service can be disabled by some programs; various system optimizers especially like to do this. And if you do not have the original Windows image installed, but an assembly, then the service may be disabled immediately after installing the system.
Additional measures
If after this it turns out that the WlanSvc wireless network auto-configuration service is not running, try downloading utilities specially designed to troubleshoot such problems from the official Microsoft website (even the small Microsoft Fix It program will do) or use the prompts in the Diagnostics and Troubleshooting Center available on any Windows system.
Naturally, you shouldn’t discount viruses either. Just in case, perform an in-depth scan and eliminate all threats using portable or disk-based antivirus programs.
In principle, if the problems are related to damage to components of the operating system itself, as an additional tool for eliminating them, you can offer a system file check, which can be activated via the command line using the command “sfc /scannow” (of course, without quotes). If this does not help, for example, because access to some files is blocked, try performing a similar procedure when booting from removable media with a distribution kit or recovery disks like LiveCD. After completing all the operations, repeat the above steps to activate the problematic service. If this does not help, in the latest versions of Windows you can try to perform a recovery while saving user data or return the computer (laptop) to its original state, which fully corresponds to a “clean” installation of the OS, so to speak, from scratch.
Note: some laptop models provide the use of special menus for this, called up by buttons or keyboard shortcuts.
How to enable WLAN AutoConfig service in Windows 10, 8, 7
Press the keyboard shortcut Win + R. The Run window will appear. Enter the command “ services.msc ” and click “Ok”.
Next, in the list we find the “WLAN AutoConfiguration Service” we need, right-click on it, and select “Properties”.
Set the “Startup Type” to “Automatic”. Click the “Ok” button and “Apply”.
Restart your computer. After these steps everything should work.
What to do if the WlanSvc service does not start?
If you are faced with the fact that the WLAN auto-configuration service does not start, then the problem may be that the service itself is completely disabled. Let's check and turn it on.
Press the Win + R , but this time enter “ msconfig ”, and click “Ok”.
We find the service we need in the list and see if there is a checkmark next to it. If not, then check it, click “Ok”, and “Apply”.
Update: enable “Normal startup” if error 1068 appears
This solution was shared with us in the comments. It is very simple and helped get rid of error 1068 when starting the WLAN service . Press the Win + R key combination on your keyboard, copy the msconfig command into the appropriate line and click Ok.
Set the launch option to “Normal launch”, click on the “Apply” button (must be active) and “Ok”.
Restart your computer.
If these tips did not help you solve your problem, then describe it in detail in the comments. If there is a problem with connecting to Wi-Fi, then see the article why the laptop does not connect to Wi-Fi. And if you came to this page to find a solution to the problem of distributing Wi-Fi from a laptop, and the method described above did not help, then look at the solutions in this article.
source
How to get rid of error 1068
When working with a computer, users sometimes encounter system errors, the causes of which can be very different. In this article, we will take a closer look at how to fix error 1068 and why it occurs. Let's figure it out. Go!
"The Application Identity service on Local Computer failed to start. Error 1068: The child service could not be started" - a similar message appears when an unsuccessful attempt to start a system application, which becomes an obstacle when working with the computer. To get rid of this problem, you need to take the following steps:
- Open the Start menu, select Control Panel.
- In the Control Panel window, click System and Security.
- Go to the Administration section.
- In the window that appears, select “Services”.
- Going to the list, find the “Task Scheduler” utility. Next, right-click on it and select “Properties”.
- On the “General” tab, in the “Startup type:” item, select “Automatic”.
- Be sure to click the "Apply" and "Run" buttons.
- Find the applications in the list: “Windows Event Log” and “Remote Procedure Call (RPC)”. Repeat the same steps with them as described above.
- Restart your computer for the changes to take effect.
If despite the settings you have made, the error does not disappear, then try the next method.
You can go to the desired list of utilities in the same way as the previous method, or launch the “Task Manager” by pressing the key combination Ctrl+Alt+Delete, then open the “Services” tab. There you will need to find and activate 6 more utilities:
You need to do the same with them as in the first method. If an application cannot be activated, try this:
- Go to the Start menu.
- "All programs".
- Select the "Accessories" folder and in it "Command Prompt".
You can also use Windows search by typing "cmd". Please note that you must run the command prompt with administrator rights. In the window that appears, enter the command: net start the name of the utility that cannot be enabled. To view the full name, go to the utility properties and copy what is listed in the “Name” section.
After completing all the steps described, you can get rid of error 1068, and full operation of your PC will be restored. Write in the comments whether this article helped you solve the system malfunction and ask any questions you have about the topic discussed.
Similar articles:
How to get rid of error 619 How to get rid of error 797 How to get rid of error 769
Inclusion
You can see the instructions clearly in the following video:
There are two ways to start the WlanSvc wireless network auto-configuration service:
- Through the "Control Panel";
- Through the Run dialog box.
The differences are only in the first steps; after we get into the list of system programs, the instructions will be the same for both methods. So, you can find the WLAN auto-configuration service on Windows 10 and younger like this:
- Through Start, go to “Windows Settings” and in the search bar write “Control Panel”. In the “Configure computer settings” window, open the “Administration” section. On the page that opens, click “Services”.
On Windows 7, to access the WLAN auto-configuration service, open the “Control Panel”, then “System and Security” - “Administration” - “Services”.
- Launch the “Run” command by simultaneously pressing Win + R and enter services.msc. Press Enter or OK. The Services (Local) page will immediately open.
Method 1: Start the required services
Based on the error, it can be assumed that the services necessary for the normal functioning of the system are simply disabled. Accordingly, the problem can be solved if all required services are enabled.
- Call window "Run"
keyboard shortcut
Win+R
. In the window that appears, enter the command
"services.msc"
(without quotes). - A services window will pop up on the screen. In this list you will need to find a service "Telephony"
, right-click on it and select
"Properties"
. - In the window that opens, click on the button "Run"
. If clicking this button is not available, then you will need to
"Startup type"
change parameter
"Manually"
on
"Automatically"
or vice versa. Save your changes and close this window. - You will need to do the same with other services, which are listed below:
- Nutrition;
- Automatic remote access connection manager;
- Plug and Play;
- Remote Access Connection Manager;
- Network Awareness (NLA) service;
- Network connections;
- Application Layer Gateway Service;
- Remote procedure call (RPC);
- Remote Access Connection Manager;
- Connected Network Information Service;
- PNRP protocol;
- Multimedia Class Scheduler.
Once all services are configured, restart your computer and check for the error.
Error when working with the Internet and local network
In a similar way, error 1068 is eliminated during any actions with the network, only this time you need to check other services, namely: Windows Connection Manager, WLAN Auto Configuration, Remote Procedure Call RPC, Connected Network Information Service. All of them must be enabled and have an automatic startup type. It is also recommended to look at Plug and Play Services, PNRP, SSTP, Network Member Identity Manager. They must have a launch type of “Manual”.
Alternatively, you can resolve error 1068 when working with network components as follows. Open a command prompt as an administrator and stop the Network Principal Identity Manager service Net stop p2pimsvc
Then go to the C:/Windows/serviceProfiles/LocalService/AppData/Roaming/PeerNetworking directory in Explorer and delete the idstore.sst , if there is one there.
Now restart your computer and check if error 1068 still appears.
Enabling services does not guarantee that the problem will be resolved; in fact, the service may not start at all. So, if there are problems with the local network, it often happens that the Workstation service does not start, giving error 1068. The reason may lie either in the incorrect operation of “senior” services (see dependencies), or in damage to system files, viruses, etc. P.
Another difficulty in diagnosing such faults is that not all users are well versed in the purpose of Windows services. What if you don't know which service to enable? Nothing bad will happen if you turn everything on. If this does not work, try restoring Windows by rolling back to a previous restore point; perhaps the cause of the error actually lies in damaged system files or registry keys.
- 8shared
- 0Facebook
- 6Twitter
- 0VKontakte
- 2Odnoklassniki
Disabling the power saving mode of the Wi-Fi adapter
Windows 10 uses a power-saving mode for most hardware. Windows can automatically turn off various devices to save laptop battery power. This is a completely expedient and effective way to extend the battery life of your device. However, some network adapter models may not continue to function after resuming from sleep mode without restarting the computer. This may occur due to incorrect device architecture, firmware, or adapter drivers. In this case, it is recommended to disable the power saving mode for the wireless network adapter. For this:
- Open the Device Manager console (devmgmt.msc);
- Expand the Network adapters section, find your Wi-Fi adapter (usually Wireless or 802.11 is in the name) and open its properties;
- Go to the "Power management" (Power Management), uncheck the option "Allow this device to turn off to save power"(Allow the computer to turn off this device to save power). Save your changes by clicking OK.
If you have several network adapters installed in your computer/laptop, including an Ethernet LAN adapter, for example, “Realtek PCIE Controller”, you must also disable the power saving mode in their properties.
It is also recommended to change the power saving mode settings. To do this, open “Control Panel” -> “Power Options” -> current power plan -> “Configure power plan” -> “Change advanced power settings” -> “Wireless network adapter settings” -> “Power saving mode” -> Select “ Maximum performance ."
Troubleshooting error 1068 when connecting to a network
This problem is not inferior in frequency to the previous one, so you should pay attention to it as well. It happens that some protocols that are used in non-standard cases are simply disabled, but these are exactly what you need, more details in the list:
- WLAN AutoConfig Service (Automatic);
- SSTP Service (Manual);
- Routing and remote access (Just run it and check if the error is resolved);
- Network Member Identity Manager (Manual);
- WWAN auto-configuration (Manually, used for wireless connections);
- PNRP protocol (Manual).
Fixing error 1068 when turning on sound
First you need to determine how to enter the “Services” menu, since it is from here that all actions must be performed:
1.Open the Start window;
2.Go to “Control Panel”;
3.Find the element called “Administration”;
4.In the list of actions, select “Services”.
Another, easier way is: press Win + R and paste the command services.msc, then Enter.
For the audio component to work fully, you must have the following services working:
- Power (Automatic) is an important element of many services;
- Windows Audio Endpoint Builder (Automatic);
- Media Class Scheduler (if present);
- Remote Procedure Call RPC (Automatic).
If the error was caused by this particular problem, after following these steps everything should work correctly for you, if not, then see the instructions below.