Problems: how they manifest themselves
As it turns out, the most common problems with Windows indexing are not uncommon, but the user rarely pays attention to them. At the same time, most people tend to attribute errors in indexing to the “crookedness of the Windows developers.” But here are perhaps the most common of them:
- in the search results via Windows/File Explorer the required files are not found in the index. But you know for sure that they are there...
- On the contrary, phantom files that have long been deleted from the computer appear in the search results
- Windows Search service crashes with error 0x80070002 or 0x80070005
Where is the search index and how can I change its contents?
By default, it is located in the path C:ProgramDataMicrosoftSearch , although the utility itself is launched from the C:WindowsSystem32 . Its location can also be changed, but you will have to restart the service itself, clear the results and create the index again. The easiest way to add something to the index is to add a folder to its library directly from the specified window. In the next tab you can “adjust” the list of extensions that will be included in the index. The window we need opens with an applet
control srchadmin.dll
after calling the line Run WIN + R :
Disable Windows 10 indexing in Control Panel settings
The standard method for setting up and disabling indexing in Windows 10 is to use the corresponding section in the Control Panel:
- Open Control Panel and then Indexing Options. You can simply start typing the word “Indexing” in the taskbar search to quickly open the desired item.
- In the window that opens, you will see a list of locations for which indexing is enabled. To change this list, click the "Edit" button.
- Uncheck any locations you don't want indexed and apply the settings.
Additionally, you can disable indexing of file contents on individual drives (for example, only for SSDs) as the most resource-intensive indexing operation. To do this, just follow these steps.
- Open the properties of the desired disk.
- Uncheck and apply the settings you made.
As you can see, everything is relatively simple, but the indexing service itself continues to work on the computer.
How to disable indexing
To disable search indexing (Windows Search service), open the Services console by pressing the keyboard shortcut + R, in the Run window that opens, enter services.msc and press Enter↵
.
In the Services window, double-click the Windows Search service.
In the Properties window that opens: Windows Search (local computer)
stop the service by clicking the Stop button.
Then, in the Startup Type: drop-down list, select Disabled and click OK.
Enable search indexing
To enable search indexing (Windows Search service), open the Services console by pressing the keyboard shortcut + R, in the Run window that opens, enter services.msc and press Enter↵
.
In the Services window, double-click the Windows Search service.
In the Properties window that opens: Windows Search (local computer)
in the Startup type drop-down list: select Automatic (delayed startup) and click the Apply button.
Then start the service by clicking the Start button.
Command line control
You can also disable or enable search indexing (Windows Search service) using the command line.
To disable search indexing (Windows Search service), run Command Prompt as an administrator and run the following command:
sc stop "wsearch" && sc config "wsearch" start=disabled
To enable search indexing (Windows Search service), run Command Prompt as an administrator and run the following command:
sc config "wsearch" start=delayed-auto && sc start "wsearch"
Disable advanced indexing mode.
Step 1:
Open the
Settings
.
Go to Search → Search in Windows
.
Step 2:
To turn off Advanced Indexing Mode, in the
Find My Files
select
Classic Style
, this will disable Advanced Search Mode and return the classic behavior.
To speed up the search for requested files and folders, Microsoft uses a special service in Windows that scans all files and folders on the hard drive and collects information about them into an index file. Subsequently, with each new search for files, Windows does not scan the hard drive again, but simply takes information from the index file.
If you want to disable the indexing service, you can do this in a few clicks. First, open the Start menu - Control Panel - Administrative Tools - Services
In the long list, find the Windows Search service and right-click on it, open Properties. In the Startup type item, set the Disabled option and use the Stop button to turn off indexing.
The second step is to open My Computer and right-click on the logical drives, for example D, and open Properties. Here we uncheck the Allow the contents of files on this disk to be indexed in addition to file properties.
Click Apply and in the next dialog box select To drive D:\ and to all attached files and folders.
Then we repeat this operation with the remaining local drives from the My Computer folder. That's all...
Modern powerful desktop computers and laptops with high-performance hard drives and processes, and large amounts of RAM can easily cope with search tasks, so disabling indexing should not seriously affect the operation of the computer.
However, if, after disabling the Windows Search service and indexing logical drives, your computer begins to freeze, slow down, and simply work slower than before, we recommend restoring the settings to their original state, that is, enabling indexing of files and folders and starting the stopped Windows Search service.
2notebook.net
Disable Windows 10 Indexing Service (Windows Search)
If you need to completely disable Windows 10 indexing, you can do this by disabling the corresponding system service, which is called Windows Search:
- Press Win+R keys on your keyboard, enter services.msc
- Find "Windows Search" .
- Set the startup type to "Disabled", apply the settings and restart the computer (if you just disconnect and stop, it will start again).
After this, indexing in Windows 10 will be completely disabled, but searching for settings, system items, and installed programs in the taskbar will continue to work, as will searching for files if you use the search box in Explorer (in the latter case, you will see a notification that that searches may be slow because indexing is not performed).
Disabling for individual drives
In addition to the method described above, there is an alternative option; you can disable indexing in the disk properties. To do this, open the “This PC” window, right-click on any drive and select “Properties”.
In the window that opens, you need to uncheck the box next to “Allow indexing” and then close the window by clicking on the “OK” button.
This procedure can be repeated for all disks and thus disable indexing completely.
Rebuilding the Windows Search index
The most “correct”, but not the most effective way to reduce the size of the Windows.edb file is to start the process of re-indexing data in the system. To do this, open the Control Panel -> Indexing Options -> Advanced -> Rebuild (to open this dialog, just run the command rundll32.exe shell32.dll,Control_RunDLL srchadmin.dll).
After some time (usually quite a long time), the system will finish re-indexing the data and the size of the edb file will decrease slightly.
Defragment Windows.edb using Esentutl
Since the Windows Search index file is a database in EDB format, you can defragment it using the standard utility for maintaining such databases, esentutl. exe - Extensible Storage Engine Utilities (should be familiar to Exchange administrators). Defragmentation of the database is performed offline (the database should not be in use), so you will have to stop the search services first. All these operations can be combined into one script:
sc config wsearch start=disabled sc stop wsearch esentutl.exe /d %AllUsersProfile%MicrosoftSearchDataApplicationsWindowsWindows.edb sc config wsearch start=delayed-auto sc start wsearch
Advice . To perform defragmentation, there must be enough free space on the disk, because... a copy of the edb file will be created.
The esentutl utility displays the defragmentation progress on the screen while running.
Note : If, when executing the esentutl command, the error appears: Operation terminated with error -1213 (JET_errPageSizeMismatch, The database page size does not match the engine) after 10.125 seconds, this means that your system is 64-bit and you need to use the x32 version of esentutl to perform defragmentation. Those. the third command will look like this: “C:WindowsSysWOW64esentutl.exe” /d %AllUsersProfile%MicrosoftSearchDataApplicationsWindowsWindows.edb
In my case, the size of the edb file after defragmentation decreased by 30%.
Configuring Windows 10 for an SSD manually or using the SSD Mini Tweaker program
To improve Windows 10 performance, it is best to install an SSD drive on your computer. They have a higher data read/write speed and are also less likely to fail compared to conventional hard drives. But to experience all the benefits of working with a solid-state drive, Windows 10 must be properly configured for an SSD.
What to check before optimization?
Before starting the optimization process, check whether the system supports TRIM and whether AHCI SATA mode is enabled.
Controller operating mode
You can check the controller's operating mode in the BIOS. Find the “SATA Operation” or similar section in the settings. If it is set to ATA operating mode, switch it to AHCI.
This may cause difficulties:
- The old BIOS version does not support the controller in AHCI mode. In this case, go to the motherboard manufacturer's website, find out if your model supports AHCI mode, then download and install the new BIOS;
- The OS won't boot because it doesn't have the required drivers. In this case, install drivers on your PC in advance. The best option is to immediately reinstall the operating system.
Enabling TRIM
The TRIM function when using an SSD increases its speed and ensures equal wear of memory cells. This has a positive effect on the performance of the solid-state drive.
In the command line running under the Administrator account, enter the command: fsutil behavior query DisableDeleteNotify. If:
- 0 – parameter enabled;
- 1 – parameter disabled.
To enable, enter the command: fsutil behavior set DisableDeleteNotify 0.
If all the above points are configured, proceed to optimize Windows 10 on a computer with a solid-state drive.
Disabling features
When using a solid-state drive on your PC, disable some Windows 10 features that help with HDD operation. Below it is written in detail how to do this in several steps.
File indexing
Indexing is designed to speed up the OS. It provides quick access to the files you need. But an SSD drive has a high speed of information exchange with the system, and frequent rewrites will quickly damage it. Therefore, it is better to disable file indexing.
This PC → right-click on the SSD drive → Properties menu → uncheck the “Allow files on this drive to be indexed in addition to file properties.”
Search service
Users rarely use the search service, which separately creates an index of files to quickly find them, so it is better to disable it.
Control Panel → System and Security → Administrative Tools → Services → RMB on the Windows Search service → Properties → Startup type → Disable.
Hibernation
Hibernation saves an image of the working OS when the computer is turned off. It is written to the internal storage. This increases the subsequent boot speed of Windows 10. In the case of an SSD drive, hibernation is not needed, because the system boot speed is high, and frequent overwriting of information negatively affects the service life of the drive.
In the command line (you can read how to work with it in the article “How to open and use the command line in Windows 10”), running as Administrator, enter the command: powercfg -h off.
Prefetch and SuperFetch
Prefetch speeds up startup of frequently used software, and SuperFetch predicts what program you're about to launch. In both cases, the OS preloads information into memory. If using SSDs, disable them.
Important! During a “clean” installation of Windows 10 on an SSD drive, these parameters are initially set to “0”. But when combining SSD and HDD drives on a PC, failures occur. Therefore, double-check these values after installing the OS.
Defragmentation
Defragmentation increases the speed of HDD disk operation by arranging the arrangement of clusters of information one after another. A solid-state drive has the same access speed to all memory cells. Defragmentation is not relevant for him, so disable it.
Automatic optimization with SSD Mini Tweaker utility
The portable, free SSD Mini Tweaker utility optimizes Windows 10 for a solid-state drive. Because it is created by a third party, you use it at your own risk.
Download and run the program. In the window that opens, select the items that you consider necessary and click “Apply changes.”
Conclusion
After installing or transferring Windows 10 to an SSD drive, you need to optimize its performance. This can be done manually by disabling functions that are irrelevant for the solid-state drive, or using the special SSD Mini Tweaker utility.
windowsten.ru
Moving the Windows.edb file to another drive
In some cases, when the size of the Windows.edb file is constantly increasing, it may make sense to move the Windows Search index base to another volume. Thus, extreme growth of the database will not lead to a system stop when free space on the system partition is exhausted. Typically, this needs to be done on RDS terminal servers where users actively work with files, personal folders, and other indexed content.
To change the file location, open Control Panel Indexing Options Advanced Index location-> New Location and specify the path to the new location of the Windows.edb file.
There is no search field
From the Start menu:
In Windows Explorer:
Open Control Panel > Programs and Features > Turn Windows features on or off.
Check the Windows Search box to get it back.
To disable Windows Search, clear this check box. Click OK and for Windows to configure the settings.
Restart your computer.
Setting up Windows 10 for maximum performance: algorithm of actions
Whatever version of Windows is installed on the computer, the user will want to configure it in such a way as to get maximum performance. This issue is especially acute for owners of weak hardware, which requires maximum free resources for stable operation. Therefore, tuning Windows 10 for maximum performance is an excellent priority for them when purchasing new components such as a processor or video card.
Disk Defragmenter
When adding a large number of files to the hard drive, information is not written sequentially, but in fragments on different parts of the disk surface. In this case, fragmentation occurs, and when requesting data, the computer takes longer to process it because it needs to put all the “pieces” together. To minimize such situations, defragment your disk. This is done using standard utilities.
Good to know! In Windows 10, disk defragmentation occurs automatically once a week at a set time. But you can start this process after adding a large amount of information to your computer in order to optimize the disk.
- In the Run window (Win+R), enter “defragmentation” and run the utility.
- In the Disk Optimization window, click Analyze. If more than 5 - 7% is fragmented, click "Optimize". Repeat for all drives.
Important! In the "Disk Optimization" window, you can enable/disable and configure automatic defragmentation.
Startup optimization
In many programs, when they are installed on a computer, the autoload function is enabled during system startup. They may not be used by the user, but, working in the background, they take up computer resources, so its work slows down. Applications that you do not use should be disabled or completely removed from your computer if they are not needed.
- Task Manager > Startup tab.
- Right-click (RMB) on the unnecessary program > Disable.
Alternative options for disabling programs in startup can be seen in the video.
Disabling unnecessary services
Just like programs in startup, some Windows 10 services load computer resources, which leads to slowdowns. Disabling them will increase system performance.
- In the Run window, type services.msc. Alternatively: Control Panel > Administrative Tools > Services or open System Configuration (type msconfig in the Run window) and go to the Services tab.
- RMB > Properties > Startup Type > Disabled.
- When using the Computer Configuration utility, uncheck the required services and save the changes.
- Restart your computer.
Important! If you are not sure which process a service is responsible for, do not disable it. See the list of services that can be disabled here.
In the video you can learn more about which Windows 10 services can be disabled and how to do it.
Setting up visual effects
In Windows 10, a lot of PC resources are used to create interface visuals. Disabling some performance parameters (visual effects) will increase the speed of older computers. But they will have less effect on modern gaming PCs.
- Start menu > System > Advanced system settings.
- In the System Properties window > Advanced tab > Performance block > Options.
- Set the toggle to "Get the best performance." You can turn off each effect separately so as not to radically change the Windows 10 interface.
Disable windows and taskbar adaptation to the desktop background color, as well as Windows animation.
- Start menu > Settings > Personalization > Colors > Choose a color > Automatically select main background color > Turn off.
- Win+I > Accessibility > Other Options > Play Windows Animations > Turn Off.
Disabling indexing
Indexing speeds up the search for files stored on your computer. But this function constantly scans them, monitors changes, and therefore uses system resources.
Important! You should only disable indexing when you are not using search on your computer.
- In the Run window, enter the command services.msc.
- Windows Search > RMB > Properties > Disabled.
- Confirm the changes and restart your computer.
Driver setup
One of the problems with slow operation of Windows 10, which is encountered by a large number of users, is non-original or outdated drivers. This problem is especially relevant for a video card. Look at the driver provider and their version in Device Manager.
- Start menu > Device Manager > select the desired hardware > RMB > Properties > Drivers tab.
- If necessary, download and install drivers from the official website of the equipment manufacturer or update them to the latest version.
The Temp folder in Windows 10 is used to store temporary and intermediate files created by the system and programs. Therefore, to speed up your computer, clean it:
- Enter the variable %TEMP% in the line where the path to the folders is indicated.
- Close running programs and delete the contents of the folder > restart your computer.
An alternative way is to use the built-in Disk Cleanup utility.
- Open System Disk Properties > General tab > Disk Cleanup.
- Specify the files to be deleted (be sure to select “Temporary files”) > confirm the actions.
Power settings
By default, Windows 10 is set to Balanced power mode, which reduces processor speed when the device is idle or does not require maximum hardware. To speed things up, set your computer to High Performance power mode.
- Start menu > Settings > System > Power and sleep > Advanced power options.
- In the Power Options window, move the switch to High Performance.
Cleaning from viruses and malware
If after following the steps above, your PC still slows down and you don’t understand why this is happening, viruses or malware are probably the cause. Check Windows 10 with antivirus programs such as DrWEB Cureit or Malwarebytes Anti-Malware.
Setting your Windows computer to perform at its best can help it run faster. To do this, you need to disable all visual effects, remove viruses, and also change your PC settings: disable indexing and some services, update drivers.
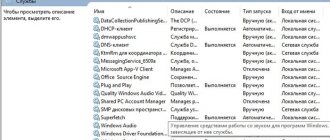
SearchIndexer.exe is using up the CPU
What does it mean? Professionals can argue with me, but according to experience, Windows indexing should not take more than 15-20% of the processor load. So…
- restart a familiar service by Stopping and Restarting directly from the Windows Services window
- rebuild the Windows index (without resetting); option available directly from the indexing location window
- if you want to rebuild the index and plus reset the existing indexing data, it is better to disable the service through the registry (in the HKEY_LOCAL_MACHINESOFTWAREMicrosoftWindows Search
, set the SetupCompletedSuccessfully 0 , and then restart Windows Search ) - Let's track the problem from the Resource Monitor. We launch it with a quick command:
resmon
In the Overview in the CPU , find the process ID SearchIndex.exe . Immediately go below to the Disk . From here we identify by ID which files the process is working with. If you notice anything unusual, go to the Index window (see above) and remove the entire file directory from the index. You can already do this in the Indexed Locations :
Check if the problem is resolved. Also, in the resource monitor, check everything related to the searchprotocolhost.exe , if it is running .
- Let's run the system using DISM and SFC utilities. For Windows 7, only one utility from the list of Windows repair programs will work. Run sequentially from the command console as administrator:
sfc /scannow sfc /scannow /offbootdir=c: /offwindir=c:windows
Reboot to apply the changes. If you are the owner of Windows 10, file system repair can be continued with successive commands
Dism /Online /Cleanup-Image /CheckHealth Dism /Online /Cleanup-Image /ScanHealth Dism /Online /Cleanup-Image /RestoreHealth Dism /Image:C:offline /Cleanup-Image /RestoreHealth /Source:c:testmountwindows Dism /Online / Cleanup-Image /RestoreHealth /Source:c:testmountwindows /LimitAccess
- The following option works for Windows 10. Create a hidden administrator account. Having entered through it, go along the path
C:Usersproblem-user-accountAppDataLocalPackages
Rename the Microsoft.Windows.Cortana_cw5n1h2txyewy folder to Microsoft.Windows.Cortana_cw5n1h2txyewy.old. Some folders along this path are hidden, so make sure the Folder Options will allow you to find the files and directories you need. All that remains is to reboot and log in to your previous account again. In PowerShell, as an administrator, type the following command:
Add-AppxPackage -Path “C:WindowsSystemAppsMicrosoft.Windows.Cortana_cw5n1h2txyewyAppxmanifest.xml” -DisableDevelopmentMode -Register
Restart your computer and check if the problem is fixed.
- disable and enable the option in Disk Properties:
By the way, if you are unhappy with the indexing speed, this does not mean that there is something wrong with the service itself. So we will look at how indexing can speed up the system in the next article.