Despite the fact that the main services and important components of the system responsible for wirelessly connecting the computer to virtual private networks or other devices that support wireless data transfer are activated by default, it is not uncommon that when trying to establish communication between devices or connect to wireless networks, the system suddenly reports that the WlanSvc wireless network auto-configuration service is not running. Not all users know what to do in this case. That is why, for all those who do not particularly understand these issues, we can give several techniques that will help eliminate the problems that have arisen.
What is the WlanSvc service and what is it responsible for?
But first, let's take a quick look at what this service is. The definition of this component speaks for itself. This is a service for automatically recognizing Wi-Fi wireless networks based on the iEEE 802.11 standard and identifying devices that can transmit data using Bluetooth radio modules. When trying to connect to such networks or devices, the user himself does not need to set the necessary parameters (this is understandable).
But if the WlanSvc wireless network auto-configuration service is not running, even if the wireless adapter installed on your computer or laptop is turned on, you will not see anything in the list of available networks. This equally applies to the activation of data transmission via Bluetooth, when the adjacent device simply will not be detected as active and within the range of the wireless module.
What is WLAN AutoConfig Service?
Without complicated and boring terms, this service in the Windows operating system manages all wireless connections (via Wi-Fi and Bluetooth). That is, the WlanSvc service is responsible for searching, connecting, disconnecting and other operations that are necessary for the operation of wireless connections on a laptop. It is clear that if this service is stopped, then Windows will not be able to see available wireless networks and will not be able to connect to them.
Basically, that's all we need to know about the WLAN auto-configuration service. In the system, this feature is always enabled by default. You may ask, why then does it need to be turned on? Everything is very simple, there are many instructions on the Internet where they advise disabling this service “to make the computer work faster.” Also, the service can be disabled by some programs; various system optimizers especially like to do this. And if you do not have the original Windows image installed, but an assembly, then the service may be disabled immediately after installing the system.
Yes, if you do not connect your computer to wireless networks, then you do not need this service; the computer will work fine without it. But this is not a reason to turn it off.
What is the cause of the service startup error?
As for the reasons for disabling this system component, it can be absolutely impossible to immediately identify them. The main factors that can affect the state of the service are usually called virus exposure or conflicts of processes associated with the service with other similar software, thoughtless user intervention in system settings, failures and errors of the Windows operating system itself when important files are damaged, etc. Fortunately, this problem can be resolved quite simply. We can offer two main options for activating the service, which any user can use. We will not consider actions with the command line, since many may find them very complicated. However, most users do not need this.
Note: sometimes the system may not directly signal the deactivated state of the main service, but issues notifications about the impossibility of starting (launching) child services (most often this is error number 1068), which, in turn, is precisely an indication of the problem that has arisen.
Ways to fix error 1068
To fix error 1068 when a child service or group failed to start, there are several ways to try.
Method No. 1
Press “Win+R” and enter “services.msc”.
We find in the list of services the one indicated in the error. For example, the “Server” service.
Double click to open the service settings. If the “Start” button is not active, you should select “Manual” or “Disable” in the startup type, and then reactivate the service.
After making changes, you should restart your computer.
Method No. 2.
If the Windows Audio service is not running
Most Windows operating system services are linked to many other services. This also applies to services such as Windows Audio. If it does not start, it is worth checking the status of the following services:
Service "Power" - startup status "Automatic";
Media Class Scheduler - startup status "Automatic";
Windows Audio Endpoint Builder - startup status is Automatic;
After changing the status of these services, Windows Audio itself should set the startup type to “Automatic” and restart the computer.
Method number 3.
Error 1068 on network connection
If error 1068 occurs when starting services when connecting to the Internet, it is worth checking the operation of the following services:
Application level gateway service – startup status “Manual”;
PNRP protocol – launch status “Manual”;
Network Member Identity Manager – launch status “Manual”;
- Windows Connection Manager – startup status “Automatic”;
- Remote procedure call RPC – launch status “Automatic”;
SSTP service – startup status “Manual”;
WLAN auto-configuration service – startup status “Automatic”;
- Service for information about connected networks – startup status “Automatic”;
- WWAN auto-configuration – launch status “Manual”;
- Remote access connection manager – launch status “Manual”;
- Automatic remote access connection manager – launch status “Manual”;
- Routing and remote access;
- Telephony – launch status “Manual”;
- Plug and Play – launch status “Manual”.
It is also worth stopping the Network Member Identity Manager service, but not changing the startup type.
It is also worth noting that if this error occurs and the network is not detected, its solution may be as follows:
Launch the command line with Administrator rights and enter the command “Net stop p2pimsvc”. Next, put “Y” and press “Enter”.
Next, press “Win+R” and paste the address “C:\windows\serviceProfiles\LocalService\AppData\Roaming\PeerNetworking”.
Delete the file “idstore.sst”.
Reboot the PC.
You know, an error informing that the user or system was unable to start a certain service due to the fact that “a child service could not be started” is probably one of the few errors in the Windows operating system that quite reasonably makes it clear what exactly happened wrong. After all, you won’t argue that the name of the error is quite informative? You just need to figure out what kind of child service does not want to start. (Although if the error indicated which service is a child service and which one actually became the problem of the error, it would be absolutely great).
Additional measures
If after this it turns out that the WlanSvc wireless network auto-configuration service is not running, try downloading utilities specially designed to troubleshoot such problems from the official Microsoft website (even the small Microsoft Fix It program will do) or use the prompts in the Diagnostics and Troubleshooting Center available on any Windows system.
Naturally, you shouldn’t discount viruses either. Just in case, perform an in-depth scan and eliminate all threats using portable or disk-based antivirus programs.
In principle, if the problems are related to damage to components of the operating system itself, as an additional tool for eliminating them, you can offer a system file check, which can be activated via the command line using the command “sfc /scannow” (of course, without quotes). If this does not help, for example, because access to some files is blocked, try performing a similar procedure when booting from removable media with a distribution kit or recovery disks like LiveCD. After completing all the operations, repeat the above steps to activate the problematic service. If this does not help, in the latest versions of Windows you can try to perform a recovery while saving user data or return the computer (laptop) to its original state, which fully corresponds to a “clean” installation of the OS, so to speak, from scratch.
Note: some laptop models provide the use of special menus for this, called up by buttons or keyboard shortcuts.
Restoring the connection to the wireless network
Checking the network adapter
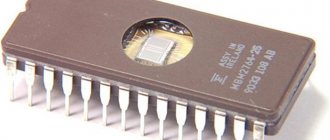
Desktop PCs are sold without WiFi network adapters, so to connect to wireless networks you will have to buy and install an adapter separately. For example, like the one in the picture.
There is no need to buy a Wi-Fi adapter for a laptop - it is already inside.
In order for the laptop to see and connect to wireless networks, WiFi must be turned on. On some models there is a switch or button on the case for this.
On others, the key combination Fn+F1…F12 is used. The key with the image of an antenna is responsible for turning on the wireless adapter.
Once turned on, the WiFi adapter should appear in the Windows 8 Device Manager. To check this, launch the device manager from the context menu of the Windows button (Start)
and expand the “Network adapters” list. If your adapter is in this list, it means the system recognized and installed it. If it appears as an unknown device, go to its manufacturer’s website and install the driver.
If the adapter is connected, but the system does not see it, make sure that it is activated in the BIOS.
The option that controls the built-in WiFi is called OnBoard Wireless LAN
or
WireLess LAN support
. Its value should be "Enabled".
Among other things, make sure that the wireless adapter is not in traffic monitoring mode (monitor mode). Although those who use this mode are always aware of this (it requires the installation of a special driver).
Checking the access point
If your PC or laptop does not see your home access point, try connecting to another one. To check, you can use public networks, for example, in cafes or parks, or private ones - with your friends. To check your desktop computer without leaving home, you can temporarily create a .
If wireless networks are not detected anywhere, the problem should be looked for in the adapter or WiFi settings on the computer, and if there is no connection to only one access point, the problem probably lies there.
Diagnostic steps (if the previous step did not solve the problem, proceed to the next one):
- Make sure the access point is turned on and is emitting a signal (detected by the wireless indicator light).
- Make sure that there are no devices near the router and computer that create electromagnetic interference - cordless phones, microwave ovens, powerful power cables. Try moving the access point closer to your PC to improve the signal strength.
- Turn off the router's power and turn it on again. If the problems persist, reset the settings: with a sharp object - a toothpick or a paper clip, press the recessed Reset button, which is located on the back or bottom side of the device. After this manipulation, all settings will be restored to the state as after purchase.
- Change the broadcast frequency channel. Connect your computer to the access point via cable, enter the wireless network settings menu, find the “ Channel
” option and switch to another channel. Perhaps the connection will be restored on some of them.
- In the same menu, check the “Hide SSID” setting and, if it is active, o. Hiding the SSID disables broadcasting of the network name - such a network is not displayed in the lists of available connections. Also enable support for wireless communication standards b/g in case the Wi-Fi adapter on your computer works on one of them, and the access point works on another, for example “a”, which does not support “b” and “g”.
- If many devices are connected to the access point at the same time, it may become unresponsive due to overload. Such situations are unlikely at home, but often occur in organizations. Try connecting to a different, less busy network, or try again after a while.
Checking Windows 8 settings
Airplane mode
WiFi may disappear due to the fact that the user has activated Airplane mode in Windows 8 - in this mode, the network adapter is turned off and the computer does not see any wireless networks. The network icon in the system tray will help you determine that the problems really arose because of this - it takes the form of an airplane.
To exit Airplane mode in Windows 8, open the Charms flyout and click the Options charm.
Next, click “Change computer settings.”
Make sure that Windows sees WiFi again and that the network icon in the tray returns to its previous form.
Network diagnostics
Windows 8 has a tool that automatically diagnoses network connection problems. It's called Windows Network Diagnostics. This tool sees and eliminates many obstacles to WiFi operation, for example, when there is a connection, but the computer does not access the Internet (connection is limited) or there is Internet, but access to sites is limited.
When the connection is limited, the network tray icon is marked with an exclamation mark.
To launch the Windows 8 Network Diagnostic Tool, right-click on the network icon and select “Troubleshooting” from the menu.
The utility will check all network connections on the computer and determine how Internet access is limited. Local problems that can be fixed will be fixed automatically. And if the connection cannot be restored, for example, due to problems with the access point or problems on the provider’s side, the information will be displayed in a window marked “Not fixed.”
If your PC has multiple connections, of which only one is limited, or the diagnostic tool does not see a problem, you can only diagnose the selected network. To do this, go to the “Network and Sharing Center” and go to the “Network Connections” folder (click “Change adapter settings” in the navigation bar).
Open the connection context menu, which is limited, and click “Diagnostics”.
Let's start debugging
So, you have decided that Wlan needs to be enabled. But how? Our service is located among others of the same kind, so we need to find them. Press the Win+R key combination, enter the command services.msc and click “Ok”. We have all the services in front of us, we can stop, disable or start each of them, but we need that same Wlan, we are looking for it. By the way, you can get here without the “Run” line; to do this, go to the control panel through the “Start” menu and in the “System and Security” category we find the “Administration” item.
Changes to the Automatic Wireless Configuration service name
Remember that to access your wireless network, you must disable the firewall included with your computer.
Given the similarities between both operating systems in terms of their wireless configuration, we have grouped the documentation together. You can obtain more detailed information about some security aspects from this documentation. Open Control Panel and select Network and Internet. On the Wireless Networks icon, right-click and select Properties. Select Internet Protocol Version 4 from the Wireless Properties tab. Click the Add tab to get a window where you need to manually create a network profile.
Right-click on our line and go to properties. Switch the mode to automatic, click the “Run” button and save the changes.
If Wi-Fi networks still haven’t appeared, the service is disabled, you’ll have to dig around a little more. Using the usual motion for us, we call “Run” by pressing Win + R, but now we enter the msconfig command. In the window that opens, go to the “Services” tab and look for our WLAN auto-configuration service, most likely there will be no checkmark next to it, put it in its place. Save the changes and do not forget to restart the computer. If everything is fine with your hardware (the Wi-Fi module is intact and there is no damage to the board), then all wireless communication methods should work.
Enter the name of the network you want to connect to according to the group it belongs to. After adding a network, the connection settings must be changed. In the next window, go to the “Security” tab. Security settings and encryption type should already be configured.
We recommend that you check Remember my credentials for this connection every time you sign in. This way, even after authentication, you won't be asked for your keys again during the connection. Anyway, check it in the next steps.
IMPORTANT! Don’t think about thoughtlessly turning off services left and right. Each of them controls a certain area of the machine’s activity; disabling any of them can lead to a huge number of problems. In the worst case, you will have to contact a specialist to restore the previous settings and restore the system. However, everything is not so scary, if you approach the matter wisely, you can quite significantly speed up your computer by disabling services that are useless to you.
Restoring the connection to the wireless network
Click the "Settings" button in the next window.
Select Certificates: You must enable the Verify server certificate option. If this certificate authority does not appear, you must manually install it using this file. Go to the User Account tab to ensure that the Prompt for User Credentials option is selected and the rest are blank. However, you can leave this box unchecked and enter your account and password, which will be automatically entered when you connect. We don't recommend this feature because anyone with access to your computer can connect to the network, and everything you do could be registered in your name.