AutoCorrect
This feature allows you to replace letters or symbols as you enter text. With its help, you can significantly speed up the time of working with Word documents:
- replace a word entered in one language with its version in another, so as not to switch the keyboard layout - for example, Word to Microsoft Word
- change an abbreviation or abbreviation to a full word or phrase - for example, MSO to Microsoft Office Word
- automatically change words that you often make mistakes when writing, to the correct ones - for example, if Word does not correct them or the keyboard buttons are stuck
- quickly enter characters that are supported by Word documents, but are not available on the keyboard - for example, so that when entering (c) the © icon is substituted
back to menu ↑ back to menu ↑
How to activate
To set up the AutoCorrect feature:
1 Click File (or MS Office icon) in the upper left corner.
2 Then click Options.
3 Open the Proofing tab, click AutoCorrect Options.
4 In the window that opens, make sure that the Replace as you type checkbox is checked. Then go to the replace field - enter the word you want to replace there. In the on field, accordingly, enter the one you want to substitute instead. Then click Add - the function is activated.
The entered word or phrase will be replaced with the specified one after pressing the spacebar or the Enter key.
Please note that the function is case sensitive. If, when setting up, you enter the word to be replaced with a capital (capital) letter, autocorrect will not work when you enter it with a lowercase letter. But if you enter it with a lowercase (small) letter, then autocorrect will work regardless of what letter you write it with.
Remember that the function will be active for all your Word documents, not just the current one.
back to menu ↑ back to menu ↑
How to disable
To remove autocorrect:
1 Go through the above steps to the setup window.
2 Enter in the “replace” field the word whose replacement you want to disable to find it among all autocorrects saved in Word’s memory.
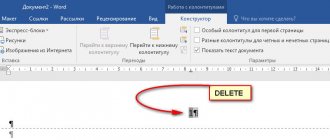
3 Select the desired line, click Delete.
back to menu ↑ back to menu ↑
Alternative: Find and Replace
Autocorrect is activated only when you enter text yourself; it will not work on text that has already been typed. Therefore, if you need, for example, to make corrections to text that was copied from another source, use the alternative - the Replace function (for earlier versions of MS Office Word - Find and Replace).
You can learn how to use it from the video below.
back to menu ↑
VIDEO: Replace function in Word
AutoCorrect and AutoText in Word (Microsoft Word) | Step-by-step instruction
AutoCorrect and AutoText in Word (Microsoft Word) | Step-by-step instruction
back to menu ↑ back to menu ↑
Automatic replacement in Word
This AutoCorrect setting will be relevant for versions 2007, 2010, 2013 and 2020. Follow these steps to open the main AutoCorrect window.
- Click on the “File” tab or the “MS Word” button in the upper left corner for older versions of Word;
- Select the “Options” section;
- In the new “Word Options” window that opens, on the left side click on “Spelling”;
- In the “AutoCorrect Options” section, click on the “AutoCorrect Options” button;
- In the new dialog box, go to the “AutoCorrect” section;
- Check the box next to “Replace as you type”;
- In the field above the word “Replace”, type the word or phrase in the wrong form (i.e., sometimes you type with a typo);
- And under the line “On” you should indicate the correct word with the desired ending;
- Next, you should click “Add” then the “OK” button and be sure to click the “OK” button in the “Word Options” window, otherwise nothing will be saved.
Thus, you can add new words, abbreviations and all kinds of symbols. Don't forget to indicate which word or symbol needs to be replaced.
Note. If you need to enable automatic replacement of phrases in Word 2003, then use the following tips: open the “Tools” tab and go to “AutoCorrect Options”.
In the new dialog box, in the “AutoCorrect” section, enter the desired characters or words in the appropriate fields and add using the “Add” button. Don't forget to save the changes, click on "Ok".
Autotext
The function is useful when, when working with a document, you often need to insert typical, repeating fragments. For example, when drawing up contracts, statements, instructions, letters and other documents where text templates are used.
It works like a clipboard and its associated Copy-Paste function. But the contents of the buffer are reset when you exit the application or restart your computer. And the saved AutoText fragments will be available in the memory of the Microsoft Office package until you delete them.
You need to create the template once and then save it as an express block. After which you can paste the saved fragments into any Word document.
The template can include not only text, but also graphic elements.
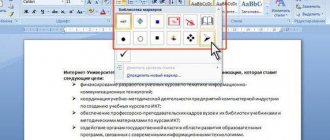
You can manage AutoText elements using the Express Blocks button. It is located on the toolbar, Insert tab, Text menu field.
back to menu ↑ back to menu ↑
How to add
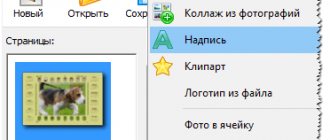
1 Type a piece of text that you want to save as a Quick Block. Format it, insert additional elements - pictures, icons, graphic symbols. Select the finished block with the mouse pointer. Open the AutoText management menu, select Save selection to AutoText collection.
2 Enter the parameters of the fragment to be saved. For simplicity, you can leave everything as default except the Name field. The name of each block should be unique and memorable - this will allow you to avoid confusion and also quickly insert saved fragments as you type.
3 To insert the desired fragment, you can also use the AutoText control menu on the toolbar. When you click on the icon, a list of all the fragments you have created opens.
4 You can also start entering the name of the block that you specified earlier in the Name field - a note will be displayed where Word will offer to insert it automatically by pressing Enter.
You can manage a block by right-clicking on it and then selecting the desired item from the context menu.
To open a list of all the fragments that you have saved, click Building Blocks Organizer. A full list will open - there will be both Word autotext blocks available by default, and those created by you.
back to menu ↑ back to menu ↑
How to delete
1 Open the Building Blocks Organizer. This can be done not only using the corresponding button. You can also right-click on any AutoText element that you saved earlier and select Arrange and Delete from the context menu.
2 The organizer window will open. Find the desired text fragment in the list, select it with the mouse pointer and click Delete.
back to menu ↑ back to menu ↑
Alternative: special software
If standard built-in Microsoft Office tools are not enough, use third-party programs. They insert stored elements into text using commands entered from the keyboard. The commands and insertion parameters themselves are flexibly configured, which allows you to completely adapt the program to the user.
As a rule, they also contain additional functions. For example, quickly switching the input language or layout, changing the case of characters, etc.
A significant advantage of such programs is that they work not only with text editors, but also with other applications, including browsers.
For Windows OS you can use:
back to menu ↑ back to menu ↑
Replacing individual words and characters
If you did not create the document yourself and find a recurring error in it, you should not waste time correcting it manually. The program will do this for you.
- Press Ctrl + H on your keyboard and a dialog box will pop up.
- If you just want to find some kind of error first, open the “Find” tab and enter it in the designated field. By the way, below you can indicate where to search: in the entire text or in a selected fragment. There is also a “More” button nearby that allows you to set additional search filters.
- To correct, switch to the “Replace” tab. Write the misspelled word or sign on the top line, and the correct option on the bottom line. The principle is the same here: if you need to replace one word with another throughout the text, click the “replace all” button, and if only once, click “replace”.
I have described the main points regarding autocorrect. I think you shouldn't have any problems setting it up.
Therefore, I say goodbye to you until new joyful meetings on other pages of this blog.
How is AutoCorrect done in Word 2010?
Every active Microsoft Word user tries to use any tools to ensure faster work with this program. However, many are unaware of the many opportunities this program offers them.
In order to speed up the procedure for entering text, Word provides specialized automation tools - auto-completion and automatic replacement. Now you need to figure out exactly when the user may need automatic replacement in Word.
AutoCorrect function in MS Word: inserting symbols and text
The AutoCorrect function in Microsoft Word is what makes it easy and convenient to correct typos in text, errors in words, add and insert symbols and other elements.
To operate, the AutoCorrect function uses a special list that contains common errors and symbols. If necessary, this list can always be changed.
Note: AutoCorrect allows you to correct spelling errors contained in the main spelling dictionary. Text presented as a hyperlink cannot be autocorrected.
Adding entries to the autocorrect list
1. In a Word text document, go to the “File” or click the “MS Word” if you are using an older version of the program.
2. Open the “Settings” .
3. In the window that appears, find the “Spelling” and select it.
4. Click on the “AutoCorrect Options” .
5. In the “AutoCorrect” , check the box next to “Replace as you type” located at the bottom of the list.
6. Enter in the “Replace” the word or phrase that you often misspell. For example, this could be the word “feelings” .
7. In the “On” , enter the same word, but this time correctly. In the case of our example, this will be the word “feelings” .
8. Click “Add” .
9. Click “OK” .
Changing entries in the AutoCorrect list
1. Open the “Options” located in the “File” .
2. Open the “Spelling” and click the “AutoCorrect Options” .
3. In the “AutoCorrect” , check the box next to . ”
4. Click on an entry in the list so that it appears in the “Replace” .
5. In the To , enter the word, symbol, or phrase that you want to replace the entry with as you type.
6. Click “Replace” .
Rename entries in the AutoCorrect list
1. Follow steps 1 - 4 described in the previous section of the article.
2. Click on the “Delete” .
3. In the “Replace” , enter a new name.
4. Click on the “Add” .
AutoCorrect and AutoText in Word (Microsoft Word) | Step-by-step instruction
To save time when creating documents in Word, use AutoText or AutoCorrect. With their help, you can quickly replace words and symbols, as well as insert entire text fragments so as not to type them again each time.
The instructions in the screenshots are for working with Microsoft Word, but when working with other versions, the steps will be similar.
Content: