How to disable Windows Defender Security Center in Windows 10 (versions 1703, 1709 and later)
If you have updated to the latest version of Windows 10, which we always recommend doing, then you will no longer see these settings. Starting with version 1703 of the Creators Update, all protection settings have been moved to one place, which Microsoft calls Windows 10 Defender Security Center.
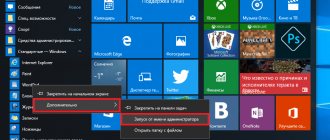
- Press Win+Q Windows Defender Security Center in the search bar .
- Next, go to the Protection against viruses and threats section.
- And press the button Antivirus and other threat protection settings.
- And in the same window we disable such parameters as Real-time Protection and Cloud Protection .
The Windows Security Center service failed to start in Windows 8, 7, 10: how to fix the failure?
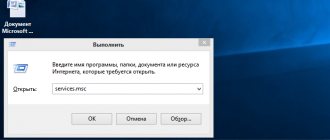
First of all, you should look at the state of the service itself. To do this, call the “Run” console (Win + R), set the command services.msc in it and run it as Administrator, after which we agree to allow this application to make changes to the system.
You can also access service administration from the “Control Panel” by selecting the appropriate section. You can also use the computer control bar from the menu called up by right-clicking on the computer icon or on the icon of the same name in Explorer.
On the right side of the window you should find the line with the name of the service and look at the installed startup type. If the value is different from the automatic type, the system will persistently display a message that it was unable to start the Security Center service.
The remedy is to activate this component. To do this, call up the parameters editing window by double clicking, and then go to the general parameters tab. In the startup type line, select automatic (delayed) from the list of available modes, then click on the service start button (“Start”) and apply the parameters by clicking the “OK” button.
Disable Windows 10 Defender by Group Policy
The Group Policy Editor is not available in the Home and Starter editions of Windows 10, and is only available in the Professional and Enterprise editions. You can transfer it from the professional version, but it’s easier to use another method. If you are using a professional or enterprise version of Windows 10, then this method is for you.
- Open the Local Group Policy Editor by pressing the Win+R in the Run window, enter gpedit.msc and click OK .
- Let's go along the path: Computer Configuration > Administrative Templates > Windows Components > Windows Defender Antivirus, look for the option Turn off Windows Defender Antivirus.
- Open the setting and change the setting's status to Enabled (if you enable this policy setting, Windows Defender Antivirus does not work and the computer does not search for malware and other unwanted programs).
Fixing the problem of starting and turning on Windows Defender 10
Solution 1: software to remove antivirus programs
When you uninstall third-party antivirus software using the standard option in the Programs and Features section of Control Panel, there is a risk of incomplete removal of files. They are the ones that can prevent Windows Defender from turning on. In this list, you can find one of the suitable methods to remove the installed antivirus before restoring Windows Defender.
In addition to these tools, you can try specialized software - uninstallers that efficiently remove programs. “Aninstaller” will not only remove the specified software, but also destroy all files created by a third-party antivirus, as well as entries about it in the system registry. As a result, you will receive a clean operating system without traces of third-party antivirus software. Among the good uninstallers, I can recommend two to you - IOBit Uninstaller and Revo Uninstaller. They are very easy to use, and you can easily use them to remove all “traces” of the software. I also note that after removing the antivirus software, Windows 10 should be rebooted.
Solution 2: check system files
The System File Checker system utility will help you recover damaged or deleted system files. Use this console program to check Defender - are its file components damaged or not?
- To run the System File Checker (SFC) tool, open a command prompt with administrator rights and type the following:
sfc /scannow
- Press Enter
- If for some reason you cannot run the SFC utility, you can try another tool instead - DISM.
- Type the following command at the command prompt as an administrator and press Enter:
DISM /Online /Cleanup-Image /RestoreHealth
- DISM will then begin scanning. The process can last 20 minutes or more. There is no need to interrupt him!
- After the scan is complete, check to see if the problem of enabling Windows Defender still exists. If DISM does not solve the problem of starting the built-in antivirus, try running SFC again.
Solution 3: Boot your computer in a clean state
Sometimes third-party programs can actively interact with Windows components, which can lead to problems. However, you can find the problematic application yourself by performing a clean boot on your computer. This is a simple operation if you follow the following steps carefully.
- Find through the Start menu and run the msconfig utility (System Configuration)
- In the system configuration window, select the Services tab. Check the box below the list of services “Do not display Microsoft services.” Then click the “Disable All” button.
- Go to the “Startup” tab and click on the “Open Task Manager” link.
- You will see a list of startup programs - programs that are automatically loaded into memory when the system starts. Right-click on the first application in the list. From the context menu, select Disable. Similarly, disable all subsequent applications.
- Once you are done disabling services and programs from startup, return to the original “System Configuration” window, click “Apply” and “OK”. Reboot your computer.
After restarting your computer, check to see if the problem with Windows 10 Defender turning on has disappeared. If so, it means that one of the disabled applications or services is interfering with Defender starting. In order to figure out which application is bothering you, you need to enable them one by one through “System Configuration”. Once you have identified the conflicting application, leave it disabled or remove it completely.
Solution 4: Restart Security Center
In order for Windows Defender to turn on and work properly, certain services must be running. However, you can always run them by doing the following:
- Launch the “Services” system snap-in through the “Run” command in the “Start” menu. To do this, type services.msc and press Enter.
- Next, find “Security Center” in the list of services, right-click on it and select “Restart”.
After the service is restarted, check if Windows 10 Defender turns on.
Solution 5: Change Group Policy settings
Sometimes Windows Defender doesn't want to turn on because it's disabled by Group Policy. This may seem difficult for some, but believe me, small changes in Group Policy will help solve it. Do the following:
- Launch the gpedit.msc snap-in through the “Run” command, just as you did in the previous paragraphs.
- When the Local Group Policy Editor opens, open the Computer Configuration section in the left pane of the editor. Next, find the “Windows Defender Antivirus” subsection at the following path:
“Computer Configuration” -> “Administrative Templates” -> “Windows Components” -> “Windows Defender Antivirus”
- Go to the right pane of the editor and find the option “Turn on Windows Defender Antivirus.” Double-click on it to open the policy settings editing window.
- Select Not Configured. Click "Apply" and "OK" to save the changes.
After these changes in Group Policy, Windows 10 Defender will be enabled and run on your operating system without any problems.
Solution 6: Make changes to the system registry
If Windows Defender does not want to turn on, one of the reasons may be an incorrect key in the registry editor. You can fix the error using Registry Editor.
- Launch Registry Editor via the Start menu and the Run command. Type "regedit" and click OK.
- When the Registry Editor opens, find the following branch in its left pane:
HKEY_LOCAL_MACHINE\SOFTWARE\Policies\Microsoft\Windows Defender
- Find the "DisableAntiSpyware" option in the right DWORD pane. Double-click on it, and in the “Change DWORD (32-bit) Value” window, change its value from 1 to 0.
- If you don't find such a parameter, create it. Right-click in the right pane of the editor and select “New”, and then in the drop-down menu select “DWORD Value (32-bit)”.
After these actions, Windows Defender will be turned on and will resume its work in Windows 10. I note that some users recommend removing the “DisableAntiSpyware” setting altogether. If you want, you can try this option too.
OK it's all over Now. It seems that I have covered all the most important and effective ways to restore Windows 10 Defender. If you are faced with the problem of enabling Windows Defender Antivirus, try one of the suggested options. Hope something helps you!
How to disable Windows Defender on Windows 10 using Registry Editor
And also for advanced users, it is possible to disable Windows Defender in Windows 10 using the Registry Editor.
- To do this, open the registry editor Win+R and enter regedit .
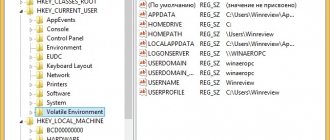
- Let's go to the path HKEY_LOCAL_MACHINE\SOFTWARE\Policies\Microsoft\Windows Defender.
- Let's create a parameter called DisableAntiSpyware and set the value to 1 to disable Windows Defender.
DisableAntiSpyware parameter to 1 or simply delete the current parameter.
Changing the policy
This option is only suitable for Professional and Enterprise versions. The home version does not provide such a function (in fact, the editor can be installed).
Open the policy management window: command execution window + gpedit.msc.
In the computer configuration area we find administrative templates. Clicking on the arrow will expand the list.
Then we need the operating system components and a link to the antivirus program.
Here you need to change the value of the service shutdown parameter. Open properties by double clicking on it.
Disable Windows 10 real-time protection with one command
There is also an option to disable Windows 10 Defender real-time protection with just one command.
- Open PowerShell as administrator , I recommend using the search.
- Paste and run the command: Set-MpPreference -DisableRealtimeMonitoring $true
After executing one command, Windows Defender will be disabled. If it doesn’t work and it says you don’t have enough rights, then run PowerShell as an administrator.
Additional Information
If the above doesn't help or you get some additional errors when you turn on Windows 10 Defender, try the following things.
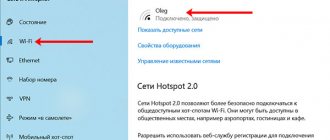
- Check in Services (Win+R - services.msc) to see if "Windows Defender Antivirus", "Windows Defender Service" or "Windows Defender Security Center Service" and "Security Center" are enabled in the latest versions of Windows 10.
- Try using the action in the System Tools section in the FixWin 10 program - “Repair Windows Defender”.
- Perform a Windows 10 system file integrity check.
- See if you have Windows 10 restore points, use them if available.
Well, if these options don’t work, write comments, we’ll try to figure it out.
How to completely disable Windows Defender 10 (up to version 1703)
- Open the Start menu and start typing Windows Defender .
- In the search results, select Windows Defender - Desktop . I would like to note that you can open Windows Defender in other ways, but this one is the most convenient.
- Let's go to Defender Settings Unlike Windows 8.1, in Windows 10 we will see general system settings, which already include Windows Defender settings. Windows 8 users can disable Defender directly from the program interface.
- In this window we need to drag the slider real-time protection And cloud protection in a state Off
And also, in order not to look for Windows Defender in Windows 10, you can simply open Start > Settings > Update and Security > Windows Defender and you will be taken to the same section from where we disabled Windows Defender.