After rebooting the personal computer (PC), the user may receive a “Test mode” notification, where the revision number will be indicated. The inscription appears in the lower corner of the monitor, on the right side. You can switch your computer to Test Mode by accident, for example, after installing some utilities that prompt the user.
Other reasons are updating the operating system, malfunctioning drivers, etc. Methods for eliminating the inscription will be discussed below and instructions for making adjustments to the BIOS configuration will be provided.
What is test mode in Windows 7
Windows in test mode on the seven is used by program developers or users who carry out operations to check drivers, utilities and other software components. This applies to those programs that do not have a Microsoft digital signature.
On Windows, the feature does not make any major changes. Using Test Mode will increase the likelihood of installing low-quality software products, including malicious files, due to the lack of verification by an official Microsoft developer.
How to enable test mode
Your copy is not genuine Windows 7 7601 - how to remove
In fact, in Windows 7 there is only one way to enter test mode. It also helps to switch to normal operating mode. We are talking about the command line, which was discussed above. The instructions are practically the same as the previous ones, except that the console command changes. In general, the sequence of actions is as follows:
- Go to the Start menu and search for Command Prompt. You can also launch it by clicking on the “Win + R” combination and entering the “cmd” command.
- Find the corresponding application in the search results and run it as an administrator.
- Enter or paste the command “bcdedit /set TESTSIGNING ON” into the console without quotes and press the “Enter” key.
- Close the console and restart your computer or laptop.
You can also turn it off via the command line
Disconnection methods
If necessary, you can remove the notification from the screen; this does not require a high level of computer skills and does not require installing additional software into the system. There are two ways to complete the task, which involve using the Command Line.
Ways to launch Command Line
The first thing you need to do is run the console with administrator rights. There are several ways, starting with the standard:
- Expand “Start”, go to the “All Programs” section.
- Open the “Standard” folder in the list.
- Right-click on “Command Prompt” and select the “Run as administrator” option.
To simplify actions, you can use the system search. To do this you need:
- Open “Start” and enter “command line” into the search bar.
- In the results, right-click on the element of the same name and select the required option.
As an alternative, you can use the console executable file, which is located on the system drive in the Windows → System32 folder. In the list of files in the directory, you need to find the cmd.exe element and run it as an administrator through the context menu.
Changing the boot configuration
You can disable test mode in Windows 7 via the console by executing a special command. For this you will need:
- Type bcdedit /set testsigning off.
- Press Enter.
- Restart your computer.
The login notification field in the corner of the monitor will disappear, indicating the successful completion of the task.
Enable digital signature verification
If the method suggested above does not help, you will need to activate the program signature verification option. Step by step guide:
- Launch a console window using one of the previously suggested methods.
- Run bcdedit.exe -set loadoptions ENABLE_INTEGRITY_CHECKS, press Enter.
- Enter the statement bcdedit /set testsigning off and press Enter.
If the operation is successful, you will need to restart your personal computer. When you subsequently start the operating system, there will be no inscription on the desktop. In the future, you should carefully monitor the selected options in application installers so as not to accidentally enter Test Mod again.
Shutdown
After installing the drivers, you should remove the Windows 7 test mode. There are two methods for this, which differ slightly from each other. The first option resembles enabling this mode. Go to “Start”, then to “Run”. Enter the following: bcdedit.exe -set TESTSIGNING OFF. The second method is perhaps a little simpler. The above text must be entered after pressing the combination Test mode is disabled.
In Windows 7, test mode is not the most everyday thing, but it is still a necessary thing, especially immediately after switching to Windows 7 from any other system. The operating system changes, but the devices remain the same. So don't be afraid to use test mode in this case. But in other situations, you should still use licensed drivers.
If you were not the one who set up the PC, keep in mind that the system has a special solution that allows you to check the presence of a signature on the drivers.
A little about what the test mode is for. From the Microsoft website:
That is, in test mode you can use programs whose drivers are not digitally signed by Microsoft.
Test mode Windows 7. How to enable and disable.
Some programs require Windows to enter test mode during installation. I personally encountered this while trying to install a small utility called OpenedFilesView. During installation, she asked whether to switch to driver signature test mode, which I agreed to out of curiosity.
If you have a problem disabling test mode
Most incidents involving exiting test mode in Windows 7 can be resolved using the console, which is launched as an administrator. But this does not always help to disable the presented function.
You can get to the desired interaction with the system by changing the Secure Boot option, which is present by default in the BIOS.
This parameter is necessary to prevent unauthorized downloading of programs during computer startup. This feature may cause the user to be unable to make changes to the computer's configuration.
If the problem is with Secure Boot, to exit test mode, you need to do the following:
- To restart a computer.
- Open the BIOS using the Delete or F2 key (depending on the motherboard or laptop model).
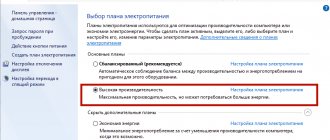
- Using the arrows on your keyboard, move between items in the Security menu. The required section may have different names depending on the BIOS version, for example: System Configuration, Main, or Authentification.
- Find the desired item, turn off the function by switching the mode to the Disabled position.
After setting up the input and output utility, you must save the changes by pressing the F10 key and confirming the action in the dialog box. In the future, when executing statements in the console to disable the testing mode, the operation will be successful.
How to exit test mode
It's time to tell you how to disable test mode in Windows 7. In fact, disabling a notification (inscription) on the desktop already deactivates the corresponding mode of operation of the operating system. It has already been mentioned above: you need to launch the console as an administrator, and then enter the command “bcdedit /set TESTSIGNING OFF” into it.
How to run compatibility mode in Windows 10
There is another method based on using the Driver Signature Enforcement Overrider (DSEO) utility. You can download it from the link (https://www.download82.com/download/windows/driver-signature-enforcement-overrider/). After downloading, all that remains is to unpack the archive with the program and then run the executable file. Next, select “Disable Test Mode” and click on “Yes”. After restarting the PC, everything will fall into place.
Note! You can also use this program to activate test mode and perform other specialized actions. To do this, simply select the appropriate item and follow the program instructions if they appear.
Putting Windows 7 into test mode
Enabling Windows test mode on the seven can be done in the same way - through the “Command Line”. To do this, you need to do several steps:
- Open the console command interpreter through the search menu or using the Win + R keys.
- Type the special statement bcdedit.exe -set TESTSIGNING ON, then press Enter.
- Reboot your personal computer.
After completing the indicated actions, a transition will be made from the standard mode to the test mode, as a result of which an alert will appear in the lower corner of the screen.
Important! It is recommended for experienced users to put the computer into testing mode - it increases the chance of infecting the PC with viruses.
Test mode windows 7 build 7601. How to remove it?
Hi all.
Today there will be a short article.
Recently this problem came up:
At the bottom right, the inscription “Test mode windows 7 build 7601” appeared.
This happens when test mode is turned on so that it is possible to use unsigned drivers.
In fact, removing this inscription is quite easy.
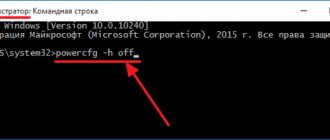
You must open Command Prompt as an administrator.
Launch “Start - All Programs - Accessories - Run”, enter cmd.exe, press Enter.
On the command line itself we type the following:
bcdedit /set TESTSIGNING OFF
| bcdedit /set TESTSIGNING OFF |
Reboot the computer.
That's all)
This is a simple life hack.
If this information was useful, leave comments and share with friends.
Bye everyone...
Best regards, Sergey Krivtsov
The hardware configuration of computers on which Windows is installed can differ significantly in a number of parameters, just as the versions and editions of the OS themselves can differ from each other. It is for this reason that applications created for Windows must be universal in terms of compatibility. This is usually the case, but there are software that require a special mode to run, called testing mode.
September 19, 2020 Blog – Note to the System Administrator
When you boot your computer running Windows 8 or Windows 7, you may see one of the following messages in the lower right corner of the screen (the exact text of the message depends on the version you are using).
Windows 8.1 Test mode Windows 8.1, build 9490
Windows 8 Test mode Windows 8, build 9200
Windows 7 Test mode Windows 7, build 7600
Note. This message may also indicate a specific edition of Windows. For example, the message might look like this: “Windows 8 Professional test mode, build 9200.”
This message appears because the computer is running in test mode.
To resolve this issue manually in Windows 8, you must follow these steps:
- Swipe in from the right edge of the screen, tap Search , and type cmd , or type cmd from the Start screen .
- In the search results, tap Command Prompt (or right-click it). From the menu that appears at the bottom of the screen, select Run as administrator . Note: When the User Account Control window appears, click Yes .
- At the command prompt, type the following command and press ENTER. bcdedit -set TESTSIGNING OFF
- When confirmation appears, close the Command Prompt window.
- Save the data you were working on and restart your computer.
Windows 7
To fix this issue manually in Windows 7, follow these steps in the order listed.
Method 1
- Click the Start and type cmd in the Search .
- In the Programs , right-click cmd.exe and select Run as administrator .
- At the command prompt, type the following command and press ENTER: bcdedit /set TESTSIGNING OFF
- Close the Command Prompt window and restart your computer.
Note. If this method does not resolve the issue, try Method 2.
Method 2
- Click the Start and type cmd in the Search .
- In the Programs , right-click cmd.exe and select Run as administrator .
- At the command prompt, type the following commands, pressing ENTER after each one: bcdedit.exe -set loadoptions ENABLE_INTEGRITY_CHECKSbcdedit.exe -set TESTSIGNING OFF
- Close the Command Prompt window and restart your computer.
The message about test mode means that the operating system test signing mode is running on the computer. Test signature mode may start if an installed program is under testing due to the use of drivers that are not digitally signed by Microsoft. Microsoft has added test mode to Windows to allow users to test programs without an authentication certificate.
← Hiding the “System Reserved” drive in Windows 7 Portable programs do not start due to an error in Xenocode Virtual Desktop →
Tags:
- administration