Introduction
Failure of hard drive heads is a fairly common problem encountered by data recovery specialists. There are several reasons for head failure, the most common are:
- Damage to the heads due to an emergency shutdown of the disk (sticking to the surface, incorrect entry into the parking lot, etc.).
- Damage to the heads due to physical impact on the disk (dropping the disk, hitting the disk, strong vibrations during operation, etc.).
- Damage to the heads due to electric shock (the power supply burned out, a voltage surge in the power supply network, polarity reversal when connecting the power (don’t ask me how, they somehow manage to jam the connector on the other side) to the drive, etc.).
- Manufacturing defects.
- Natural wear and tear.
In this article I would like to talk about the last reason. This reason for the failure of the magnetic head unit of hard drives ( natural wear
) personally seems to me the most interesting, since it is quite difficult to diagnose. Usually, for the first four reasons, everything is more or less clear almost at the first glance at the heads, often even without a microscope. Natural wear and tear is practically invisible to the naked eye. What is it for? Wouldn't it be easier, if you discover that the heads are faulty, to simply replace them and read the data? Unfortunately no. How we will approach the procedures for restoring access to data depends on what exactly caused the failure of the magnetic head unit. Let me explain with an example.
If the heads fail as a result of an impact, then before installing a working unit in the disk, a detailed examination of the magnetic plates will be required: have they been damaged as a result of the impact? Are there any scratches or chips? Could installing a new magnetic head unit without prior preparation lead to new damage? As a result, there is a significantly increased list of preparatory procedures, including the application of special chemicals to damaged surfaces.
Another example. If the heads fail due to improper emergency parking, then another study will be required. It will be necessary to evaluate how the heads were damaged, whether their slider was bent, whether this led to the loss of block fragments inside the hermetic zone, etc. Accordingly, the order of work when restoring information will, again, be different, up to the modification of the parking element inside the containment zone and significant modifications of the drive’s firmware.
Well, if the heads fail as a result of natural wear and tear, then in the vast majority of cases it will be enough to simply replace the heads and start reading the information (of course, provided that serviceable
compatible
spare parts are used). That is why the task of determining the degree of wear of the magnetic head unit seems quite important to me.
A little theory
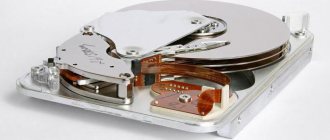
The hard disk head is a unit that floats above the disk surface during operation, using the aerodynamic properties of its slider.
To ensure maximum aerodynamic efficiency, the surface of the MR element of the head is perfectly flat and has a specific pattern of recesses and convexities. The rotation speed of the spindle motor of a modern hard drive can vary from 5400 to 15000 rpm, depending on the purpose of the drive. Many laptop drives are designed to be low-speed to increase energy efficiency; disks for servers and high-performance platforms are made with high speed. At this rotation speed, a powerful air flow is formed inside the disk, which is used for the aerodynamics of the heads.
However, this air flow also has another effect - gradually knocking out small particles from the ceramic and plastic parts of the magnetic head unit that are in direct contact with it. Banal weathering
, if we speak in terms of school natural history. To prevent these particles from damaging the surface (although, of course, this cannot be completely avoided), a fine dust filter is installed in the disk, which is located in a place where it can cover the maximum volume of passing air flow. The fight against microdamage to the surface, which does occur, occurs through defect management of the hard drive firmware: defective sectors are entered into a growing list of defects and reassigned to good sectors from the disk reserve.
The hard drive makes no sound
If the hard drive makes no sound at all, there may be either electronic or mechanical damage to the drive.
One of the most common causes of such hard drive symptoms is the failure of one of the components of the power chip: it could be a blown fuse or a TVS diode. Modern hard drives usually have surge protection: a fuse or a TVS diode. This protection is triggered in the event of a significant voltage drop. Often it is enough to simply replace the fuse or remove the TVS diode on the hard drive board to restore its functionality.
Less commonly, the hard drive board may suffer from failure of the chips or hard drive heads.
Another problem with drives that do not produce any sound is mechanical damage, such as sticking hard drive heads or jamming of the moving element. To diagnose this type of failure, you need to open the hard drive case and check whether the hard drive heads are in the starting position. Then try to rotate the disk manually to determine if it is jammed. An easier way to determine these mechanical damages without opening the hard drive is to check it using special software. But to do this, you need to connect it to another computer.
Sometimes, the hard drive may detect the heads as non-functional during the diagnostic process when it is turned on. In this case, the disk will not start. In order to determine that you are dealing with the specified case, you need to disconnect the disk board from the contact of the disk heads. To do this, you can use a piece of paper that needs to be squeezed between the contacts. After that, start the hard drive. Most drives will not detect a head error, but the drive will spin up and you will know if the heads are working or not.
Natural wear and tear: how it manifests itself
As a rule, natural wear and tear on the magnetic head unit begins to appear long before the hard drive finally fails. Only those who do not monitor the condition of their computer hardware in general do not notice it. The hard drive has a SMART subsystem
, which accumulates error statistics (reassigned sectors, unsuccessful startup attempts, number of attempts to reassign a sector, etc.), based on which an approximate prediction of disk failure is made. When the computer starts, the SMART subsystem is polled, and if all is well, the computer boots; if one of the SMART attributes has dropped so much that it goes beyond the boundaries of normality, you will see a message on the second POST BIOS screen of this type: Hard Disk Drive XX SMART Status BAD, or something similar in meaning. Starting the computer will only be possible by pressing one of the function keys (usually F1).
Unfortunately, quite a few users have problems with the initial assembly of the computer (for example, incorrect installation of the CPU FAN), which leads to the constant appearance of such messages (something like “CPU FAN speed error”) and the need to press a function key to continue starting the computer , disable this feature in the BIOS. In this case, when the machine starts, all notifications are ignored, and it becomes impossible to see whether there was a notification about the bad SMART status of the disk at startup.
True, the Windows operating system also recognizes disks with a bad SMART status, but for a disk that is actually already dying, this may be too late. And this mechanism does not always work, as practice shows: quite often disks with one or two “sagging” attributes may not arouse any suspicion in Windows for a very long time. Therefore, look at the accumulated SMART statistics, they are useful. You can monitor it using a lot of free utilities, for example Victoria.
Wear of the disc begins from the moment it begins to operate, but at first it occurs with low intensity. After a certain time, when the degree of wear reaches a certain, critical value, wear goes from linear to exponential growth, and the disk goes into a faulty state quite quickly.
The main signs that a disk is entering the stage of exponential wear are: a rapid increase in the number of reassigned sectors in the SMART report, an increase in the number of errors when trying to reassign a sector, “slowdowns” of the disk, and the appearance of “punching” sounds when accessing certain files or folders. At the final stage of wear, a large number of defective sectors appear (the defect management system can no longer cope with the flow of emerging defects), causing serious brakes on the operation of the disk. Failure of a head (or several heads) due to wear is the apotheosis of this process. The computer stops booting or boots very slowly, you can't copy any of your files, everything is terribly slow, and finally it just stops working. All. The heads are worn out and can no longer read anything.
To be fair, it must be said that some drives have an activated firmware blocking system in case of problems (including defect management). In this case, the disk refuses to work (either it is not detected at all, or it is detected but does not provide capacity, or it is determined by the “factory” name, etc.). The blocking prevents critical wear if the disk comes directly to this edge, provided that the user does not try to “start” the disk through repeated switching on (“what if it starts”), dancing with a tambourine and dubious recommendations from the Internet (“on On the full moon, place your disk on the system unit, spit three times on the processor fan and, when it flies back, say “Information return, hard drive boot”” and similar anti-scientific heresy). There is only one correct advice: take the locked disk to people who understand how to get data out of it.
Checking the disk with Victoria program
Victoria is one of the main programs that I personally use to check the hard drive through Windows, or if the operating system does not start at all, then through a boot disk with this utility.
You can download the program here Victoria v4.3
After downloading Victoria version 4.3, you need to go into the archive, unpack it or run the file with a green cross called Victoria43.
Let's launch the program, it's in English, if you don't know this language, don't be alarmed, I'll help you figure it out.
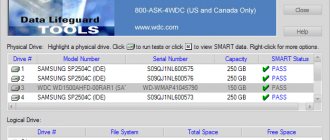
The Standard window describes the main characteristics of the storage medium: its model, serial number, disk size, how many cylinders, sectors it has, and so on.
In the Smart tab you can see the status of the hard drive. Click on the Get Smart button and look at the indicators that appear. Since my hard drive is new, my indicators are normal, SMART status = Good. You may have different meaning and information.
Smart is a technology of analysis, self-control and reporting. Using it, you can view and evaluate the condition of the hard drive, its built-in self-diagnostic equipment, and also predict the possible time of its failure.
To test the storage media, go to the Test tab and click on the Start button. If you have a lot of green, orange, red and blue rectangles (sectors) - this is not good. Ideally, all sectors should be light gray and grey.
If you have damaged sectors marked “Err X”, then after completing the test, check the box next to the word Remap and run the test again. The Victoria program will try to restore these sectors and fix errors on the hard drive.
Checking the hard drive may take a long time, so be patient, it all depends on the amount of information on the media. In the meantime, while testing is underway, I recommend reading the article on how to set up your computer yourself or Setting up your computer.
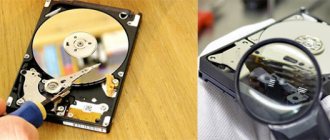
Diagnosis of natural wear of a magnetic head unit using a microscope
Microscoping hard drive heads has long been a standard in the data recovery industry.
Examination of the heads under a microscope makes it possible to identify surfaces on which there are serious damages (dust on the heads, polished surface of the head, etc.), to identify the nature of the origin of damage to the heads, etc. However, there is no generally accepted method for detecting natural wear of heads. Taking into account the fact that head wear is, first of all, the knocking out of microparticles from its surface as a result of exposure to a strong air current (microdamage to the surface), it is quite logical that the degree of wear can be assessed by the state of its relief. However, with standard lighting, only large flaws in the working surface of the MR element can be seen; in order to “reveal” the microrelief completely, two light sources are required: the main one, directed perpendicular to the surface, and some kind of backlight, directed at a slight angle (20 - 30 degrees) to the surface. To enhance the “manifestation” of the microrelief, we used ordinary white light from a ring halogen lamp as the main light source, and a cold blue LED was used as additional (“background”) light.
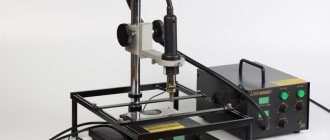
The research setup thus consists of: a trinocular microscope MS-VP; adapter for Canon EF mount, Canon EOS 5D Mark II camera, Model 2401 ring lamp, backlight source – standard microscope illuminator with a replaced LED.
Installation for studying the degree of wear of the magnetic head block of a hard disk.
Under normal direct light illumination, only large relief damage is visible on the surface of the MR element. This is understandable: the light comes from top to bottom at a right angle, the light source comes from all sides (ring illuminator); in this case, practically no shadows are cast. The introduction of a “back” light source into the lighting circuit allows you to see shadows from numerous micro-irregularities of the surface and assess the nature of damage to the MR element.
Checking the hard drive using HDDScan
HDDScan is a program for diagnosing and testing hard drives in English.
Download HDDScan 3.3 utility
After downloading, you need to run the file called HDDScan.
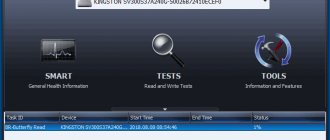
Select the desired Select Drive device; on the right there will be basic information about it.
Click on the blue round button and select the desired action. Go to Surfase Test - select and run the test.
Check the boxes next to Verify or Read and click the Add Test button. I do not recommend choosing Erase - it erases data.
Once you click add a test, it will start automatically and will appear in the lower Test Manager window.
Double-click on RD-Read, go to the test that has started and look at its process, you can see it on the Graph.
View on Map. At the top there are navigation buttons for controlling the Pause, Stop and Report test process, cluster and testing speed in KB/s, and on the right is the sector scanning time in numbers from < 5 to > 500 milliseconds.
In the third column of Report you can see the scanned clusters and sectors of the storage medium, and at the very bottom the progress of the test process is shown as a percentage.
Upon completion of the test, a corresponding message will appear in the task manager window.
If for some reason you did not like the first three methods, then I suggest for your reference a powerful and useful utility for diagnosing hard drives and storage media from Ashampoo.
Example
As an example, let’s take two identical, fairly old drives in which the wear-out process has been going on for a long time, but one drive is in a critical (“near-death”) state, and the second is in a state where the SMART status is just beginning to warn about the possible imminent failure of the drive (the disk is just starting to wear out exponentially).
Seagate ST3160215AS drives, Seagate Barracuda 7200.10 family, capacity 160 GB. The hermetic zone design uses 2 heads. The shooting conditions are the same: ISO 320, shutter speed 1/30, F 0 (the aperture is completely open, since the shooting is done through a microscope). A disk in a “near-death state” has extremely sad SMART attributes and a huge number of defects. A disk whose SMART has just begun to show an error has a smooth read graph and less dismal SMART attribute readings.
Reading graph of an experimental disk in a critical state of wear, the first 3 million sectors
SMART attributes of an experimental disk in a critical state of wear
Reading graph of an experimental disk in a pre-critical state of wear, the first 3 million sectors
SMART attributes of an experimental disk in a pre-critical wear state
Let's look at the heads first under normal lighting from above. The surface of the MR element appears smooth.
General view of the microrelief of the MR element of the Seagate ST3160215AS disk heads, under a direct light source
Well, now let's turn on the backlight. The relief picture has changed: where we see depressions under normal lighting, under double lighting they look like bulges, and the “graininess” of the surface is noticeably increased.
A disc with less wear on the surface of the MR element has a relatively finer grain size, but most importantly, there are no large potholes. A disc with a higher degree of wear has a relatively coarser grain size and has clearly visible large potholes on the surface of the MR element.
Different degrees of graininess of the microrelief of one section of the surface of the MR element of the Seagate ST3160215AS drive heads with different degrees of wear, scale 100%.
General view of the surface microrelief of the MR element of the Seagate ST3160215AS drive heads with varying degrees of wear
How to install Windows 10
"Security and Service Center"
"Service"
As you can see, Windows 10 evaluates the condition of the hard drive as normal: All drives are working fine. OK.
But in fact, if you now run a special program for diagnosing hard drives, CrystalDiskInfo, you will see that the condition of the hard drive is C (Alarm!) and it is full of unstable sectors that the built-in firmware of the hard drive could not fix.
The Victoria program will say the same thing.
How else can you find out the status of your hard drive using the built-in tools of Windows 10 or how to use the disk check utility (chkdsk). Running disk check from the GUI
Windows 10 has a disk check utility called chkdsk and you can run it directly in the graphical interface or using the command line. After checking, the utility will issue a full report on the state of the file system of your operating system installed.
Note: On many sites you may read that the chkdsk utility, run with the /R parameter, can fix bad sectors (bad blocks), but in fact this is not the case. Bad sectors can be reassigned to good sectors from backup tracks only by the technical control firmware built into the hard drive. disk status. What the chkdsk utility does is fix errors in the NTFS or FAT32 file system, and it is best to use the chkdsk utility to fix file system errors, rather than using it to diagnose the condition of the hard drive. Let me explain a little. You all know that the minimum unit of information on a hard disk is a sector, the volume available to the user is 512 bytes. When formatting a hard drive into a file system, all sectors are combined into clusters (one cluster is placed on several sectors); accordingly, a cluster is the minimum area of the file system. So, the chkdsk utility does not work with hard disk sectors, but at a higher level - with clusters. In turn, the Victoria and MHDD programs are used to check hard disk sectors, not clusters, and accordingly they do not disinfect the file system.
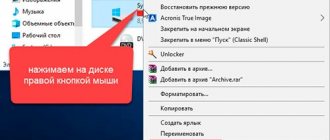
Go to the Computer window and right-click on the drive (C:), select “Properties”
Go to the “Service” tab and click on the “Check” button
"Check disk"
The disk is being checked for errors.
The disk has been successfully verified. No errors found.
Click on "Show details"
The Event Viewer window opens. You can view the scan results on the “Details” tab or double-click the left mouse button on the “Details” link
In the window that opens, you can view the result of the check. If you want, click on the "Copy" button and paste the result into a text file.
Windows checked the file system and found no problems.