The file server operates using the SMB/CIFS protocol and allows you to provide access to shared resources on the local network, for example, text files or network printers. To deploy it on Windows, standard OS tools are used; on Linux, the Samba file server is used.
The instructions cover setting up a file server on servers running Linux and Windows operating systems. There will be 2 directories on the server - public and private. The connection to the file server will occur from both the Windows and Linux operating systems, because There may be servers with different operating systems on a virtual or physical local network.
Creating and setting up a private network
To begin with, all servers necessary for the network must be created in the control panel.
After creation, you need to combine all machines into a single local network through the control panel in the Networks section. As a result, the servers will receive local IP addresses.
After creating a private network, you need to configure network adapters on each server. You can read about this in our instructions:
- Setting up a network adapter in Ubuntu and Debian
- Setting up a network adapter in CentOS
- Setting up a network adapter in Windows
CONNECTING THE SAMBA NETWORK IN MAC OS X.
To connect directly to a file server, use the Connect to Server feature in the Finder window. Choose Go > Connect To and enter a URL, IP address, or domain name.
- We enter the address, for example, of my UGOOS X3 CUBE TV STB where access is already shared.
androidSAMBASAMBA setup
Connecting to a shared directory using Linux
To connect to the shared directory, you need to install a connection client:
sudo apt-get install smbclient
To connect, use the following command format:
smbclient -U <user> \\\<shared directory="">
You can also mount a shared directory by installing an additional utility package:
sudo apt-get install cifs-utils
To mount, use the following command format:
mount -t cifs -o username=<user>,password= ///<share directory=””> <mount point=””>
Where is the address>
is the address of the machine on which the shared directory is located, and
<shared directory="">
is the path to the shared directory.
For example:
mount -t cifs -o username=Everyone,password= //10.0.1.2/Win /root/shares/publicaddress>address>
If the shared directory is on Linux?
To connect to a public folder, you do not need to enter a login or password; you just need to enter the desired IP address in the address bar without entering additional information. To connect to a private directory, enter your username and password in the window that appears.
PS Other instructions:
- Routing within a local network on pfSense
- Setting up a site-to-site VPN network using VyOS
- Windows/Linux server security settings checklist
- How to set up vsftpd on Ubuntu
- Setting up an FTP server on Windows Server 2016
Organizing access to Windows using the smbclient client
First of all, we need to make sure whether our Linux can communicate with Windows using Samba. The easiest way is to use the FTP-like client smbclient . With the help of which you can send a request to the Windows system and obtain information about which Windows resources are available.
samba:~# smbclient -L host -U% Domain=[WORKGROUP] OS= Server= Sharename Type Comment ——— —- ——- Error returning browse list: NT_STATUS_ACCESS_DENIED Domain=[WORKGROUP] OS= Server= Server Comment —— — ——- HOST Workgroup Master ——— ——- WORKGROUP HOST samba:~# smbclient -L host -UAdministrator%12345 Domain=[HOST] OS= Server= Sharename Type Comment ——— —- ——- IPC$ IPC Remote IPC print$ Disk Printer drivers SharedDocs Disk PrinterHP3005 Printer HP3005 share Disk ADMIN$ Disk Remote Admin share_ware Disk C$ Disk Standard share Domain=[HOST] OS= Server= Server Comment ——— ——- Workgroup Master ——— — —-
The listing shows how we used smbclient and the -L parameter to request a list of available resources on the host machine on behalf of an anonymous user (the -U% parameter). In response, Windows told us that Error returning browse list: NT_STATUS_ACCESS_DENIED, that is, anonymous access is prohibited. Next, we tried to connect to the machine as the Administrator user with the password 12345, which is registered in the system. We received a response with a list of shared resources. This is good news. Let's try to connect to the share:
samba:~# cd smb/ samba:~/smb# smbclient //host/share -UAdministrator%12345 Domain=[HOST] OS= Server= smb: \> dir . D 0 Fri Mar 18 17:36:56 2011 .. D 0 Fri Mar 18 17:36:56 2011 ime D 0 Fri Mar 18 17:36:43 2011 My drawings DR 0 Fri Mar 18 17:36:56 2011 Mine music DR 0 Fri Mar 18 17:36:56 2011 40915 blocks of size 262144. 24388 blocks available smb: \> cd ime smb: \ime\> dir . D 0 Fri Mar 18 17:36:43 2011 .. D 0 Fri Mar 18 17:36:43 2011 chsime D 0 Fri Mar 18 17:36:43 2011 CHTIME D 0 Fri Mar 18 17:36:43 2011 imejp D 0 Fri Mar 18 17:36:43 2011 imejp98 D 0 Fri Mar 18 17:36:43 2011 imjp8_1 D 0 Fri Mar 18 17:36:43 2011 imkr6_1 D 0 Fri Mar 18 17:36:43 2011 mscandui.dll A 220160 Tue Apr 15 16:00:00 2008 shared D 0 Fri Mar 18 17:36:43 2011 SOFTKBD.DLL A 130048 Tue Apr 15 16:00:00 2008 SPGRMR.dll A 62976 Tue Apr 15 16:00:00 2008 SPTIP.dll A 272384 Tue Apr 15 16:00:00 2008 40915 blocks of size 262144. 24388 blocks available smb: \ime\> get SPTIP.dll getting file \ime\SPTIP.dll of size 272384 as SPTIP.dll (11565 ,2 KiloBytes/sec) (average 11565,2 KiloBytes/sec) smb: \ime\> quit samba:~/smb# ls -l total 269 drwxr-xr-x 2 root root 1024 Mar 18 19:00 . drwxr-xr-x 13 root root 1024 Mar 18 18:50 .. -rw-r—r— 1 root root 272384 Mar 18 19:00 SPTIP.dll
So, in the above listing, we were able to connect to the \\host\share share from the Administrator user with the password 12345. We received the contents of the directory (and Russian characters are displayed perfectly), went to the ime subdirectory, received its contents and received the SPTIP file on the local machine. dll, with the get command (the command is the same as for the FTP client). You probably noticed that in the smbclient utility the path to the share is specified with a forward slash, although in Windows it is customary to specify the path with a backslash. The smbclient utility is quite flexible and is used as part of the smbprint utility to transfer a stream of data sent to the printer.
How to install and configure Samba on Ubuntu
Installing Samba on Ubuntu
Launch a terminal by pressing the key combinations Ctrl + Alt + T, then enter the following command to install Samba.
sudo apt install samba
Check your Samba installation
You can check if Samba is successfully installed and running by entering the following command. It will show the Samba service status.
sudo systemctl status nmbd
You can see that Samba is active and running.
Samba configuration
Once you are done with the installation, you will need to configure it.
1. First we need to create a Samba directory in which the shared data will be stored. Open Terminal and run the following command as sudo:
sudo mkdir /samba
This will create a new samba subdirectory in the root directory.
2. Just in case, let's make a backup copy of the configuration file by copying it to the same or another directory. To copy the file, run the following command:
sudo cp /etc/samba/smb.conf /etc/samba/smb_backup.conf
3. Now let's edit the configuration file. It is located in the /etc/samba/ directory in the smb.conf file. You can use Gedit, Nano or Vim to edit it.
sudo nano /etc/samba/smb.conf
Now we will configure our new samba directory as a share. Add the following lines to the end of the smb.conf file.
[samba-share]comment = Samba on Ubuntu path = /samba read only = no browsable = yes
[samba-share] – name of the resource comment – Add a short description of the share path – This is the directory of your shared resource. read only - Indicates whether the directory is writable browsable - whether the share should be listed in the list of shares
Press Ctrl + O to save and Ctrl + X to exit.
Setting up a Samba user account
Now let's set up a Samba user account. Samba uses the system account to access the share, but does not accept the system account password. If the user does not exist in the system yet, you need to create one.
sudo useradd username
You will need to set a password for this account by entering the following command from sudo. When prompted, enter a new password.
sudo smbpasswd -a username
Restarting Samba
After completing all the settings, restart the Samba service by running the following command:
sudo systemctl restart smbd.service
Connecting to a Samba share
To access Samba server files, the IP address of your Samba server and the clients connecting to it must be on the same network.
For example, in my scenario I have a Samba server and a Windows client. Both machines are on the same network.
Samba IP (Server): 192.168.10.1/24 Windows IP (Client): 192.168.10.201/24
Setting the Samba Server IP Address
You can check the IP address of any machine by running the ip a in Terminal.
Connecting from Windows
You can connect to a Samba share from Windows in two ways: using the Run utility or using Explorer
Editing a Configuration File
There's only one configuration file that needs to be edited: /etc/samba/smb.conf.
sudo nano /etc/samba/smb.conf
In the [global] section, make sure that the workgroup refers to the workgroup of Windows computers.
workgroup = WORKGROUP
Scroll down to the bottom of the file. (In the nano text editor, press CTRL+W and then CTRL+V.) Include a new section as shown below. Replace username with the desired username.
comment = Home Public Folder path = /home/username/ writable = yes valid users = username
Home Share is the name of the folder that will be displayed on the Windows network. A comment is a description of the shared folder. The next 3 lines indicate that only the specified valid users has access to the /home/username/ directory, which is also writable. The above configuration will disable anonymous access.
Save and close the file, and then run the following command to check if there are syntax errors.
testparm
Creating a user
Samba contains a default user as a security mode, meaning that clients must enter a username and password to access the shared folder. To add a user in Ubuntu, run the following command:
sudo adduser username
You will be prompted to set a Unix password. Additionally, you need to set a separate Samba password for the user using the following command:
sudo smbpasswd -a username
Now all that's left to do is restart the smbd daemon.
sudo systemctl restart smbd
Samba access to shared folder from Windows
On a Windows computer that is on the same network, open File Explorer and click Network in the left pane. You will see a samba server. Double-click the shared folder and enter your username and password.
Samba access to share folder from Ubuntu computer
In File Manager, go to the Network tab in the left pane and select Windows Network.
Select the workgroup, Samba server, and shared folder, and then enter the Samba username and password.
Adding multiple users or groups
If multiple accounts need to gain access to a shared folder, then the authorized users must be changed, as shown below in the /etc/samba/smb.conf file.
valid users = user1, user2, user3
Also use smbpasswd to set the Samba password for each of these users.
sudo smbpasswd -a user1 sudo smbpasswd -a user2 sudo smbpasswd -a user3
To allow a group of users to access a shared folder, use the following configuration in /etc/samba/smb.conf.
valid users = @sambashare
Create a group.
sudo groupadd sambashare
Then add users to this group
sudo gpasswd -a user1 sambashare sudo gpasswd -a user2 sambashare sudo gpasswd -a user3 sambashare
The group must have write permission to the shared folder, which can be achieved with the following two commands.
Set sambashare as the group owner of the shared folder:
sudo chgrp sambashare /path/to/shared/folder -R
Grant write permission to the group.
sudo chmod g+w /path/to/shared/folder/ -R
All!
Terminal
You can do anything you want using the “Terminal” in Ubuntu; accordingly, you can also configure Samba. For ease of understanding, the entire process will be divided into stages. Below you will see three options for setting up folders: with shared access (any user can open the folder without asking for a password), with read-only access and with authentication.
Step 1: Preparing Windows
Before setting up Samba in Ubuntu, you need to prepare the Windows operating system. To ensure correct operation, it is necessary that all participating devices belong to the same workgroup, which is specified in Samba itself. By default, in all operating systems, the workgroup is called “WORKGROUP”. To determine the specific group used in Windows, you need to use the Command Prompt.
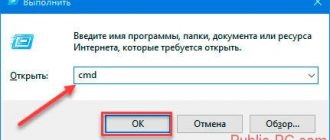
- Press the Win+R key combination and enter the command cmd in the “Run” window that pops up.
- In the Command Prompt that opens, run the following command:
net config workstation
The name of the group you are interested in is located in the “Workstation Domain” line. You can see the specific location in the image above.
Next, if the computer with Ubuntu has a static IP, it must be registered in the “hosts” file on Windows. The easiest way to do this is to use Command Prompt with administrator rights:
- Search the system with the query “Command Prompt”.
- In the results, right-click on “Command Prompt” and select “Run as administrator.”
- In the window that opens, do the following:
notepad C:\Windows\System32\drivers\etc\hosts - In the file that opens after executing the command, write your IP address in a separate line.
Setting up Samba shares
Each resource has its own section in the /etc/samba/smb.conf configuration file. Resource sections are located after global parameters and look like this
[resource_name] path = browseable = read only = force create mode = force directory mode = valid users =
share_name is the name of the resource used when accessing. path — full path to the resource in the file system. browsable - determines the visibility of the resource for other users, but does not give them access rights. read only - determines the ability to have write access for the users specified in the valid users parameter. force create mode - sets the specified access rights to any file created in the resource. force directory mode - sets the specified access rights to any directory created in the resource valid users - list of users who have access to the resource. Here you can specify names or groups; the groups must be preceded by the @ symbol, for example, @admins.
To configure the resource configuration, you need to add the following blocks to the configuration file for each user in any text editor:
[ivan] path = /samba/ivan browseable = no read only = no force create mode = 0660 force directory mode = 2770 valid users = ivan @admins
For the everyone resource, the block will look like this:
[everyone] path = /samba/everyone browseable = yes read only = no force create mode = 0660 force directory mode = 2770 valid users = @sambashare @admins
All users will have read and write access because they were added to the sambashare group upon creation. Now you need to test the parameters
$testparm
If everything is configured correctly, the result will be as follows:
After checking the configuration, start the server and add it to startup using the systemctl command:
$sudo systemctl start smbd.service $sudo systemctl enable smbd.service
The server is running and ready to accept users.
Creating Samba Users
To create a new user myuser, use the following command:
sudo useradd -M -d /samba/myuser -s /usr/sbin/nologin -G sambashare myuser
- -M - Do not create the user's home directory. We will create this directory manually.
- -d /samba/myuser - Set the user's home directory to /samba/myuser.
- -s /usr/sbin/nologin - disable shell access for this user.
- -G sambashare — Add a user to the sambashare group.
Let's create the user's home directory and assign the owner of the directory to myuser and the group to sambashare:
sudo mkdir /samba/myusersudo chown myuser:sambashare /samba/myuser
The following command will add the setgid bit to the /samba/myuser directory so that newly created files in that directory will inherit the group of the parent directory. This way, no matter which user creates the new file, the file will have the group owner sambashare.
sudo chmod 2770 /samba/myuser
Add the myuser user account to the Samba database, setting the user password:
sudo smbpasswd -a myuser
You will be prompted to enter and confirm your user password.
New SMB password: Retype new SMB password: Added user myuser.
After setting the password, let's launch our user:
sudo smbpasswd -e myuser Enabled user myuser.
Now you can use our file storage. Open the network environment and look for our new server:
As you can see, a SAMBA computer appeared there. We entered this name in the Global section, in the netbios name parameter. Next, double-click on the name of this computer and get to the list of available resources. Since we only made one, called music, we are watching it.
In order for us to have several resources, we need to copy the music section and name it something else. For each such resource, you can individually assign parameters: path, access, etc.
If you have questions, write in the comments.
Setting up Samba clients
To access resources from the command line in Linux, the smbclient utility is used. In most distributions it is not installed by default; if not, you need to use a package manager:
$sudo apt-get install smbclient
On some distributions, you may need to create a /etc/samba/smb.conf file because if it is missing, an error message will be displayed. To access the resource you need to run the following command:
$smbclient //name_or_address_of_server/resource -U user
For example, to access the ivan resource on the samba.example.com server, you need to enter:
$smbclient //samba.example.com/ivan -U ivan
Next, you will need to enter a password, after which a command line interface similar to the FTP interface will appear:
For example, you can create a directory:
smb: > mkdir test smb: > ls
Command line access is used mainly for testing; in practice, access is most often carried out from graphical shells, for example, KDE. Access from other platforms (Windows, MacOS) is also possible.
For example, to access from Windows, type \samba.example.comivan in the search bar. And enter your login password
After which you will be able to access network resources.
Installing Samba
Samba is easy to install from the package manager, but you need to update before installing a new package. Use the following commands (examples hereinafter are for Ubuntu 16.04):
$sudo apt-get update (update) $sudo apt-get install samba (start and install the Samba server)
The NetBios service for Samba (nmbd) is not required in our examples, so for security reasons you can easily disable it with the commands:
$sudo systemctl stop nmbd.service $sudo systemctl disable nmbd.service
conclusions
That's all. Now you know how to correctly install Samba on Ubuntu 18.04, as well as configure it. In addition to manually editing configuration files, in order to share a folder in Ubuntu, you can use the graphical utility system-samba-config. But after we have sorted out all the low-level settings, you can handle this utility without difficulty.
Related posts:
- Task Manager in Ubuntu
April 14, 2020
- Installing Atom on Ubuntu
June 29, 2015
- Installing Avidemux on Ubuntu
May 27, 2016
- Installing Opera on Ubuntu 20.04
June 13, 2020
Nautilus file manager
These operations can also be performed in the popular Nautilus file manager.
Windows Command Prompt and its commands
Installation
First of all you need to install:
- Open “Nautilus” by clicking on the icon on the taskbar .
- Go to the location with the shared . Right-click and select “ Properties ”.
- Go to the “ Local Network Public Folder ” tab.
- Select " Publish this folder ".
- A window will open in which you can click on the “ Install service ” button to begin installing Samba.
- A window will open in which you can view a description of the packages being installed. Click “ Install ”.
- Enter the user password to continue installation.
Wait for the installation to complete and proceed to configuration.
basic settings
Setting up Samba from Nautilus is much simpler compared to previous methods.
To add public access to a directory you need:
- Go to the " Permissions " tab.
- Define rights for all types of users.
- To restrict access to any group, select “ No ” from the list.
- Next, go to the “ Change permissions on attached files ” menu.
- In the same way as in the second paragraph, determine the rights to interact with files.
- Click “ Edit ”, then go to the “ Local Network Public Folder ” tab.
- Check the “ Publish this folder ” option.
- Enter the name of the folder.
- Check or uncheck the boxes that allow you to carry out operations and provide shared access to a user without an account.
- Click " Apply ".
It is worth noting that without configuring Samba, folders may not become publicly accessible .
How to connect to Samba
There are several packages that you will need in order to connect to a Samba share. Install them using the following command.
sudo apt install samba-client cifs-utils
Now you can open the file manager and go to the Network . There you will see your server, as well as the share you just configured.
Checking sharing settings
We will consider two cases:
- When computers do not see each other on the local network.
- Sharing access to a network storage device. This can be a flash drive, or a hard drive that is connected to the router, or a separate drive (aka NAS).
First case
For computers to be able to see each other and appear in the Network section in Explorer, they must be connected through the same router. Or connected directly (cable or via Wi-Fi). Simply put, they must be on the same local network.
Next, on all computers (I don’t know how many of them you have), it is advisable to assign the network status to “Home” (private). How to do this in Windows 10, I wrote in the article Home (private) and public (public) network Windows 10. In Windows 7, just go to the “Network and Sharing Center” and change the status of the current connection there.
If after this the computer still does not detect other computers (or vice versa), then let's also check the sharing settings.
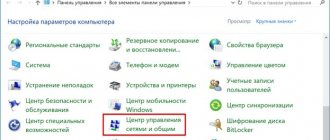
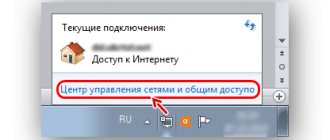
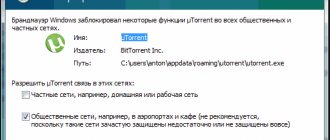
To do this, in the “Network and Sharing Center” window (if you don’t know how to open it in Windows 10, then see this article), click on the “Change advanced sharing settings” item.
And for the current profile (usually “Private”) we set the parameters as in the screenshot below.
We do this on all computers on the local network.
Articles on this topic:
As a rule, these tips solve all problems with detecting computers on a local network.
Second case
When you have problems accessing your network storage. As in my case. Windows 10 did not see the USB drive that was connected to the ASUS router. Now many routers have a USB port for connecting drives and other devices, so the topic is relevant.
You need to make sure that this drive is defined in the router settings and that sharing is enabled. It is clear that this is done differently on different routers. On ASUS routers, for example, it looks like this:
Don't confuse sharing settings with FTP settings. The FTP server settings on the router have nothing to do with this.
Well, if other devices see the network storage and have access to it, but on a particular computer there is no access to it, then the problem is not on the router’s side. Go through the settings of the “problem” PC using this article.
MS Windows 10 does not connect to network folder on SAMBA server
After updating MS Windows to version 1709 on my home PC, I stopped connecting to the network folder.
It crashes with error 0x80004005. Solution to the problem further I have a home server based on FreeBSD, it has a SAMBA server running on which a folder is shared. Security on the home network is zero; SAMBA is configured with guest access with full rights to a single network folder. Everything worked until the home PC with MS Windows 10 was updated to version 1709. After the update, this computer stopped seeing the ball. Other devices see the ball as before, without problems. After updating to MS Windows 10, security was tightened and guest access became unavailable. Loosen the nuts and restore access
To do this, launch the Group Policy Editor on the PC
Local Computer Policy Enable Insecure Guest Logons Option - Status Enabled
Reboot the PC and check that access to the network folder is available
Where to look in the English version:
Group Policy settings: Computer configurationadministrative templates etworkLanman Workstation “Enable insecure guest logons”
Settings can also be made through the registry
Default Registry Value: [HKEY_LOCAL_MACHINESYSTEMCurrentControlSetServicesLanmanWorkstationParameters] "AllowInsecureGuestAuth"=dword:0 Configured Registry Value: [HKEY_LOCAL_MACHINESYSTEMCurrentControlSetServicesLanmanWorkstationParameters] "AllowInsecureGuestAuth"=dword:1
I have Samba server version 4.1.11 running on Ubuntu 14.04. I can't connect from Windows 10 (but I can from Windows 7).
The server and clients are not on the same local network.
The error message given by Windows is that the server is online but not responding. However, the Samba logs say otherwise.
I have included logs for a failed connection attempt from Windows 10, as well as a successful attempt from Windows 7 (for comparison).
In short, unlike a successful attempt, a failed attempt begins with:
then it asks for several different protocols before selecting SMB2_FF . Then, after some security negotiations, it switches to SMB 2 protocol, then SMB3_00, and then:
A successful attempt selects the SMB2_10 protocol from the start, but this protocol is not even requested by Windows 10.
Failed attempt (from Windows 10) Link
Successful attempt (from Windows 7) Link
I added the smb.conf file as a comment (can't have more than two links with 10 reputation)
Ubuntu Folder Sharing
First, let's create a shared folder accessible to everyone. That is, with anonymous access, without samba authorization.
Create a folder to which we will share access, for example:
sudo mkdir -p /samba/allaccess
After the folder is created, you need to set the correct access rights for it. The following commands allow access to the folder to everyone and make the owner nobody:
cd /samba sudo chmod -R 0755 allaccess sudo chown -R nobody:nogroup allaccess/
The next step is to describe the allaccess folder in the samba configuration file:
[allaccess] path = /samba/allaccess browsable = yes writable = yes guest ok = yes read only = no
Your configuration file should now look like this:
[global] workgroup = WORKGROUP server string = %h server (Samba, Ubuntu) netbios name = Ubuntu Share dns proxy = no log file = /var/log/samba/log.%m max log size = 1000 passdb backend = tdbsam unix password sync = yes passwd program = /usr/bin/passwd %u pam password change = yes map to guest = bad user usershare allow guests = yes #============== [AllAccess] path = /samba/allaccess browsable = yes writable = yes guest ok = yes read only = no
Let's take a closer look at the options that were used here:
- path — path to the folder to be shared;
- browsable - whether the folder will be displayed in the list of available shares;
- writable - whether the folder will be writable;
- read only —the folder is read-only;
- guest ok, public — whether guest access will be allowed;
- only guest — if set to yes, then the folder will be accessible only to guests;
- hosts allow - IP addresses from which you can access this server;
- valid users — by default, all users can log in; if you pass a list of users in this parameter, then only they can log in;
- create mask — rights mask for created files.
To apply the changes, restart the Samba server:
sudo systemctl restart samba
Setting up Samba Ubuntu 16.04 for anonymous access is complete. Now you can check the availability of the allaccess shared folder from Windows, to do this, press Win+R and run:
\\srvr1\allaccess
You will see our folder. If you don't see it, check your configuration again. The folder can be accessed without samba authorization. Setting up Samba shares with access without authorization is complete.
You can also connect to this server from Linux using Nautilus; to do this, just type the address smb://ip-server , in the other places section: