Fps up » Video card » You are here
Find out how to get your lost program back
Published 02.11.2019, 13:31 · Comments:15
The missing NVIDIA Control Panel problem is common for Windows 10 users. It's annoying, but it doesn't change anything about how your computer works and won't cause any significant problems. There are a few different ways to solve the problem, or if you're feeling lazy, there are easy ways around it. In the guide below we will look at some of the solutions.
Most users think that Windows Update is the cause of Control Panel crashing (of course), but since we will never know for sure, it takes a little trial and error to find the right solution. If one of the methods below doesn't work for you, it's not easy to know for sure, then move on to the next one!
Restoring the display of the NVIDIA Control Panel
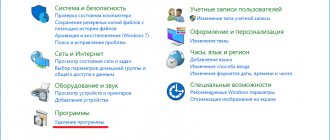
Apparently what Windows Update has done is causing the system to hide the NVIDIA Control Panel. To get it back, all you have to do is show it and everything should go back to normal. Start the fix by going to the Control Panel on your computer. You can do this by typing "control panel" while the Start menu is open.
Then click the drop-down menu next to "View by:" and select "Large Icons." From here, select NVIDIA Control Panel.
With the NVIDIA Control Panel open, go to the Desktop tab and select Add Desktop Context Menu. Make sure Show notification tray icon is checked.
This will make the NVIDIA Control Panel accessible by right-clicking on your desktop. It should also show up in the system tray if it's running.
Method #5 Fixing the Windows Registry
If you were still unable to resolve the problem when launching the Nvidia Control Panel, now we will try to fix the entries in the Windows Registry. As always, be careful when changing entries. We recommend that you create a backup of your Windows Registry so that if something unexpected happens, you can quickly recover.
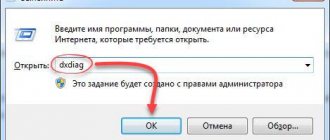
- Press Windows+R , type regedit and press Enter.
- Go to HKEY_CLASSES_ROOTDirectoryBackgroundContextMenuHandler.
- Find NvCplDesktopContext , right-click on it and select “Delete”.
- Now go to HKEY_CLASSES_ROOTDirectoryBackgroundshell .
- Right-click on Shell and select New→Partition and name it Nvidia Control Panel .
- Right-click on Nvidia Control Panel and select New→Partition. Name this section command .
- Double-click on command and enter the value C:WindowsSystem32 vcplui.exe , and then click OK.
- Exit the Windows Registry and restart your computer.
After making small changes to your Windows Registry, try opening the Nvidia Control Panel again. She should definitely open up calmly this time.
Driver Update
Sometimes outdated drivers can cause the NVIDIA Control Panel to not work properly. While it's a pain—and let's face it, it happens far too often—it's an easy fix. To begin updating drivers, open Device Manager. To open Device Manager, type “Device Manager” while Start is open, just like we did with Control Panel.
In Device Manager, open the Display Adapters tab. Then right-click on your graphics card and select Update Driver.
After that, select Search automatically to update the driver software. Windows must find and download any necessary software and install it. Alternatively, you can download the necessary drivers from NVIDIA and select "Browse my computer for drivers" instead.
Method #6 Updating the .NET Framework and VC++ Redistributable
NVIDIA applications, as expected, run on software such as the .NET Framework and VC++ Redistributable. If you have outdated versions of these libraries installed on your computer, then the inability to open the Nvidia Control Panel may be an expected problem.
Try updating the .NET Framework and VC++ Redistributable by downloading from the download section of the official Microsoft website. In addition, you can also check if you have any pending updates for the operating system. Try installing them if available.
Clean driver installation
If all else fails, a complete reinstallation of the NVIDIA drivers should resolve the Control Panel issue. However, note that this method is a bit complicated, so it is best to try it only if you are an experienced user.
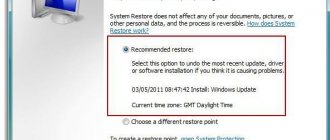
First, you need to boot your computer in safe mode. Go to Windows Settings by searching for Settings in the Start menu. From there, select Update & Security, then Advanced Startup under the Recovery tab. Click Restart Now and boot your computer into Safe Mode.
After restarting your computer, find the NVIDIA folders on it and delete them. They should be on the C: drive by default. Then open Device Manager again. Under Display Adapters, select Remove Device for your NVIDIA graphics card.
When this is done, restart your computer normally. Then download the graphics card drivers from NVIDIA. Be sure to select the Custom installation option and perform a clean install when installing new drivers. Restart your computer again to see if this fix solved your problem.
The most effective method
The most effective method is to completely remove previous Nvidia drivers using the Display Driver Uninstaller program, which must be downloaded and installed on your computer. Then you should reboot the PC into safe mode, run this program and uninstall the drivers from Nvidia (select Nvidia and click on the “Reboot Uninstall” button).
After the reboot, you should download the latest drivers for the video card from the developer’s website and install them on your computer (as an option, first download Geforce Experience, and then use this program to download the latest drivers for the video card). The problem will be solved in most cases.
https://youtu.be/bckm0zHgyNk
Above, I analyzed the reasons for the dysfunction of the Nvidia Control Panel, and also listed a set of tips for solving this problem. If you cannot open the NVIDIA Control Panel, then most likely you have a problem with the operation of your computer’s video card drivers (they are outdated, or, conversely, new versions of drivers are unstable).
The program is missing in the control panel
If your NVIDIA Control Panel is missing and you're just looking for a quick fix, manually opening the program should fix the problem before restarting your computer. To do this, go to the NVIDIA folder wherever it was installed (by default it is installed on the C: drive under Program Files).
Open the Control Panel client folder, then run nvcplui.exe as an administrator. This should open your NVIDIA Control Panel.
There are many different fixes for the NVIDIA Control Panel issue, so if none of these fixes worked for you, don't give up hope! Sometimes strange programs or corrupted files can cause software to crash, so it just takes a little luck and persistence to find the right solution. Good luck in solving your problems.
Method 3. Install original OEM drivers on your PC
An effective solution to the problem is to install original OEM drivers for the video card of your PC. Do the following:
- Go to Device Manager as described just above;
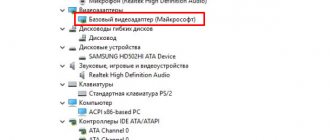
- In the list of devices, find the “Video adapters” tab, open it, and first remove the drivers for the Nvidia video card (hover the cursor over the name of the video card, right-click, select “Delete device”), and then the Intel video card drivers. In some cases, for complete removal it is worth using the DDU program;
Remove both cards from the remote control
Get-WmiObject win32_bios
And press enter. The parameters displayed on the screen will contain “SerialNumber”, the value of which will need to be entered into the corresponding search field on the website of the manufacturer of your device. You will have the opportunity to download drivers and other updates for your laptop.
- Download drivers for the version of your Windows OS (do not confuse 32 or 64-bit versions). The specified drivers may be of an earlier date than the drivers you already have installed, but that’s okay;
- First install the drivers for the Intel video card;
- Then install the drivers for your Nvidia video card. Make sure you do a clean installation for Nvidia drivers;
- Restart your PC.
If you are worried that Windows will install its drivers again, you can disable this feature. To do this, go to Control Panel, then to “System and Security”, then “System” - on the left “Advanced system settings” - “Hardware” tab - “Device installation options”. Here, select the “No” option, click on “Save”, and restart your PC.
Disable the specified option
No NVIDIA Display Driver Service
The NVIDIA Display Driver Service process runs in conjunction with drivers for NVIDIA family video cards and is independently installed on your personal computer or laptop along with the installation of NVIDIA software. If you want to visit the control panel of your card and make changes there, view activity reports, the service is vital, because without it, the card control panel simply will not open. If you do not know about the existence of the panel and never use it, then you can safely disable this service without harm to you and your work. However, many are guided by the simplest rule: if something is working properly, then you should not interfere with this work, otherwise you can break something.
There are also those among users who would rather try to find this service on their computer than try to disable it. Most likely we are talking about problems with drivers (glitches, errors, viruses, crooked Windows operating system, etc.). Using the NVIDIA GeForce Experience utility, you can remove and download the newest and most recent version of drivers for your card to make sure that the problem is not related to crooked or outdated drivers on your system.
We also recommend the following: if you removed the old drivers and installed new drivers instead, downloaded from the official website of the manufacturer of your device, and the NVIDIA Display Driver Service still does not appear, try to do everything exactly the same, but before uninstalling and installing, disable your antivirus and firewall. Sometimes the installation of additional software may be blocked by your antivirus and you just need to unload it at the time of installing the drivers, thus making sure that everything is installed as needed.
Also, one of the reasons why the service may not be displayed is a crooked Windows operating system. We want to highlight this reason as a separate item, since it is not always clear what the user was doing on his computer. Often, only reinstalling the system helps to get rid of many glitches, including those caused by the lack of the NVIDIA Display Driver Service.
Today we got acquainted with such a service as NVIDIA Display Driver Service. We also figured out what to do if the NVIDIA Display Driver Service is missing on your system. We hope the article was useful to you.