If we talk about RAM or, as it is also called, random access memory (RAM) in the context of working within a computer system, then all its parameters are set directly by the Windows operating system itself and the BIOS. Of course, the operation of the dies of a given memory is also affected by its independent configurations, so it is impossible to set an operating mode via a computer that differs significantly from that provided by the manufacturer. But despite this, the user can independently make adjustments to the operation of this element, for example, overclocking the RAM.
This article will tell you how to configure RAM in the BIOS. Read the article to the end, because, in addition to the main instructions, we will talk about related things, without knowledge of which nothing may work.
Why it may not be possible to configure RAM in BIOS
Unfortunately, every user cannot make adjustments to the RAM settings. And this is not at all due to its model, so there is no need to guess which RAM is better suited for adjusting parameters. On the contrary, this is due to the model of the motherboard. Why? Yes, because the BIOS Setup Utility is located there. It follows that the first step is to understand whether the computer’s configuration allows you to make changes to the RAM settings. And this is not so easy to do, because each motherboard is different from each other, but we can definitely say that old motherboards and motherboards of the lowest price segment are absolutely not suitable.
Launching BIOS Setup Utility
What should you do first? Of course, before you start setting up RAM, you need to enter CMOS. What is this? This is the same BIOS. Unfortunately, it is impossible to offer a universal way to enter it, because everything depends directly on the manufacturer and the motherboard itself. But we can say that the login is carried out directly when the computer starts, when there are many different words in front of you against a black screen. At this moment, you need to press a special key responsible for entering the BIOS utility. Most often this is Del, less often F1 or F2. This applies to computers; laptops, on the contrary, use keys with the F prefix (F1, F2, F10, F11 or F12) to enter.
In general, you can see the required key when the system boots, there will be something like the following text: “Press DEL to run Setup”, where instead of “DEL” perhaps another key will be indicated.
BIOS interface
So, we not only figured out that CMOS is the BIOS, but, importantly, we decided how to enter it. However, it’s still too early to move on to the guide on changing the parameters of a random access memory device, because first you need to understand the types of BIOS, or more precisely, the types of its interfaces.
Looking ahead, let's say that the article will examine three representatives: AMI, UEFI and AWARD, although there is also an Intel BIOS, but this is only a modification of AMI, so the instructions for them are general. You should also not confuse AWARD BIOS and Phoenix, since they are the same thing.
All of the above versions have a different appearance, which is why the RAM settings in the BIOS are performed differently. There is no point in describing each one now, because further everything will be stated verbatim. One need only say one thing - despite the different appearance and different arrangement of some interface elements, the instructions are largely applicable to all BIOS Setup Utilities.
Settings
Now, having dealt with all the nuances, having found out what CMOS is and how to enter the BIOS, we can finally move directly to the guide on how to configure RAM. However, please note that interfering with the settings of this component may affect the stability of the computer. This “indicator” can change for the better or for the worse, so it is recommended to have a large theoretical knowledge base behind you so that in the process of following all the instructions you do not cause harm to the computer.
What needs to be changed?
When overclocking or downgrading RAM, you should pay attention to the following few points:
- Clock frequency. Clock frequency is the number of operations that RAM performs in one clock cycle. Increasing this value will significantly improve the performance of your RAM.
- Timings. Timings are a set of numbers that, in addition to the BIOS, you can also find on the RAM sticks themselves. The lower the values of these numbers, the faster the CPU receives data from RAM.
- Memory voltage. Memory voltage is the voltage that the RAM receives from the power supply. We categorically do not recommend changing any other values, as this may cause the entire PC system to fail without the possibility of recovery.
All these changes are like a lottery. There is no exact and completely correct algorithm for everyone. If you want to change the memory in the BIOS, you will need to change each value by one unit, and then look at the result. Otherwise, you risk completely burning out the RAM or breaking the entire computer.
We also do not recommend overclocking the RAM, since even if it works correctly, after some long time this hardware component will become unusable due to the fact that it was working at a power that was not intended for it.
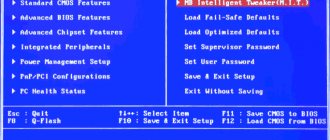
Method one: Award BIOS
We’ll start by telling you how to configure RAM in the Award BIOS. This type of CMOS features a split screen, divided into two parts. On the left are standard settings, and on the right are advanced settings. We will use both. Well, without ranting for too long, let’s move on to the setup instructions themselves.
- Once you enter the Award BIOS, press the Ctrl+F key combination to access advanced settings.
- Using the arrow keys on your keyboard, highlight the line “MB Intelligent Tweaker”.
- Press the Enter key to enter the settings menu for this option.
- Here you can increase or, conversely, decrease the clock frequency of your RAM. This is done by changing the “System Memory Multiplier” parameter. However, please note that you cannot change the indicator to the maximum value; this can lead to malfunctions of the component or even to its complete breakdown. It is advisable to choose a value slightly larger than originally specified.
- Here you can change the voltage supplied to the RAM, this is done at the bottom of the screen. But there are limitations here too; it is highly not recommended to change it by more than 0.15 V.
- Return to the main menu by pressing Esc.
- Select "Advanced Chipset Features" and go to it.
- Here you will be allowed to change the RAM response time. First, change the “DRAM Timing Selectable” item to “Manual”, and then proceed to change the values.
At this point the setup can be considered complete, press F10 to save all changes and exit the BIOS.
Setting up RAM
The RAM setting in the BIOS depends on the motherboard firmware. Depending on the manufacturer, the sequence of actions may vary.
If you have a BIOS (UEFI) password that you don’t know or have forgotten, we recommend that you read the material on resetting and setting a password for the basic input/output system: https://code01.ru/others/bios/reset- bios-password/
Award
To overclock RAM in BIOS from the Award group of companies, you need to follow simple instructions:
- To restart a computer.
- Open the BIOS menu by pressing the Esc, Del or F2 buttons.
- Click on the “Advanced settings” line or use the keyboard shortcut Ctrl + F1.
- Select the MB Intelligent Tweaker (MI T) option using the Enter button.
- Find the System Memory Multiplier tab. This component changes the clock speed of the RAM.
- You should not set the value too high, you just need to increase it slightly.
Custom changes can only be made after switching to manual control
- If necessary, change the voltage supplied to the RAM. An increase of 0.15 V is allowed.
- Return to the main BIOS menu and select Advanced Chipset Features.
- This panel is responsible for timing. The first step is to change the DRAM Timing Selectable parameter from automatic control to manual (Manual). Next, start setting up the components. It is important to remember that a reduction of one value is allowed at a time.
- Save changes and exit BIOS.
AMI
Changes in BIOS on boards from this company are practically no different from Avard’s:
- Go to the BIOS and select the Advanced BIOS Features line.
- Go to Advance DRAM Configuration, where you should change the clock frequency, voltage and response time. The algorithm of actions copies the previous method.
- Exit the BIOS after saving the settings.
UEFI
UEFI BIOS is equipped with a modern and convenient menu. It allows you to easily adjust processes and make changes to previously inaccessible parameters.
- Call BIOS. This is done by pressing the Del or F2 buttons.
- Using the F7 key, go to the Advanced Mode tab.
- Select Ai Tweaker. There you need to find Memory Frequency. This component is responsible for the clock frequency.
- In the same menu, click on the DRAM Timing Control line. Here you need to set the timing values after changing the field values from Auto to Manual.
- Go to the Ai Tweaker tab, where click on the DRAM Voltage panel. In the menu that opens, you can increase the supplied voltage. The increase in values should be minimal.
- Go to advanced settings and click on the Advanced line. Open the North Bridge menu and find the Memory Configuration component.
- This line is responsible for the configuration of RAM modules, the operating mode of RAM error control, etc.
- Save the settings and exit the BIOS.
AMD
Users of boards on the AMD platform can use a calculator that allows you to make targeted changes to the RAM configuration. Overclocking requires Ryzen Dram Calculator and Thaiphoon Burner programs. They will help you choose the right values for the RAM characteristics.
- Download the utilities from the official website and unpack the archive.
- Run the program.
- In the main menu, select the panel responsible for the current characteristics.
- Enter data into the fields using the Thaiphoon Burner utility.
- Calculate safe values by pressing the Calculate Safe key.
- If necessary, you can compare the original and custom timings.
- Take a screenshot of the parameters using the Screenshot button in the left corner of the panel. Transfer it to another device.
Now you can start making changes to the BIOS menu. To do this, you need to select a method that matches the installed hardware.
Method two: AMI BIOS
As you can understand, there is no point in deciding which RAM is better, because its indicators can be easily changed in the BIOS settings. Let's now move on to the AMI BIOS and tell you how to do this in it.
- Once in CMOS, go to the "Advanced BIOS Features" menu.
- In it you need to find the line “Advance DRAM Configuration” and press Enter on it.
- Here are all the parameters that were presented in the first method, that is: the supplied voltage, timings and RAM clock frequency.
Similar to the Award BIOS, change all the settings to the ones you need, save them and restart the computer to enter the operating system.
How to find out what RAM is installed in your computer
There are dozens of ways to determine the basic parameters of RAM installed in a computer. We will not consider all of them, and we will present below the most convenient and simple options for the average user.
Video instruction
Visual inspection
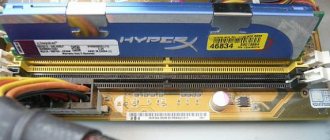
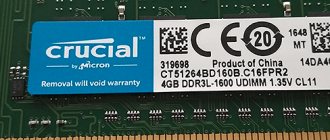
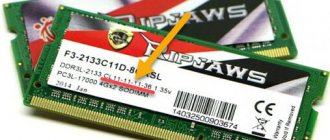
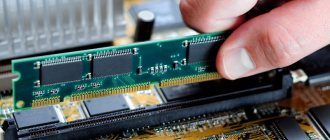
The easiest way to find out the basic parameters of the RAM installed in your computer is to inspect the already installed RAM module. To do this, you must first turn off the power to the computer, then remove the cover and pull out the bar (to remove it, you will need to loosen the clamps on both sides). There should be a sticker on it with key information about the RAM.
Advantages of a visual inspection:
- No need to turn on your computer or download third-party applications;
- In addition to the basic parameters of RAM, you can find out its exact model.
Disadvantages of visual inspection:
- If the sticker from the RAM has been torn off, the information cannot be found out;
- Some modern RAM modules do not have stickers with information attached to them due to the presence of a cooling radiator on them;
- This method is not suitable for laptops, since removing the cover from them is a very labor-intensive procedure.
Using BIOS
Through the BIOS or UEFI environment, you can determine the basic parameters of the RAM installed in the computer. To do this, before starting to load the operating system, that is, immediately after turning on the computer, press Del to go to the BIOS settings. Next you will have to act depending on the BIOS or UEFI version:
- If we are talking about older BIOS versions, you need to look for information about RAM in the Memory Information column, which is located in the Chipset tab. Please note: the location of the RAM information may vary depending on the BIOS version.
- If we are talking about a modern BIOS, that is, UEFI, then you need to look for information about RAM on the main screen. The Total Memory column indicates the frequency, type and amount of RAM installed in the computer.
Advantages of determining RAM parameters using BIOS:
- You can obtain data even if Windows is not installed on the computer or does not load;
- If you need to check several RAM modules in a row to see if they are detected by the system, this method is the fastest.
Disadvantages of obtaining information about RAM using BIOS:
- Since there are many BIOS versions, and most often they are not localized, it can be difficult to find information about RAM among the mass of parameters;
- The old BIOS does not always display all the necessary information, and often only the amount of RAM is visible.
Windows tools
The Windows operating system has built-in utilities that allow you to find out minimal information about RAM - its used volume. That is, it will not be possible to determine the memory type and frequency using operating system utilities.
There is another important limitation. Windows will only show the amount of memory used, not the total amount installed. This aspect should be taken into account if the computer is running 32-bit Windows, which does not support more than 3 GB of RAM. That is, if the computer has more RAM installed, it will not be displayed in diagnostic utilities, and the “extra” memory will not be used during operation.
There are several ways to find out the amount of RAM using Windows. The easiest way to do this is as follows:
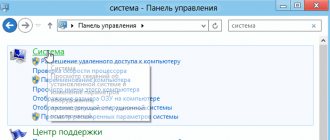
- Right-click on the My Computer icon in File Explorer and select Properties. A window will open indicating the amount of installed RAM;
- Press the Windows + R key combination on your keyboard and enter the command msinfo32, then press Enter. The System Information window will open, where information about RAM is stored in the main tab.
Third party applications
A lot of diagnostic applications have been released for Windows, each of which can be used to solve specific problems. Most of them provide the ability to find out information about RAM. Below are examples of such programs that can be downloaded for free from developer sites to determine information about RAM.
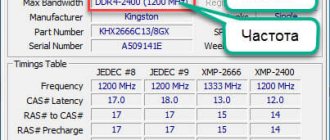
CPU-Z
Information about RAM in the CPU-Z application is distributed across several tabs:
- Memory. In the “General” column, the “Type” value will tell you about the type of installed RAM, and the “Size” item contains information about the amount of RAM. Also below in the “Timing” column you can see information about the operating frequency.
- SPD. In the SPD tab, you can determine the number of installed memory modules and detailed information about each of them.
AIDA64
Another convenient application for viewing information about components installed on your computer is AIDA64. To find out information about RAM through the program, you need to select SPD in the “Motherboard” tab. The application determines all the main RAM parameters.
HWiNFO64-32
HWiNFO64-32 is another handy application that allows you to diagnose the system and check its parameters. Unlike AIDA64, this application has a portable version, that is, which does not even need to be installed on your computer. All information about RAM in the HWiNFO64-32 application is displayed in the “Memory” column.
( 11 votes, average: 4.36 out of 5)
How to overclock the processor on a computer or laptop
How to find out your video card on Windows 10 and earlier versions?
Related Posts
Method three: UEFI BIOS
Now let's move directly to setting up RAM in UEFI BIOS, perhaps the most convenient BIOS of all. This is because it has a graphical interface and supports the mouse, which greatly simplifies the execution of all actions.
- Once you enter the BIOS, you should go to advanced mode. To do this, press F7.
- Here, go to the “Ai Tweaker” tab.
- Find the “Memory Frequency” button and in the drop-down list that appears after clicking on it, select the desired clock frequency.
- To adjust timings, you need to go to the “DRAM Timing Control” menu.
- If you decide to change the voltage supplied to the component, then you need to go to the “DRAM Voltage” menu. Here, in the appropriate input field, indicate the desired parameter.
All that remains is to save all the settings and restart the computer - setting up the RAM in the UEFI BIOS can be considered complete.
SDRAM
SDRAM reduces DRAM timing. JEDEC standard DRAM type, works in synchronization with the memory bus. SDRAM provides information in high-speed bursts using a high-speed synchronized interface. Because the signals are synchronized with the motherboard clock, SDRAM removes much of the latency of asynchronous DRAM.
Like any new type of memory, it requires chipset support on the motherboard before it can be used in systems. Beginning in 1996 with the 430VX and 430TX, most Intel chipsets began supporting standard SDRAM, and in 1998 the introduction of the 440BX chipset caused SDRAM to eclipse EDO as the most popular type on the market.
The performance of SDRAM, compared to the performance of FPM or EDO RAM, is significantly improved. However, since SDRAM is still a type of DRAM, the initial latency is the same, but the cycle time in burst mode is much faster than using FPM or EDO. SDRAM timing for packet access is 5-1-1-1, which means four memory reads will be completed in just eight system bus cycles, compared to 11 cycles for EDO and 14 cycles for FPM. This makes SDRAM almost 20% faster than EDO.
SDRAM, in addition to the ability to operate in smaller cycles, is capable of supporting a cyclic system bus of up to 133 MHz (7.5ns). Most PC systems sold between 1998 and 2002 included SDRAM memory.
SDRAM is sold in DIMM form and is usually rated by clock speed (MHz) rather than cycle time (ns). This was confusing during the initial transition from FPM and EDO DRAM.
To meet the stringent timing requirements of its chipsets, Intel developed specifications for SDRAM called PC66 and PC100. For example, it would seem that 10ns would be enough to run at 100 MHz, but Intel's proposed PC100 specification required faster 8ns memory. This ensures that all timing parameters are met with sufficient margin for error.
In May 1999, JEDEC created a specification called PC133. An increase in speed to 33 MHz is achieved due to the PC100 specification, tightening timing and capacity parameters. The faster PC133 quickly reached all systems with a 133 MHz processor bus. The original chips used in the PC133 modules are rated at 7.5ns or 133 MHz. Later chips had a bitrate of 7.0ns, which is technically 143MHz. These faster chips were still used on PC133 modules, but they allowed for improved columnar strobe latency (CAS or CL for short), which slightly improves overall memory cycling time.
SDRAM typically came with 168-pin DIMMs running at multiple speeds. The table below shows the standard single data rate SDRAM data rates and corresponding bandwidth.
JEDEC SDRAM module (168-pin DIMM) “Speeds” and “Baud Rate”
| Module type | Chip type | Clock frequency | Cycles over time | Bus speed | Tire width | Data transfer rate |
| PC66 | 15ns\10ns | 66MHz | 1 | 66MTps | 8 bytes | 533MBps |
| PC100 | 8ns | 100MHz | 1 | 100MTps | 8 bytes | 800MBps |
| PC133 | 7.5ns\7ns | 133MHz | 1 | 133MTps | 8 bytes | 1.066MBps |
MHz = million cycles per second MTps = million transfers per second Mbps = million bytes per second NS = nanoseconds (billionths of a second)
Some manufacturers sold modules that they claimed were "PC150" or "PC166", although these speeds did not exist as official JEDEC or Intel standards, and the chipsets or processors did not officially support these speeds. These modules actually used chips assembled at 133 MHz, which could be overclocked at 150 MHz or 166 MHz.
Essentially, PC150 or PC166 memory was PC133 memory that was tested to run at overclocked speeds not supported by the original chip manufacturer. This overclockable memory was sold to enthusiasts who wanted to overclock their chipsets on the motherboard, thereby increasing the speed of the processor and memory bus.
Attention . In general, PC133 memory is considered backward compatible with PC100 memory. However, some chipsets or motherboards had more specific requirements for certain types of 100 or 133 MHz chips and module designs. If you need to upgrade an older system that requires PC100 memory, but PC133 memory is not identified by the vendor as compatible with your system, you should not purchase it. To purchase memory to ensure it's rated for your system, you can use the online tools provided by most major memory manufacturers.
Typically, you will find SDRAM modules rated CL 2 or CL 3.