For a long time now, computer processors have reached the maximum possible frequency, which increases very slowly over the years. This state of affairs is due to the design features of the CPU, which do not allow a significant increase in gigahertz in mass-use products. Therefore, the computer hardware industry is moving towards increasing the number of cores, not the frequency. The more cores a computer heart has, the more parallel tasks it can handle, and, accordingly, the more productive it is. All modern games and resource-intensive applications are designed for multi-threading to increase optimization. Any user can easily determine the number of processor cores. We are talking about the simplest and most popular methods that work on any version of the Windows operating system.
How to see how many cores a processor has: task manager
The task manager provides the user with a lot of useful information about the computer, and can also show superficial data about the installed processor. To open the task manager, press the key combination Ctrl + Shift + ESC . After this, a window will appear that will display all running processes that consume the resources of the following PC components: processor, RAM and hard drive. By the way, based on this information, you can draw a conclusion about how well your CPU copes with the tasks. If you are experiencing high CPU usage for no apparent reason, then you can read this material in order to fix the problem.
In the second “performance” tab at the bottom of the window you will see basic information about the processor, including the number of cores. Please note that the data may not be displayed correctly if you have an old motherboard BIOS firmware installed, which may not be compatible with the latest CPU models. We often encountered a similar problem when working with Ryzen stones. In order to obtain reliable data, you need to update the motherboard BIOS to the latest version. You can traditionally find the firmware on the official website of the developers.
How to understand how many cores are in a processor: Device Manager
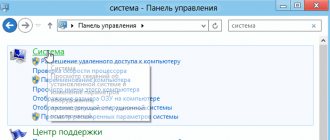
On your desktop, find the “my computer” shortcut and right-click on it. In the menu that appears, select “properties”. If you don’t have a shortcut on your desktop, you can simply open any folder and use the quick access panel, which is located to the left of the files in the folder, to find the “my computer” shortcut. Then do the same as described above.
In the new window on the left side you need to select the appropriate item called “device manager”. If for some reason you cannot get into the device manager, then you can call it using a special command. To do this, press the Win + R key combination on your keyboard and enter the following text in the field that appears: devmgmt.msc. After this, confirm the operation by pressing “Enter”. There is no need to put a period at the end of the command, otherwise it will generate an error.
After the manipulations have been completed, you will see a window with all connected devices that the operating system was able to recognize. As you might guess, in the “Processors” column we will find the information you are looking for. It is necessary to count the number of points in the column that opens. Most likely they will be equal to the number of cores of your processor. However, understand that the device manager reads the processor threads, not the core threads. And the number of cores does not always equal the number of threads. Therefore, if you know that your CPU supports hyperthreading (where one actual core is divided into two virtual threads), then divide the result by two. For example, the Ryzen 5 2600 gave us 12 points. We know that this model supports SMT technology (from the English simultaneous multithreading technology - an analogue of Hyper-threading technology from Intel), which means the number of cores is 6. If you do not know what functionality your CPU has, then it is better to use another method .
How to find out RAM on a computer
The question of how to look at RAM can be perceived in different ways, so in the first part of the note we will look at ways to find out its physical volume, and in the second, using third-party utilities, we will find out what we are dealing with and whether it is possible to expand it.
Finding out the amount of RAM is quite simple - standard operating system tools are quite sufficient for this, which is why we will use various programs only for a more detailed analysis
Where can I see the amount of RAM on my computer?
Stop dragging the cat for the inevitable - let's go over the options for determining the RAM. I am not a supporter of methods when, at every opportunity, you need to open the system unit and try to figure out what and where (those who really understand will look without this manual - beginners, in turn, can harm their electrical friend).
Method 1. System properties
The easiest way to find out the amount of RAM in the system is to open the computer properties and look at the necessary information. Right-click on the “This PC” icon and select “Properties” from the menu that appears. The line “Installed memory (RAM)” will contain the amount of your RAM.
Sometimes it happens that there is less available memory than there is in the system (this is exactly what we will be told in the system properties). Most likely, part of the RAM was taken by the video card for its needs (if it is built-in) or there is a 32-bit operating system and the amount of RAM in the system is more than 4 GB
Method 2: Command Line
The next method is related to the command line, if you don’t know how to launch it, then read about 10 ways to open the command line in Windows. By the way, many users appreciated the command line method when determining the motherboard - so the command line is the most alive of all living things, despite the poppy interface of the system and the habit of doing everything with just the mouse. Open the command line and enter:
systeminfo
All you have to do is wait until the report is prepared and in the line “Total amount of RAM” there will be the amount of RAM in megabytes (do not forget that 1 GB is 1024 megabytes)
You may notice the line below “Virtual memory” - this is the area on the hard drive into which background processes are unloaded if there is not enough RAM. You understand that the difference in performance between RAM and HDD is tenfold... the less we use virtual memory (swap file), the more responsive our system is
Method 3: DirectX Diagnostic Tool
The last method in today's instructions is to view the amount of RAM through the DirectX Diagnostic Tool. Launch the Run task (called by the keyboard shortcut WIN + R or type the same command in the command line) and enter
dxdiag
Wait until DirectX collects all the necessary information about the computer and on the “System” tab, in the “Memory” line, information about the amount of RAM installed in the computer is displayed.
As you can see, there are no problems with determining the volume, but when there is a need to find out more detailed information about our RAM (for example, whose production of the memory module is, its size and type) - third-party utilities are used
Where to look at your computer's RAM
Let's move on to the most interesting part - let's determine what RAM is installed in our computer (in which slots it is located, whose manufacturer it is, and much more). Unfortunately, it is impossible to find out this using standard methods, but many of the utilities on the list have portable versions and do not require installation.
Method 1: CPU-Z
We have already used this application to identify the processor, but there I mentioned that it is worth taking a closer look at the functionality of CPU-Z. First you need to download the application itself, as always we use the portable version from the official website
https://www.cpuid.com/softwares/cpu-z.html
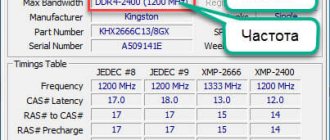
We launch CPU-Z and go to the “SPD” tab; in the “Memory Slot Selection” block we can display information about which slot is in it. Accordingly, we can check how many RAM slots are in the computer, which of them are occupied, and complete information about the modules installed in specific slots. So answer me one simple question - why do we need to disassemble the computer?
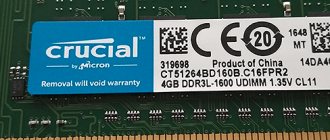
As you can see, my work computer has 8 gigabytes of RAM with one Hyundai DDR3-12800 stick in the third slot. The other three are free, I don’t see any point in taking a screenshot of them - there’s no information there
Method 2. AIDA64
Not a single note about computer characteristics is complete without the AIDA64 (formerly Everest) utility. Go to the official website to download the application (I recommend the portable version of the Extreme edition)
https://www.aida64.com/downloads
Unfortunately, the application is paid and the trial version does not reveal all the information, but we can find out some of the RAM parameters. On the left side of AIDA, go to “Motherboard” - “SPD” and on the right side of the application we will see the layout of the slots on the motherboard. Although not all the information is available to us, we can look at the volume of the module and its frequency characteristics... as a rule, this is enough in most cases.
This application is inferior to all those presented only in demo mode - who knows, maybe you have a full-fledged version and you will not have any disadvantages in hiding the necessary information
Method 3. Piriform Speccy
An excellent application that will tell you how to view the RAM on your computer. But, unfortunately, it does not have a portable version and requires mandatory installation on a computer to run. You can download it from the official website (there is a light version, we used it in the article - it’s free)
https://www.piriform.com/speccy/download/standard
After launch, wait until Speccy collects all the necessary information about your computer and select “RAM” on the left side. On the right side, the utility will draw a visual report of what and where we have it installed. This is probably the most convenient way to determine the RAM on a PC.
If anyone doesn’t know, Speccy and CCleaner are utilities from the same developer, so you can rest assured of the usefulness of the program
Method 4. HWiNFO
We smoothly complete the review of applications for determining RAM on a computer. Next up we have a good HWiNFO utility that will help us in difficult work. There are several versions of HWiNFO (for 32 and 64 bit versions of Windows)... if you don't know which version you have, then download HWiNFO32 - you can't go wrong. Traditionally, I recommend the portable version - I don’t like installing programs that are needed only once.
https://www.hwinfo.com/download.php
After launching, you will have to wait a little while the program collects all possible information about your computer. After the download is complete, the “System Summary” window will open, where the “Memory Modules” block will display detailed information about all installed RAM modules.
From the screenshot it may seem that the module is installed in the second slot, but this is not the case. In HWiNFO, the numbering of RAM slots starts from zero, and not from one as we are all used to - pay attention to this
How to find out how many cores a processor has: CPU-Z
The most proven method is to use third-party software, because highly specialized programs usually offer the user much more functionality than the built-in tools in the operating system. There are many utilities in nature that read information about a computer. But, as practice shows, the most reliable information about the processor is provided by the free CPU-Z utility, which can be downloaded on the official website.
Once launched, you will see a small window. At the bottom right is the data we need. Cores - number of cores. Threads - number of threads. In the same window you can see the processor voltage, its technical process, cache size and other useful information. The utility also shows information about the motherboard (which can be useful when updating the BIOS), RAM (which is useful when overclocking RAM) and the graphics adapter. Therefore, this is one of those Windows programs that every user should have on their computer.
Using the built-in Windows tool
If you do not want to install third-party software, you can use standard Windows tools. To do this, do the following:
- In the Start menu, open the search bar and enter “System Information” into it.
- The window that opens displays all the information about the PC and the OS installed on it. Find the line “Processor”.
- The required parameters will be displayed at the end of the line.
This is the simplest method that does not require special skills or time-consuming installation of software products.