This feature greatly simplifies the distribution of access rights to files, printers, and shared folders that are stored on your computer. For example, you came to a cafe or restaurant and connected to a wireless network. Essentially, the cafe's network will be local, meaning you will be able to access the shared folders of anyone in that zone if they have set the permissions incorrectly.
That is why in such cases you need to change the network type in your Windows 10 OS to “public”. And when you come home, you can safely change the type to home or private network so that access to “shared” folders is open to local clients.
Through parameters
- Click on the most important button in the lower left corner with the windows logo;
- Now click on the gear;
- We go to the section related to the Internet and networks.
- Go to the network status and then click on the change button;
- Well, then, choose: private - if you want your data and the laptop itself to be easily identified; or public - if you do not trust and do not know the users in this network.
How to Change Windows 10 Public Network
Security Policies
The network location determines the type of network to which the computer is connected and automatically sets the firewall settings appropriate for that location.
- Open the local security policy window by executing secpol.msc
in a
Win+R . - Go to the Network List Manager Policies , and select a network policy.
- Now in the Network location , specify the location type Personal and user permissions User cannot change location .
Windows PowerShell
- In a running PowerShell window, run the command: get-NetConnectionProfile .
- In the list of networks, look at InterfaceIndex (interface number) and NetworkCategory (network type).
- Run the command: Set-NetConnectionProfile -InterfaceIndex 12 -NetworkCategory Private .
Using the example above, the command changed the public network to a private one. The user just needs to change the network interface number, in our case 12, and the network type itself: Public or Private. To run all system commands, run Windows PowerShell as an administrator.
Registry Editor
Before making changes in Registry Editor, we recommend that you back up your Windows 10 registry. After making changes, you need to restart your computer.
- Open the Registry Editor window by running the regedit in the Win+R .
- Navigate to the location HKEY_LOCAL_MACHINE\ SOFTWARE\ Microsoft\ Windows NT\ CurrentVersion\ NetworkList\ Profiles .
- Select the profile of the network you are using (it is usually the first one in the list) and make sure that the ProfileName matches the name.
- Change the value of the Category to the desired one: Public - 0, Private - 1, Domain - 2 .
Conclusion
If the user needs to enable file and printer sharing for computers on the same network, then it is better to change the public network to a private or home network. In all other cases, use a public network profile - this will increase the security of the system as a whole. All access to your computer's network locations will be completely disabled in Windows 10.
Change sharing
When installing a particular mode, in fact, only one parameter changes in Windows. It either gives access to shared resources of a computer or laptop, or denies it. You can set this parameter directly.
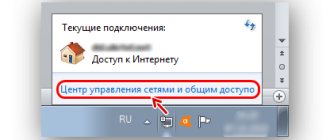
- Click on the connection in the lower right corner and select options;
- Go to the second tab from the top and click on your connection. If your connection is via wire, then click “Ethernet”. If you are connected via Wi-Fi, then select the section called “WiFi”.
- Then everything is simple: you either enable detection of your PC or disable it - if you are in a work or home group that you trust.
Change the network to private through local policies
Second way. Open local security policies:
- Or through the Control Panel - Administration.
- Or Windows + R on the keyboard, then secpol.msc
and Enter.
There you need to open a policy that has the same name as the network you need (the very first screenshot of this article). It is located in the Network Manager Policies branch:
Then, in the properties of this policy, open the “Network Location” tab and specify the location type and user permission there:
Note!
The user permission must be set exactly as indicated in the screenshot - “The user cannot change the location.” With other options, the setting will not work.
Through the HomeGroup configuration
- Go to Start again and enter “Homegroup” in the search bar, after which you will see this section at the top. Click on it to go;
- Just below you should see a link to change the location of your grid;
- If you click there, the system will ask you about the security detection of your PC. If you answer “No”, the public group mode will turn on, and if you select “Yes”, the home mode will turn on.
The easiest way to change the network connection profile in Windows 10
In the latest versions of Windows 10, a simple connection profile setting has appeared in the network settings, where you can select whether the network is public or private:
- Go to Settings - Network and Internet and select "Change connection properties" on the "Status" tab.
- Determine whether this is a public or public network.
Video instruction
In case, for some reason this option did not work or you have a different version of Windows 10 where the options look different, you can use one of the following methods.
Reset
This method is also quite correct. We simply forget connections and settings. And the computer starts connecting again and asks you: what type of network protection to install.
Again, go to the parameters, and then to the network settings. We enter the state and then press the reset button. You will be asked if you are sure of this; we simply confirm the procedure. If after this the type settings window does not appear, then simply restart your laptop or computer. You can also make and set the access level through the console or registry. But these are such clumsy methods, and they take much more time.
Change Network Profile from Public to Private in Windows 10 via PowerShell
In Windows 10 / Windows Server 2016/2019, you can manage network connection profiles from PowerShell. Launch the PowerShell console with administrator rights.
Now, using the Get-NetConnectionProfile , we will get a list of network interfaces and the network profiles applied to them.
In my example, there are 4 network connections on the computer, with different types of network profiles (NetworkCategory: Public, Private and DomainAuthenticated.
Let's try changing the network profile for one network connection. In this case, we are interested in the index assigned to this network card. In this example InterfaceIndex = 19.
Name : Unidentified network InterfaceAlias : Ethernet 3 InterfaceIndex : 19 NetworkCategory : Public IPv4Connectivity : NoTraffic IPv6Connectivity : NoTraffic
Knowing the network interface index, you can change the network type to Private:
Set-NetConnectionProfile -InterfaceIndex 19 -NetworkCategory Private
Let's check that the network profile has changed:
Get-NetConnectionProfile -InterfaceIndex 19
The new firewall rules will be applied to the interface according to the assigned profile without rebooting.
You can also change the network profile for all network adapters on your computer at once:
Get-NetConnectionProfile | Set-NetConnectionProfile -NetworkCategory Private
Note
A public network also makes your computer or laptop invisible to other devices. This is an excellent mode for the security of your data. This is especially true for large public Wi-Fi networks: in the metro, restaurants, cafes or street networks in Moscow. So, if you connected to a public network, but the system somehow missed this point, it is worth checking and changing the location and type of network configuration. How to change - you already know.
Also, some people confuse a local wireless network and the Internet - these are different things. The local network profile does not affect the global Internet network in any way. And it’s worth protecting yourself from the dangers of the World Wide Web with the help of antivirus programs. At worst, you can install special network filters such as Yandex.DNS in the settings of your home router. These services help protect your family from harmful sites, adult content and dangerous fraudulent pages, and they are completely free.
What is the difference between public and private networks in Windows 10
Public Network is a profile for unfamiliar and potentially dangerous networks. It is designed for use in hotels, restaurants, etc. When the connection is marked as public, your computer is protected and cannot be detected by other devices on the local network. This makes it much more difficult for hackers to gain access to your computer and steal your information.
A private network is another type of profile designed for use in your home or office, which is well protected and where you trust all devices. On private networks, your computer can be discovered by other devices: desktops, laptops, phones, tablets, TVs, etc.
Changing the network type for Wi-Fi connection
Essentially, in order to change the network type from public to private or vice versa for a wireless Wi-Fi connection in Windows 10, you should follow the same steps as for an Ethernet connection, differing only in the action in step 2:
- Click the wireless connection icon in the notification area of the taskbar, and then click “Network and Internet settings.”
- In the options window, select “Wi-Fi” in the left panel, and then click the name of your active wireless connection.
- Depending on whether you want to change the network from public to private or private to public, turn the switch under Make this computer discoverable on or off.
The network connection settings will be changed and when you go back to the Network and Sharing Center, you will see that the active network is of the desired type.
Additional Information
In conclusion, some nuances for novice users. We often encounter the following situation: the user believes that “Private” or “Home Network” is more secure than “Public” or “Public” and for this very reason wants to change the network type. Those. assumes that public access means that someone else may have access to his computer.
In fact, the opposite is true: when you select “Public Network,” Windows 10 applies more secure settings, turning off computer detection and file and folder sharing.
By selecting “Public,” you are telling the system that this network is not controlled by you, and therefore may pose a threat. Conversely, when you select “Private”, it is assumed that this is your personal network in which only your devices work, and therefore network discovery, folder and file sharing is enabled (which, for example, makes it possible to play video from a computer on your TV , see DLNA server Windows 10).
At the same time, if your computer is connected to the network directly with a provider cable (i.e. not through a Wi-Fi router or another router of your own), I would recommend turning on “Public network”, since despite the fact that the network “located at home”, it is not home (you are connected to the provider’s equipment to which, at a minimum, your other neighbors are also connected and, depending on the provider’s router settings, they can theoretically gain access to your devices).
If necessary, you can disable network discovery and file and printer sharing for a private network: to do this, in the Network and Sharing Center, click “Change advanced sharing settings” on the left, and then set the necessary settings for the “Private” profile.
Changing the network type from public to private and back to Windows 10: let’s take a closer look
Many people who are just starting to master the computer are not familiar with the concept of “network type”. When they connect to any point on the internet, they don't know whether to choose public or private. What are the characteristics of these network types? Which one should I stop at? Are there any other types? How to change the type if necessary if you have Windows 10?
Changing a private network to a public network and back for a local Ethernet connection
If your computer or laptop is connected to the network by cable, to change the network location from “Private Network” to “Public Network” or vice versa, follow these steps:
- Click on the connection icon in the notification area (normal, left mouse button) and select “Network and Internet settings”.
- In the window that opens, in the left panel, click on the “Ethernet” item, and then click on the name of the active network (to change the network type, it must be active).
- In the next window with network connection settings, in the “Make this computer discoverable” section, set it to “Off” (if you want to enable the “Public Network” profile or “On” if you want to select “Private Network”).
How to change the network profile of a Wi-Fi network?
You can get to the settings faster. Click on the connection icon and select “Network and Internet settings.”
Next, go to the “Wi-Fi” tab and select the Wi-Fi network to which you are connected.
Change your network location.
After setup, the computer will either be available on the network or hidden.
Changing network settings
There is another option available for those whose device is connected using twisted pair cable. To use this method, you should right-click on the current connection, and then go to network settings .
In the next menu, you need to go to Ethernet tab , and then click on the name of the active connection. A window will then open with the option to make the device discoverable. To do this, you need to enable this option by moving the corresponding slider.