Windows 7 supports the vast majority of network cards. Moreover, most modern network equipment is designed specifically for Windows, with all the ensuing problems, because Windows is not famous for its stability. However, Microsoft quickly solves most of the problems that arise with network equipment, honor and praise to them, but those that inevitably arise will be discussed in detail in this article.
First of all: in order to expand the potential range of tasks that a client computer performs on the network, there is a need to change the basic parameters of the network card.
Here are examples of such tasks:
- setting up a Wi-Fi network when used in an area with a large number of wireless devices;
- installation of drivers not supported by the system;
- correction for system support by some providers.
How to set up a network adapter on Windows 7
How to reset all network driver settings?
If you want to completely roll back all settings to their original level, then do the following:
- Open Command Prompt (as administrator). To do this, open the “Start” menu, then go to “All Programs” and “Accessories”, right-click on “Command Prompt” and from the drop-down menu select run as administrator.
Open the “Start” menu, then “All Programs”, “Accessories”, right-click on “Command Prompt”, select “Run as administrator”
- Type the following commands into the Command Line one by one, pressing “Enter” after entering each one:
- netsh winsock reset;
- netsh int ip reset all;
- netsh winhttp reset proxy;
- ipconfig /flushdns.
In the “Command Line” field, enter the commands from the list one by one, pressing “Enter” after each
Complete reset of network driver settings
If your Internet has been interrupted or most of the Internet pages cannot be opened, then resetting all parameters and the TCP/IP stack can be an excellent solution to this problem.
- Open Command Prompt.
Open the “Start” menu, then “All Programs”, “Accessories”, right-click on “Command Prompt”, select “Run as administrator” - At the Command Prompt, type “netsh int ip reset,” then “Enter.”
In the “Command Prompt” enter the command “netsh int ip reset”, then press “Enter”
- Don't forget to reboot to save all settings.
The network adapter does not have valid IP settings
A common problem for Windows 7 users is when problems arise with Internet access and the network diagnostic tool displays a message that the network adapter does not have valid IP settings.
Problems accessing the Internet due to the network adapter not having valid IP settings
In this case, you can first try resetting the router. If you have a wired connection, then disable and then re-enable your network connection in the network connections menu. If this does not help, then you can move on to further steps.
Step 1. Update your IP address - this is the simplest method, although it does not always help in this case. To do this, open Command Prompt (as an administrator) and enter the following commands:
- ipconfig /release;
- ipconfig /renew.
Open the “Start” menu, then “All Programs”, “Accessories”, right-click on “Command Prompt”, select “Run as administrator”Enter the commands “ipconfig -release”, “ipconfig -renew” one by one, pressing “Enter” after each
Check again to see if the error is still displayed? If yes, then move on.
Step 2. You can try resetting the network settings, namely the IP protocols. It is recommended to reset the TCP/IP protocol stack to factory settings in the most extreme cases, when problems arise as a result of malware, etc. To do this, open a command prompt in administrator mode and enter:
- netsh int ip reset;
- nets int tcp reset;
- netsh winsock reset.
Enter the commands from the list one by one, pressing “Enter” after each one.
Next, the computer restarts, and after that, if everything is done correctly, the problem should disappear.
Settings
In network connections, right-click on the “Ethernet” icon and select “Properties”.
Other icon options: “Internet”, “Local Area Connection” or “Wireless Network Connection” if you want to configure a Wi-Fi adapter.
Click on "Internet Protocol Version 4 (TCP/IPv4)" or "IP Version 4 (TCP/IPv4)". There should be a check mark on it, if there is not, check it. Click Properties.
Click the radio button to “Use the following IP address” and the fields will become available for input. They can indicate the IP address, subnet mask, default gateway, preferred and alternative DNS server addresses.
Selecting parameters
Depending on the task, the addresses will be different, let's consider the most common option - go to the router.
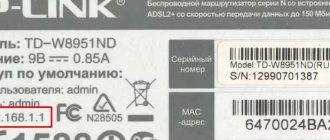
- The IP address depends on the router model, for example, if you have D-Link equipment, the router address is “192.168.0.1”. You need to replace the last digit with any one from the range from 2 to 254, for example - 5. You will get the address: “192.168.0.5”. If the router address is “192.168.1.1”, then the IP address will be “192.168.1.5”. The router address is often written on the back of the equipment; if you can’t find it, search the Internet for the following query: main gateway “model of your router.”
- The subnet mask is registered automatically after entering the IP address: “255.255.255.0”.
- The main gateway is the address of the router itself; common options are “192.168.0.1” and “192.168.1.1”.
Bottom side of the router
Example of parameters for D-Link and ZyXEL.
| D-Link | ZyXEL | |
| IP address | 192.168.0.5 | 192.168.1.5 |
| Subnet mask | 255.255.255.0 | 255.255.255.0 |
| Main gate | 192.168.0.1 | 192.168.1.1 |
If you have DNS server addresses, enter them; in other cases, you can use Google’s public DNS: the preferred DNS server is “8.8.8.8”, the alternative is “8.8.4.4”. Check the box “Confirm settings on exit”, final settings:
Click “OK”; if you can’t open the router interface right away, restart your computer.
Network card settings are lost
When setting up a network, users may encounter the following situation: when they manually enter an IP address, gateway, DNS, the specified parameters are not saved, but are reset to factory settings, and thus it becomes impossible to change the network settings from automatically receiving addresses from the router. One of the common reasons for this is the incorrect removal of an antivirus that has firewall functions.
Solving the problem when changing settings manually to automatic (factory) settings
What should be done:
- Reset the TCP/IP protocol stack to factory settings (the article above indicated how to do this).
- Reboot.
If this does not help, then do the following:
- Remove the adapter from Device Manager.
Right-click on the adapter and select “Delete”
- Install the latest drivers.
Right-click on the adapter and select “Update”
After doing this, the problem should be resolved.
Optimizing Ethernet Adapter Settings
If the ethernet network adapter does not have valid parameters, you need to make certain settings to optimize its performance.
Basic recommendations:
- Updating your network drivers is the most effective way to ensure maximum transmission. In this case, indicate the adapter manufacturer and model number. When downloading the latest version, install it in accordance with the manufacturer's instructions.
- Set Windows to prevent the adapter from being turned off through the power management setting. To do this, you need to open the Device Manager, click the “Start” button and then “Control Panel”, “System and Maintenance”, and then “Device Manager”. Expand Network Adapters, click on Ethernet and select “Properties”.
- Consumer Ethernet switches that support Green or Energy Efficient Ethernet (EEE) will automatically configure their corresponding power saving settings. But in this case, there are failures, which leads to poor network throughput and dropped packets. If the switch and adapter support EEE, then it is better to disable it to eliminate data reset.
There are many tweaks available for PC that improve system performance. To do this, open Device Manager, adapter and select “Properties”. On the “Advanced” tab, find options and make the necessary changes.
What to do if there are problems with the network card?
Many plug-in AC adapters, due to their vulnerability to electricity, may temporarily fail during periods of severe thunderstorms or building power outages. In most cases, difficulties arise in situations with wired equipment, since multi-story buildings have long cable runs laid by Internet providers in places that are not intended for this purpose, next to telephone and television cables and high voltage wires. High humidity, dampness and low temperature in this area - all this has an extremely negative effect on the insulation of wires, so breakdowns appear in them .
Reasons why problems arise with the network card
Sometimes also, in more rare cases, breakdowns occur due to emergency situations such as a major thunderstorm. Network adapters quite often burn out, or users begin to experience difficulties logging into the network. In this case, the equipment will function, but there may be no Internet connection during such periods.
Unfortunately, this problem can only be solved by purchasing another network adapter model. For a desktop computer, the PCI standard complies; for a laptop, USB and PCMCIA.
Desktop computer complies with PCI network card standard
It is also not recommended to plug in a network cable into the router and then connect a computer to it, because even if the router breaks down, replacing it will be relatively inexpensive compared to replacing the network card built into the computer (or even the entire motherboard).
Windows 7 does not see the network adapter
If physical damage occurs to integrated network equipment, it is better to replace it with new one
When integrated network equipment is not shown either in the “Network Connections” window or in the “Device Manager”, and is not even reflected in the “Unknown Devices” section (which would be explained by the lack of drivers), then most likely there is something wrong with it physically. It is quite possible that some transistors on the network card board have burned out, or a chip has fallen off - in this case, it is more advisable to buy a new card.
How to turn on the adapter?
Sometimes a network card is connected, but the system does not see it because it has been deactivated. To run it through the BIOS, follow these steps:
- Select the reboot mode and go to the BIOS - to do this, click on the F12, F1 or Esc key. The key you choose depends on your individual PC configuration, so you may have to try several options. In addition, upon startup, an inscription always appears indicating which combination you need to press to go to the settings - focus on it.
- In the settings that open, select the section containing the word “Integrated”, where there will be the line “On Board” or something close and similar to it - this is the network card.
- If you see that the value “Disabled” is applied opposite the specified line, the adapter is truly disabled. Change the status to “Enable”.
- Before you exit Settings, use the Save and Exit keyboard shortcut to make the settings take effect.
The computer will reboot again, after which the adapter will join the system.
Activation directly through Windows is performed as follows:
- Go to “Settings”, stop at the “System” section.
- Select the “Hardware” menu and find the network adapter in the drop-down lines - if it is disabled, a red cross will appear next to the name.
- To run a part, double-click on its name, check the “Hardware in use” checkbox, and click “OK” for the settings to take effect in Windows.
If there is a yellow exclamation mark next to the name, this means that the card is activated, but you need to change the drivers for it to work correctly.