What does the message “Failed to load steamui.dll” mean?
Translated from Shakespeare's language, the text of this error is translated as “Could not load steamui.dll,” usually indicating a situation in which the Steam client did not detect (or detected a damaged) steamui.dll file, and accordingly, could not load it.
The error I am considering is only one of a number of similar errors that are accompanied by messages like “Steamui.dll Not Found”, “Failed to load steamui.dll” and others similar to them.
Similar error “Steamui.dll was not found”
General settings
Method No. 1 to resolve the Failed to load SteamUI.dll error.
Windows 10's built-in security tools correctly detect the Steam app. The firewall and antivirus program automatically grant it the permissions it needs to access hardware resources. If you use third-party security solutions, you should ensure that they do not also interfere with the Steam online client. The program folder can be added to the antivirus exclusion list. The executable files located in it (steam.exe, hl.exe, hl2.exe, steaminstall.exe, steamTmp.exe) must have permission to establish a network connection on all TCP and UDP ports.
Causes of the error “Failed to load steamui.dll”
Among the reasons causing this error, I would highlight the following:
- The file steamui.dll was accidentally deleted by a user;
- The steamui.dll file was damaged due to various reasons (malignant activity of malware, hard drive crash, etc.);
- The system registry is damaged;
- Steam client update failed;
- PC hardware problems.
Solving the steamui.dll error
How to fix steamui.dll file problem
Valve monitors game licenses very closely. When Steam is disabled they will not load. There have been cases where the error “Failed to load steamui.dll” after the next official update . Therefore, rolling back the Windows system for a couple of days sometimes helps solve the difficulties that have arisen.
System Restore
Many people know how to roll back the operating system a couple of days ago. For those who are not in the know, we will describe it in detail.
- Go to the lower left Start . Open under the item “Control Panel” .
- Among dozens of other operations, find “Recovery”.
- Select the only option “Run System Restore” .
- Follow the simple instructions and select the return date you need. Click “Done” at the end. The computer will restart.
This method mainly helps with problems after updating the Steam client - therefore, rolling back largely solves the problem of a broken file
Replacing the steamui.dll file
This is the most proven method of all. First, you need to find a reliable site where you will be confident in the software. to download the file steamui.dll from it . Be sure to check the downloaded file for Trojans and viruses. Make sure its name is correct.
- Find your Steam root folder Open it and copy the steamui.dll file there. At the same time, you will receive a message about replacing the object being moved, you agree.
- Restart computer . Go back to the folder and from there, as administrator, launch the Steam shortcut.
Be sure to run as administrator
Updating files
Some people also recommend the following method:
- go to the Steam root directory and open the Package ;
- remove everything from it and launch the Steam icon on the desktop again;
- The updates will begin downloading, and after they are finished everything should work.
Let's try through safe mode
This is a bit of a long option, but there’s nothing complicated about it anyway.
- Let's start the whole process by going to the official Steam website. Download its installation file to your computer.
- Now the one that is already on the PC needs to be completely removed. To do this, it is better to use the CCleaner .
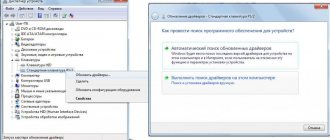
- We call the “Run” menu we need using the Win keys (the one with the flag logo) and R. The opportunity to enter a command will open, enter msconfig .
- Skip “General” and open “Download”.
- In the first bottom column, put a dot opposite “Safe Mode” , and in it select “Network”. We apply.
Starting Safe Mode
How to fix “Failed to load steamui.dll”
To correct the dysfunction I am considering, I recommend performing the following series of actions:
- Just restart your computer. The most banal method has helped more than one user;
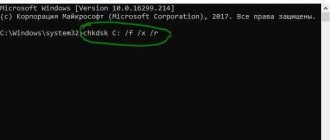
- Delete the steamui.dll or libswscale-3.dll files yourself. Typically these files are located in the C:\Program Files (x86)\Steam\ directory. After deleting them, launch Steam, this will force the client to update its structure and replace the files you deleted with fresh versions;
Steamui.dll file in the Steam directory
- Delete the beta folder. If the previous method did not work, or you are using a beta version of Steam, delete the beta folder at C:\Program Files(x86)\Steam\package\beta folder;
- Delete a number of Steam files. Go to the "Steam" folder and delete all files there except Steamapps, userdata, and steam.exe. Then run your client and wait for the update process to finish, this will help get rid of “Failed to load steamui.dll” on your machine;
- Reset Steam settings using the flushconfig command. Press the Win+R key combination, in the window that appears, type steam://flushconfig and click OK. Then restart your PC and launch the client again;
Run the command steam://flushconfig
- Clear Steam download cache.
Go to the Steam client settings, then to the “Downloads” tab and click on the “Clear download cache” button there. Then re-login to your Steam account; Click on the "Clear download cache" button - Reinstall your Steam. Remove it completely, clean the system using CCleaner.
Then press the Win+R keys, enter %temp% there, and delete the contents of this directory.
Then press Win+R again, type regedit there, and press enter. Follow the branches:
- HKEY_LOCAL_MACHINE\SOFTWARE\Valve\
- HKEY_CURRENT_USER\Software\Valve\Steam\
Hover over the “Steam” subdirectory in each branch, right-click, and select “Delete.” Restart your PC and install the client again.
Possible solutions to the problem
- The first step is to reinstall Steam. First, try simply reinstalling the program. If it doesn’t help, then completely remove Steam: in addition to the usual removal using the control panel, do not forget to delete all folders that are in one way or another associated with the application (Valve, Steam) and be sure to clear the registry of outdated keys (you can use the CCleaner utility). Only after this do we go to the official Steam website, download the application there and install it. In many cases this method helps.
- The second option was suggested by the users themselves. Go to the Steam folder and delete all files except steam.exe, userdata and Steamapps, then launch the application. Most likely, the client update will begin, wait until the procedure is completed.
- Third way. This is what you need to do: press the WIN+R key combination, after which the “Run” window will appear. Enter the following phrase into it: steam://flushconfig
and press the Enter key or the OK button in the window. If you need permission to run the program, click OK or Allow. Now restart your computer. After the reboot, do not rush to launch the client from the desktop. Go to the Steam folder (C:Program FilesSteam or C:Program Files (x86)Steam) and from there launch the client using the Steam.exe shortcut.
- Another simple option: go to the Steam folder and delete the Cached folder.
- Alternatively, you can try deleting the beta file from the Steam/package/ directory.
- When starting the Steam client, disable your antivirus and firewall and allow it to fully update. If the client launches successfully, re-enable the firewall and antivirus.
- The method is a little more complicated. Take the Steam shortcut on your desktop or create a new one. Then right-click on it and select “Properties”. In the “Shortcut” tab, in the “Properties” field, add -clientbeta client_candidate
. It should look something like this: “C:Program FilesSteamSteam.exe” -clientbeta client_candidate. After that, click OK and try to log into Steam.
Please note that with some updates, Steam may indeed not start, and with the next update the bug may be resolved.
If you have your own solution on this issue, you can share it with us through the comments.
Additional actions
- Check your computer for malware. Dr.Web CureIt!, Malwarebytes Anti-Malware, Trojan Remover and a number of other analogues will help;
- Delete the Cached folder. Go to the Steam folder, delete the specified directory there, this may help resolve the “Failed to load steamui.dll” error on your PC;
- Disable your antivirus and firewall when starting Steam;
- Change the properties of the Steam shortcut on your desktop.
Hover your cursor over the specified shortcut, right-click, and select “Properties.” Go to the “Shortcut” tab, and in the “Object” field, add the line “-clientbeta client_candidate” (without quotes) to the existing value on the right. The view should be like this: Change the properties of the Steam shortcut - Reinstall Steam in safe mode with administrator rights.
- Use System Restore to roll back to a stable point. If your Steam previously worked correctly, try rolling back the system to this restore point. To do this, click on the “Start” button, enter rstrui in the search bar, and press enter. Find a stable restore point and roll back your PC to it.
Reinstalling the client
Method No. 2 to resolve the Failed to load SteamUI.dll error.
After making sure that nothing is interfering with Steam, we reinstall the client.
For Windows, it can be downloaded from the Valve server as follows. At the path selection stage, use the “Browse” button to indicate the folder in which the application has already been installed. If you used the default settings, immediately click “Install”.
If the antivirus you are using blocks the installer at the initial stage, the operation can be performed in safe mode. Call the “Run” dialog box using the keyboard shortcut “Win + R”. Type “msconfig” in the text field. Press the "OK" button or the Enter key to run the command.
In the configurator window that opens, switch to the “Download” tab. Check the boxes in the places indicated by the arrows. Apply the changes made and click “OK”. As a result of this operation, the computer will boot into safe mode with support for network drivers. After reinstalling the client, call the configuration utility again. We uncheck the previously installed checkboxes to return the operating system to the ability to start in normal mode.
Once launched, the reinstalled program will connect to Valve's servers and download updates. As a result of the actions taken, the problematic dynamic library is replaced with a new version, and the error “Failed to load SteamUI.dll” no longer appears.