Content:
- Causes and their solutions.
- Recovering the disk boot record (MBR).
- Fix "BOOTMGR is Missing" error.
- Data recovery
The Windows operating system has a system for notifying the user of operational failures using error messages displayed when various problems occur. Using the error text, the user can significantly narrow the search for problems and quickly fix a faulty program or an incorrectly functioning component.
Below we will describe the causes and methods of solving “A disk read error occurred” or “BOOTMGR is Missing” that arise due to problems with the hard drive , BIOS , system damage by virus software, as well as other problems.
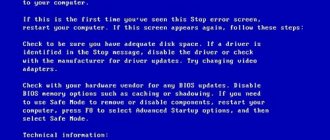
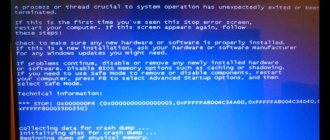
Error A disk read error occurred Press Ctrl+Alt+Del to restart… What should I do?
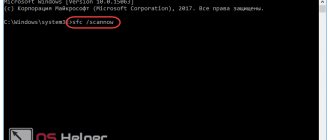
Run disk check from the command line
- The first thing to do is to reboot your computer or laptop several times quickly to trigger diagnostics.
- Turn off and on the computer 3-4 times using the button on the system unit when the boot fails.
- Create a recovery disk or Windows installation disk on another PC, if available. This will help you go 100 percent into additional system settings.
Once you are in Settings, launch Command Prompt and enter the following command:
chkdsk C: /f /x /r
C is the local drive where the windows system is located. A diagnostic will run, which will identify and automatically correct errors on your hard drive. If the tool could not cope with its job or it did not produce any errors, and the error “ A disk read error occurred ” still appears, then we move on.
Reasons and their solution
The error “A disk read error occurred” translated into Russian means “Disk read error” . From this we can conclude that the cause of the error was one of the connected media. This can be either a flash drive or floppy drive, or the main hard drive.
To correct this problem and clearly determine the cause of the problem, follow these steps:
- Disable all flash drives and other external storage devices .
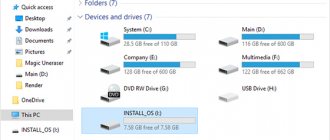
- Check that the system starts only with the HDD connected .
- Check that the connectors in the system unit are connected correctly (dust and dangling unconnected wires can cause system malfunctions).
- See if the system sees the HDD in the BIOS .
- Connect the failed HDD to another computer (this is necessary to make sure that the motherboard, power supply and other components that affect startup are working correctly).
- Defragment the failed disk on another computer.
Restoring the boot partition
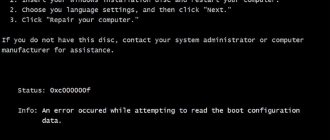
To solve the problem of a disk read error occurred Windows 7, you need an appropriate installation disk with the OS, the same for other versions. The procedure should help the system analyze the HDD for errors and, if they exist, try to fix them.
1.Now insert the disk or flash drive and run it;
2.Click on the “System Restore” link;
3.Next go to the “Diagnostics” section;
4.Now “Advanced options”;
5.Then select “Command Line”;
6.First we need to launch Notepad, thanks to which we can find out the distribution of letters for logical drives. For this:
- Type notepad.exe and press enter;
- Click on the “File” tab and select the “Open” option;
- In “My Computer,” it is important to remember or write down the letters for the “System Reserved” partitions that contain Windows files and the boot sector.
7.To restore Windows files, you need to enter the command bcdboot C:/Windows, where C is the letter of the corresponding partition;
8.To check the reserved area, enter one by one chkdsk D: /r and chkdsk D: /f, where D is the letter of your partition and it may differ.
9.Then follow step 8 for the partition that contains Windows.
10.If the check was successful, you should restore the MBR entries using the following commands bootrec.exe /fixmbr and bootrec.exe /fixboot;
11.At the end, you need to search for the OS and include them in the boot list using bootrec.exe /rebuildBcd.
Disk Boot Record (MBR) Recovery
To fix hard drive errors, you should restore the master boot record (MBR) :
Step 1. Boot from a bootable USB flash drive or Windows installation disk and click the “Next” .
Step 2. On the system language selection screen, open “System Restore” .
Step 3. In the system recovery window, select “Troubleshooting” .
Step 4. Go to “Advanced options” and open “Command Prompt” .
Step 5. In the command line window that opens, enter two commands:
bootrec /fixmbr – to overwrite the boot record
bootrec /fixboot – to rewrite the boot sector
After repairing the boot record, the computer should start without errors.
Solving the disk read error problem
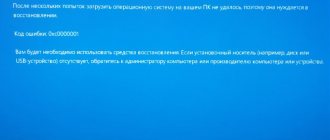
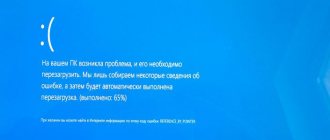
When you turn on the PC, the following message appears on the screen: “A disk read error occurred. Press ctrl+alt+del to restart." This entry says that the computer is trying to get data from the disk (read), it fails and it asks the user to press a key combination to reboot.
First of all, the user, seeing this “joy,” thinks that his hard drive is faulty, especially if it is more than 3 years old. This conclusion is very rarely true .
Let's figure out how to fix this error
First you need to do the simplest steps :
- Reset the BIOS settings to the default settings (by directly going into the BIOS itself when turning on the laptop, pressing the F2 key, find the Load Setup Defaults category, mark it and press Enter, in the window that opens, press OK (YES), then press F10 and confirm the action; or remove the BIOS battery from the motherboard for 10-15 minutes, after the time has elapsed, put it back in its original position);
- Pull out the Sata cable and insert it back (do this several times), check the state of the contacts (possibly clean them) and do the same with the power cable, because Users' computers most often stand on the floor (dust, moisture), all these conditions help the oxidation process progress, thereby losing contacts.
Did these steps not help? Then we move on to the following points , where the user is required to have basic PC skills.
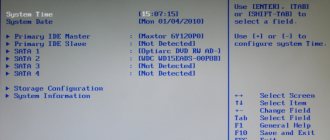
Point 1. Check whether the BIOS sees the hard drive
We go into the BIOS through the F2 or delete button, find the line called boot, open it and look at what is in the 1st place to load the hard disk.
If there is a hdd with the OS that we are trying to run, then we leave everything unchanged, but if not, use the arrows to move the desired disk to first place . We exit saving the f12 settings and agree to the changes made.
Point 2. Activate the section
If you have media with Acronis DD version 11 on hand, boot and look at the System Reserved section (SR OS Reserved, can weigh up to 350 MB). If it is not active, you need to enable it, right-click on it and click on “Mark active”, apply the operation.
If you have bootable media with Windows, boot, click “next” - “recover.” systems" - "diagnostics" - "add. settings" - "commands. line".
We enter one by one without quotes, after each entry press Enter: “list disk” all hdds, “sel disk 0” select the hard drive, “list partition” show all partitions on the hdd, “sel part 1” select the SR partition (350 MB), “active” activate the activity, “exit”.
Point 3. Correcting MBR from removable media with OS
To do this, you will need a previously recorded removable media for installing the OS (flash drive or disk), connect it to the PC. On the OS installation screen, click the “next” button, select “system recovery”, we are interested in the “troubleshooting” “add. options" "command line".
You need to write in it without quotes: “bootrec /fixmbr” command means to overwrite the MBR and press Enter, when a record of the completion of a successful operation appears on the screen, enter “bootrec /fixboot” meaning to write a new boot sector, press enter and also wait for completion. Now we can safely restart the PC.
Point 4. Checking for errors
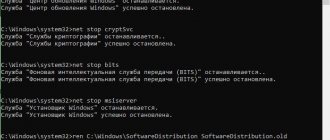
Using the built-in Chkdsk utility, system files are checked for errors. To do this, we connect a bootable USB flash drive with the OS to the PC, open the command line as described in steps 2 or 3 and enter notepad to find out what letter our local disk with the OS is called (the letters may differ from what the user sees when the OS is loaded).
In notepad, click “File” and open it, specify all file types, click on “Computer”, find out the drive letter in which the OS and system files are located. We return to the command line, enter “chkdsk E:/f”, where E is the drive letter of the OS, and also check “chkdsk P:/f”, where P is the disk with the reserved system.
Point 5. How to “force” the bootloader to find Windows
We boot from the media on which the Acronis DD program is present, select the disk, for example, :/E, from which we want to separate free space and click “change volume”. In the window that appears, indicate the “volume size” that should remain on the E drive partition, and also indicate the “unallocated space after the volume”, click “OK”.
In the line with the checkbox, click on “Apply operations”, in the “Continue” window that opens. We wait until the download is finished and next to drive E, “create volume” appears, click it, the basic category is marked, click “next”. In the Create Volume Wizard, it is advisable to select the “Primary” type in NTFS format and complete. Further actions “Apply operations” “Continue”. Reboot the PC.
We boot from the media, go through the beginning of the installation and load the OS onto the newly created disk partition. This is done in order to update the MBR, overwrite and restore all previously lost OS files.
So, the above methods should definitely help if the disk is working properly. I hope now you are convinced that you can always find an alternative to reinstalling the OS with programs already installed and configured. And only if none of the methods helped, then there is nothing left to do but replace the old hdd with a new one.
Data recovery
Incorrect operation , frequent errors and other problems with components responsible for storing data can cause data loss . Losing important files and documents is an annoying nuisance that should be corrected immediately . To effectively solve this problem, it is recommended to use a specialized data recovery program, RS Partition Recovery, which can quickly return all deleted or formatted photos, documents, media files and any other important information. RS Partition Recovery has advanced functionality that allows you to perform multi-level disk scanning, identifying all files deleted even a long time ago. With RS Partition Recovery, you don't have to worry about the safety of files on your computer.