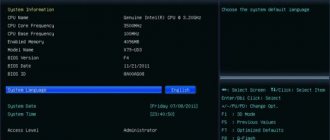
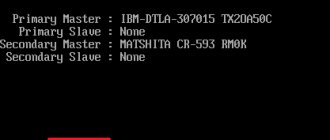
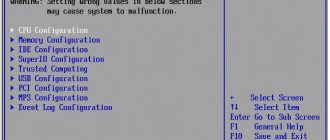
BIOS was created in 1975, its acronym stands for Basic Input Output System, and its main function is to launch the operating system and PC hardware components. It also loads power and thermal management features. The firmware identifies, tests, and starts major system components such as the hard drive, video card, and keyboard.
Most modern computers store the BIOS on a ROM chip on the motherboard. If it has failed, then determining the motherboard model will usually help restore the BIOS. Restarting the firmware will depend on this.
Motherboard BIOS
Restoring the BIOS is a simple process that anyone can do on their PC if there is a serious problem with it and they need to return the settings to the factory state. Before restoring the BIOS, the motherboard is reset, a process called Clear CMOS. It provides for the following actions:
- clearing parameters stored in the BIOS ROM;
- returning the PC to the neutral state from which it starts;
- eliminating crashes when starting the PC for the first time after assembly or after updating the BIOS.
The main reasons for performing firmware recovery:
- The motherboard does not start after configuring BIOS-specific settings.
- One of the most common reasons is manually setting the RAM on the motherboard. If a parameter is entered incorrectly from the many settings that the RAM has, the board will crash and the PC will not start.
- Another of the most common reasons is overclocking. If the user increases the frequency, while the Vcore for the processor is insufficient, it is very likely that the motherboard will not boot.
In order to reboot, you need a key typed on the keyboard. It differs for different computer models and is usually indicated on the screen when the PC starts, for a short period of time. Before you restore a BIOS that has crashed, you need to know the key keys.
They can be: F1, F2, F10, F11, F12, Esc or some other combination like “Control + Alt + Escape”. If the user does not know the recovery key and does not see the indication on the screen, then a request for the phrase “computer brand + enter BIOS” should prompt a solution. The same answer is in the PC manual. After typing the correct keys, the user will see the BIOS setup screen.
How BIOS damage manifests itself
In most cases, the BIOS firmware is partially damaged, so the symptoms of the failure may vary:
- When you press the PC power button, only the cooler is turned on, which immediately begins to rotate at maximum speed. Sometimes the LED indicators on the case and keyboard light up.
- One or several seconds after switching on, a cyclic reboot begins. Outwardly, this is manifested by a cycle of spinning up and stopping the cooler, which is repeated as long as power is supplied.
- When turned on, the power indicator lights up, the cooler does not spin.
- The computer shows no signs of life. This happens when the boot block, the BIOS bootloader, is damaged. This is the most difficult case.
There is no image on the screen. Even the manufacturer's screensaver does not appear.
There are also other forms of damage to the BIOS, more precisely, to its area that stores the configuration of the ME controller (an integral part of the chipset) on boards that work with Intel processors - the so-called ME region. If there is a problem in this area, the computer or laptop may:
- It won't load correctly or won't turn on at all.
- Shut down or restart at regular intervals.
- It is incorrect to regulate the rotation speed of the cooler, for example, turning it at high speeds regardless of the load.
The solution to such failures is to read the BIOS dump, replace the ME region with a clean one, and re-flash the firmware using the programmer. Since this is usually done by repairmen, and not by computer owners, we will not dwell on this. It’s better to do what can be done at home without special equipment and the risk of finally sending your “iron pet” to the kingdom of eternity.
Restoring the BIOS without a programmer is only possible if you save the boot loader. It is sometimes possible to determine whether it has been preserved or not by indirect signs: blinking of the screen backlight, sound signals from the system speaker, the reaction of the motherboard to turning on without RAM (with sound or blinking indicators), etc. If the BIOS bootloader is intact, the first moments of operation computers run fine, the failure appears a little later.
Performing Clear CMOS
If the BIOS has crashed and the user does not know how to restore it on the PC, experts recommend running Clear CMOS. To do this, the first thing you need to find on the surface of the motherboard is three grouped contacts, near which are the phrases Clear CMOS or CLR_CMOS. It will be easier for the user to find the mode if he first reads the motherboard manual. There will be a jumper on these pins that makes the contact between them. It should also be noted that there are those that have only two contacts, without any jumper.
The algorithm for executing the mode is as follows:
- Turn off the computer.
- Find the battery on the motherboard. This is a round battery, similar to an element from an electronic watch, located on the surface of the board.
- Carefully remove it from the outlet where it is located.
- Before restoring a BIOS that has crashed, change the position of the jumper that closes the circuit between two contacts. If contacts 1 and 2 are initially closed, then set the position so that contacts 2 and 3 are closed.
- Find a conductive metal surface and manually complete the circuit between the two contacts. A flat head screwdriver is an excellent choice for this purpose.
- After completing this step, leave the circuit closed for at least 30 seconds.
- After this time, perform the same actions, but in reverse order.
- If everything went correctly, the system will start with the default BIOS settings.
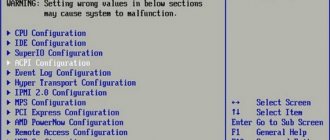
What causes the BIOS firmware to crash?
B IOS and its “descendant” UEFI, which modern motherboards are flashed with, are special computer programs necessary for the initial setup and management of PC devices until the operating system starts.
They are stored in special flash memory chips on the motherboard, one of which is shown in the picture above. It seems to be a good storage location, reliable, but sometimes the BIOS gets uncomfortable there and runs away. More precisely, it becomes damaged and ceases to perform its tasks. There are not too many reasons for BIOS damage; in some cases they are obvious, in others they are not. Here is a list of the most common:
- During this time, the computer's power supply was cut off.
- The flasher program does not interact correctly with the firmware or flash memory chip.
- A BIOS version has been flashed that is not suitable for this motherboard. Yes, .
- If the update is carried out from a running operating system, there may be a system failure or software interference, for example, blocking by an antivirus.
- Incorrect user actions, for example, restarting the computer before the update installation is complete.
- Failure of the flash memory chip.
- Hidden BIOS firmware errors. Sometimes this explains spontaneous “gatherings” that occur for no apparent reason.
- Electrical problems with the motherboard.
Restoring BIOS on a laptop
If the BIOS on a PC has crashed, but the user does not know how to restore it and cannot guarantee the safety of the machine, then it is better to perform a complete reset of the firmware on the laptop.
The algorithm of operations is as follows:
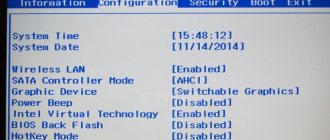
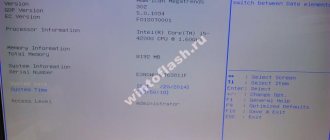
- Turn on the computer and study the BIOS splash screen, which will appear at the very beginning and tell you which function key (F2/F8) you need to press to access the configuration.
- Press and hold this key until the setup screen appears.
- If you miss the opportunity to press in a timely manner, the PC will continue to boot from Win as usual, and a reboot will be required to repeat the steps.
- After successfully entering the BIOS setup screen, use the function and scroll keys to navigate through the menus.
- Find the option “reset to factory settings”.
- If Windows has crashed, restoring the BIOS will usually help by following the instructions on the screen to switch to the original configuration.
- Confirm your choice and close the screen.
- Because the BIOS is in ROM, it must have a constant power supply to store all the changes that are made to it every time the computer is unplugged from AC power.
- If it is not possible to return to factory settings, turn off the power from the BIOS, it returns to its original configuration. The process consists of disconnecting the motherboard's small battery. In many laptops, the BIOS battery is easily accessible and located at the bottom of the device.
- No matter how the BIOS on the computer crashed, updating the SMOS of the motherboard will help restore it correctly. To do this, you will need to remove the battery and touch a metal object to ground it.
- Next, remove all the screws that hold the battery cover in place.
- They find the BIOS battery in the form of a small lithium structure, similar to a watch battery, and remove it, being careful not to damage the adjacent circuits. Wait for a minute for it to discharge and insert it into place. Then repeat the startup procedure from the beginning.
How to rollback BIOS
Before starting our review of rollback methods, we consider it necessary to mention that not all motherboards support this feature, especially from the budget segment. Therefore, we recommend that users carefully study the documentation and features of their boards before starting any manipulations with it.
Roughly speaking, there are only two methods for rolling back BIOS firmware: software and hardware. The latter is universal, as it is suitable for almost all existing motherboards. Software methods sometimes differ for boards from different vendors (sometimes even within the same model range), so it makes sense to consider them separately for each manufacturer.
Note! You perform all the actions described below at your own peril and risk, we are not responsible for violations of the warranty or any problems that arise during or after performing the described procedures!
Option 1: ASUS
Motherboards manufactured by ASUS have a built-in USB Flashback function, which allows you to roll back to the previous BIOS version. We will take advantage of this opportunity.
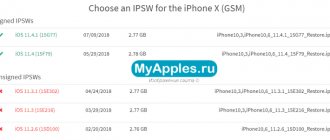
- Download the firmware file to your computer with the required firmware version specifically for your motherboard model.
While the file is downloading, prepare your USB flash drive. It is advisable to take no more than 4 GB of storage capacity and format it into the FAT32 file system.
Rebooting your Windows 10 PC
The main problem when updating the BIOS on Windows 10 can occur when trying to reboot. Sometimes the user is unable to open the BIOS no matter how many times the key is pressed. This is because Windows does not restart your PC by default.
If Windows 10 has crashed, how to restore the BIOS using key keys will tell you the following algorithm:
- In order to be able to enter the BIOS, the first thing you need to do is start booting your PC.
- To turn off the computer, press "Alt + F4" on the desktop or use the "Start" menu. It must be kept in mind that if the laptop uses “quick startup” technology, it is quite possible that the normal BIOS shutdown will not begin. There are a number of preliminary steps that need to be completed.
- First, click on the Start menu and then select Settings.
- In the Windows configuration, move to the last section called “Update and Security”, where similar recovery and troubleshooting configurations are located.
- Click on the "Recovery" tab in the left panel, and then the "Restart now" button in the "Advanced startup" section.
- A menu with a blue background will appear, which is used to solve problems with Windows, and one of the options is to enter the BIOS.
If Windows 10 has crashed, how to restore the operating system through the BIOS, users will be prompted by special tabs “Solve problems” and “Advanced options”.
How to roll back the BIOS using the software method
- Alternatively, you can change the date, which may help with virus infections.
- There are many key combinations to enter the BIOS: F1-F11, Fn+F1, Fn+Delete (Del) and others, depending on your device. The above are the main ones.
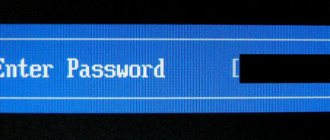
- You may have to enter a password, then you need to go to the date change menu and change it in any direction. Exit and save.
- Then, through the system, use the utility to restore it to its original state: “Start” -> “standard utilities” -> system recovery utility.
- Select a suitable date.
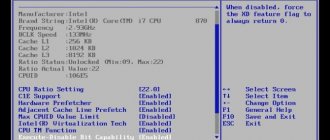
If you need to restore the original BIOS settings, then you need to go into it and set the factory settings. The F9 key will set the default settings. If the Hotkey doesn't work, then look for something similar to Load defaults. If there is no information about the password, open the system unit and find a small battery, you need to remove it for 10-15 seconds - this will reset all settings.
Next we proceed like this:
- create bootable media, place the flasher for the BIOS and the BIOS itself there;
- reboot from the media (F9 – select this media);
- then flash the motherboard via DOS.
How to roll back the BIOS to the previous version on devices where access to the BIOS is disabled?
- Through the start menu or through “Run” (Win + R) enter the command: debug.
- Then write the following:
- for AMI BIOS: O 70 FF, then “Enter” and write: O 71 FF, press Enter again and end everything with the Q symbol. There is another option: rename the file downloaded from the site to amiboot.rom, move it to the root of the floppy disk. Insert the floppy disk into the drive of the computer that is turned off. Press left Ctrl+Home and turn it on.
- WITH AWARD BIOS: O 70 17, O 73 17 and again Q. Additional option: place the firmware and BIOS files on a floppy disk (usually in one archive). Create a text document where the BIOS file name is specified with .bin resolution. Rename the document to autoexec.bat. And we continue as indicated above.
However, many manufacturers have other methods that make it easier to operate the BIOS.
Gigabyte motherboards
Gigabyte motherboards include functionality called "dual BIOS" which allows if a Gigabyte BIOS update fails or loses power during the process, the defective one can be restored for backup. It doesn’t matter how the BIOS crashed, it will only be possible to restore operation on the Gigabyte dual using an update.
Updating the BIOS gigabyte from Windows can be done in two ways:
- pre-loading the BIOS from the motherboard;
- update the BIOS from the Gigabyte server so that the program looks for the latest version.
If this needs to be done using a previous BIOS download, for example, when there is no Internet on the PC, download the above-mentioned program and the BIOS version that is needed. The latter is recommended to ensure the hardware operates at the highest possible performance and stability.
You can make a backup copy of what you currently have by clicking the “Save current BIOS to file” tab and specifying the route to save the file. Once the user has everything he needs, he proceeds to update by clicking on the “Update BIOS from a file” tab, the program will ask you to search for the previously downloaded file.
Q-FLASH app
You can update from the GB's own BIOS, with an application called Q-FLASH built into it. Before starting, format the usb to fat32 and unpack the BIOS inside. Insert into the USB port before entering the PC. The utility offers 3 options: the first, which is “Update BIOS from disk”, the second is “Save BIOS to disk”, and the third is “Exit Q-” to exit the application.
After the BIOS has crashed, using a special utility will help you restore the functionality of the operating system step by step.
The algorithm of actions looks like this:
- Select usb that contains the bios file.
- Select the BIOS version to enter and begin the update process.
- They check the new file inside the usb.
- The assistant asks if you need to update the BIOS to the version that is in the usb, they confirm “yes”, and the process begins.
- Make sure the process is completed correctly.
- Reboot, enter the BIOS and check that the version has been changed.
This process allows you to update your GB BIOS to a higher or lower version. In addition, with Gigabyte's dual Bios system, you can be calm in the face of possible failures, since the system is launched with its backup copy.
Recovery without logging into Windows 7
You can restore the system without going into Windows 7. It often happens that after Windows 7 has crashed, restoring the system through the BIOS is the only way to restore the PC’s functionality. The procedure will depend on the specific hardware installed on the machine. If the device has a CD/DVD player, remove all discs from it. Then turn off the computer and external USB drives.
Recovery algorithm:
- Turn on the PC and quickly press the F8 key on the keyboard. The Win logo should not be displayed. It is best to press F8 several times in a row when the PC starts.
- When the process goes well, a screen appears with a black background and white letters. Enable advanced OS boot options by using the arrow keys to select the one that sets Safe Mode with the command prompt, and press Enter on the keyboard to enter it.
- After downloading a series of files, an MS-Dos console window opens with a black background and white letters. Enter the command: rstrui.exe and press Enter on the keyboard.
- The Recovery Assistant starts and the user must follow all of its instructions.
Reset Lenovo settings
Surftec reinstalls all Lenovo systems to the standard version of Windows 7 Professional, while new systems are typically installed with Windows 8 or 10.
Windows 8 supports a newer, faster BIOS called UEFI, which provides additional security. To run Windows 7, this mode must be disabled. In a situation where the BIOS on a Lenovo laptop has crashed, identifying the causes of the emergency will help restore its functionality.
If the user reset the BIOS and the default features were enabled, then Windows 7 most likely will not be able to start automatically. There may be other problems with the system, such as broken wireless connectivity or old hardware drivers, which will also prevent the normal recovery process.
In cases where the firmware has crashed, recommendations on how to restore the BIOS involve performing the following steps:
- Close the windows and make sure that the laptop is completely turned off; to do this, go to the “Start” menu and select “Shut down.”
- Press the power button and then the F1 key every two seconds until the BIOS welcome screen appears.
- The BIOS is navigated using the arrow keys on your keyboard. The left and right keys move between the top BIOS headings "Main", "Config", "Date/Time", "Security", "Startup" and "Restart".
- The up and down arrows allow you to navigate through the available options on each page.
- The Enter or Return key will open an option with additional settings, then use the Up and Down arrows to highlight the desired option and the Return and Enter key.
- Use the right arrow key on the keyboard to select the "Reboot" screen.
- Use the down arrow key to select the OS Optimized Defaults option.
- Press the return or enter key, a pop-up window will appear.
- Use the up and down arrow keys to select Disabled. The selected option is shown in bold and white text.
- Use the up arrow once to select "Load Setup Defaults" and press the "Return" or "Enter" key.
- Make sure "Yes" is selected using the left and right arrow keys and then press the Enter key. The selected option is highlighted with a black background.
- Press the F10 key and use the left and right arrow keys to select “Yes.”
- Press the return or enter key to select "Yes", the machine will now save the new settings and reboot.
AMI Biostar boot software
If the BIOS has failed, you can find out how to restore the biostar from the boot block floppy disk in the technical documentation for the motherboard. But since this scheme is used for old modifications of computers or PCs operating in server mode, the instructions may have been lost, then you will have to look for the topic on the Internet.
This setting is a standard feature of the AMIBIOS8 kernel, enabled by default, and allows the user to restore a BIOS image using a floppy disk without the need for additional utilities. Before restoring the biostar, if the BIOS has crashed, follow the following instructions. The instructions for manually starting boot block recovery from a floppy disk are as follows:
- Insert the floppy disk with the new BIOS file into the root directory of drive A. In most cases, the file should be named AMIBOOT.ROM. However, this file name may differ from one product to another. The user can clarify this information in the technical documentation of the motherboard.
- Press and hold the keys while turning on the power until the floppy drive access light turns on, which may take a few seconds.
- The keys are released and AMIBIOS emits a series of beep codes that indicate that the BIOS system ROM file is being updated.
- Once the file is downloaded, a progress dialog will be displayed on the screen.
- Once the Flash ROM has been successfully programmed, the computer will reboot.
- The user should not interrupt the BIOS flashing process until it is completely completed.
- One of the functions of the AMI BIOS boot block is code to verify the integrity of the BIOS image in flash memory.
- If a problem with the BIOS image is detected in the boot block code, boot block recovery will automatically begin. This condition will be indicated by a series of beep codes.
How to restore functionality to a motherboard with a crashed BIOS
Asus
Many Asus desktop motherboards support USB Flashback
, which is designed to quickly update and restore the BIOS in the event of a failure. This does not require anything other than a USB flash drive with a capacity of up to 4-16 GB and the BIOS file itself, which must be downloaded from the manufacturer’s website from the section about your motherboard model.
After downloading the firmware you need to rename it. For example, the file “Sabertooth X79” (model name) is renamed to “SABERX79.ROM”, the file “Sabertooth Z77” is renamed to “Z77ST.CAP”. Information on what the firmware file for your model should be named is most likely on the Asus website, but if you don’t find it, check on the forums or in support.
Next, save the renamed BIOS on a flash drive formatted in FAT32 and connect it to the USB port labeled “ Flashback”
" or "
ROG Connect
". It is advisable to turn off the computer before this, this will increase the chance of successful recovery.
After connecting the flash drive, turn on the PC and press the “ BIOS”
" Hold it down for about 3 seconds until the indicator light on the board starts flashing. Blinking indicates that the file has been successfully read and is being flashed into memory. When the firmware process is completed, the indicator will turn off.
If your board is from the budget segment or is not very new, that is, it does not support USB Flashback, most likely you can restore it in another way. If your computer has a floppy drive or optical drive, write the renamed BIOS file to the root directory of a blank floppy disk or CD, place it in the drive, turn off and then turn on the PC. The firmware will be completed when the drive indicator goes off. If there is no drive, use a flash drive.
Gigabyte
On Gigabyte boards with Dual BIOS, failures rarely occur, since if the firmware in the main chip (Main_BIOS) is damaged, a
dump from the backup chip (
Backup_BIOS
)
is copied into
. As long as the main flash memory is healthy and contains the firmware, even if damaged, the board remains operational.
Problems with starting a board with Dual_BIOS are possible in the following cases:
- The main chip is missing or faulty.
- The microcode in the main chip is completely erased.
- The contents of both microcircuits are damaged.
Some Gigabyte motherboards can boot from backup flash memory and use it as the main one. Another group of boards from this manufacturer uses a dedicated area on the hard drive as BIOS backup media. This is a less reliable option, but still better than nothing.
Restoring the Gigabyte BIOS from a backup is usually performed automatically, but if this does not happen, try turning off the computer from the outlet, wait a little and turn it on again.
MSI and others
Most motherboards manufactured by Micro-Star use a firmware recovery technology very similar to ASUS's - using a flash drive, floppy disk or CD. Copy the BIOS onto a blank medium, connect it to the PC, press the power button for 4 seconds, press the left Ctrl + Home
(or
Alt + Ctrl + Home
) combination on the keyboard and, without releasing the keys, turn on the computer. The start of the firmware process can be judged by the flashing of the flash drive or drive indicator. BIOS on MSI board. On the right is the JSPI1 port for flashing firmware on the programmer
On motherboards from MSI and some other brands that are more than 8-10 years old, flashing the BIOS is done from a floppy disk. The instructions for AWARD and AMI BIOS are slightly different.
To restore the AMI BIOS, do the following:
- Rename the BIOS file downloaded from the motherboard manufacturer's website to AMIBOOT.ROM.
- Transfer it to the root of a blank floppy disk. Insert the floppy disk into the drive of the switched off PC.
- Press left Ctrl + Home on your keyboard and turn on your computer.
To restore AWARD BIOS:
- Place the firmware and BIOS files on a floppy disk (usually downloaded in one archive).
- Create a text document on a floppy disk that specifies the name of the BIOS file with the bin extension. Rename the document to autoexec.bat.
- Further actions are similar to those above.
By the way, some motherboard manufacturers post BIOSes on their websites only in exe format - in “one bottle” with a firmware program for updating from Windows. Sometimes such a file can be unpacked as an archive, but users often do not understand which of its contents is firmware. There is no universal solution for such problems. In order not to aggravate the problem, it is better to consult specialized forums or the manufacturer’s technical support.
On some boards, before restoring the BIOS, you also need to remove the real-time clock (RTC) battery from the socket or reset (remove) the CMOS clear jumper. It is important to clarify these points before starting the procedure.
Crisis Disk boot block
BIOS Recovery Boot Block is a special BIOS boot block with minimal initialization. The function is enabled to restore the firmware to complete successfully after a failure of the BIOS flashing process. The system provides hotkeys “Fn + Esc”, which enable the process of restoring a running system during BIOS POST. To use the function, it is recommended to use an AC adapter and a battery. When you enable the function, the BIOS will force you to enter a special block called Boot Block.
You should take recovery steps using a USB flash drive:
- Prepare a Crisis USB key in advance. It is created by running the Crisis Disk software on another Windows system.
- Connect the USB drive.
- Run the wincris.exe program to create a USB Crisis disk.
- Click “Start” to start the process.
- Select the "Quick Format" option for the disk and click "Start".
- Follow the onscreen instructions to create the disc.
- Copy the BIOS file KAYF0X64.fd to the root directory of the USB flash drive.
- Connect the USB flash drive to the USB port.
- Press the “Fn + ESC” buttons and turn on the power.
- The power button flashes orange once.
- Press the power button to launch the “Crisis” system mode.
- After CRISIS completes, the system reboots with a working BIOS.