Good afternoon friends. How to trim video on a computer program? Do you want to purchase an effective program to trim videos and cut clips? These functions are presented in different video editors. I have selected 15 of the most practical and understandable programs for you. Read the article carefully and choose the appropriate program for yourself.
At the end of the article I will insert a video compiled by one of these programs, where I will explain how everything is easily done through such programs. The principle of operation of each of them is similar to similar ones.
VideoMASTER
VideoMASTER is an application that is used to work with videos: deleting fragments, burning DVDs, converting files from one format to another, creating slideshows from photos. The utility works with all popular video formats. There is a useful tool for quickly replacing an audio track.
The program is fully compatible with the Windows operating system (32 and 64 bit) and the interface is in Russian. The distribution model of the video editor is shareware. To get acquainted with the main functionality of the VideoMASTER program, you can download a free trial version. To obtain the full version, a license purchase is required:
- Express. The cost of this version is 651 rubles. Users get access to all the tools that are used to convert videos.
- Standard. The price of this version of the program is 810 rubles. Access to a DVD burning tool is available, and there is the ability to edit videos.
- Premium The cost of this version of the application is 990 rubles. Owners of the program get access to all available functions: image enhancement, posting videos on third-party sites, creating GIF animations.
To get started with the utility, you need to download a video. To do this, click the “Add” button on the toolbar on the left side of the interface.
The next step is to use the Crop tool. After selecting this function, a small window will open in which users need to select a further action: trim the video, cut out the excess, or split the video into parts.
The next step is to select the section of the video that needs to be deleted. If necessary, users can mark several fragments at once. Once the process of selecting scenes to trim is completed, you need to click the “Cut Now” button.
After this, all that remains is to save the final result on your computer.
Advantages of VideoMASTER:
- convenient interface in Russian;
- several options for removing unnecessary video fragments;
- the ability to apply effects to videos;
- built-in file converter.
Flaws:
- There is no function to burn files to Blu-ray.
How to trim a video on a computer using the VideoMONTAZH program
Trimming in a video editor is the most universal way to remove unnecessary fragments from a video. The main advantage is that the software gives complete control over the final quality of the video. Of course, not every video processing program allows you to cope with the task at the proper level. Therefore, you should approach the choice of editor responsibly.
In complex professional programs, performing even such a simple action can be difficult for a beginner. At the same time, too simple applications can fail with cutting accuracy and significantly “eat up” the quality of the video. What to choose?
The VideoMONTAZH program can be considered a compromise between these opposites. The software is functional and easy to use. Any action in it is performed in a matter of seconds. To trim videos on your laptop, you only need to follow 3 simple steps. You can download the program from our website:
Works great on Windows 10, 8, 7, Vista, XP
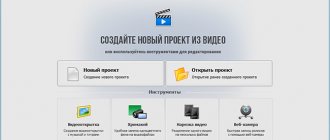
- Upload video
Launch the editor and create a new project. In the window that appears, the program will ask you to specify the aspect ratio of the video. Select “Install automatically”
to leave the video unchanged and click
“Apply”
. Next, find the folder with the desired file and drag it to the timeline.
Add video to editor
- Select the crop area
Open the “Edit”
– you will immediately be taken to the cropping window. Use black triangles to indicate the episode you want to keep. The left marker indicates the beginning of trimming, and the right marker indicates the end. If necessary, you can trim the recording down to the second by manually filling in the lines in the left panel.
Trim the excess from the video
- Save the result
You can continue improving the fragment in the program or go straight to saving. To do this, open the “Create”
and select the appropriate format for export. Video MONTAGE will allow you to leave the original data unchanged or convert the video to another extension. The software supports all popular options - MP4, AVI, WMV, MKV, etc. Having made your choice, adjust the quality of the video - the slider should remain on the green section of the scale. Then wait until the conversion is completed and check the result by playing the recording in the player.
Select video saving mode
Video EDITING makes it possible not only to shorten the duration of the video by removing unnecessary moments, but also to trim the black edges of the video.
This problem occurs when a recording shot in 4:3 aspect ratio is saved in 16:9 format. The “empty” space is compensated by black stripes.
The editor will deal with the problem in no time.
- Add a video, open the “Edit”
and find
“Crop” - Click on the “Crop video”
and in the window that appears, set a dotted selection on the desired area, cropping the video on the sides
If necessary, cut off the black bars in the video
Similarly, using cropping, you can trim the video height by removing the horizontal black bars at the top and bottom.
How to cut a fragment from a video on Youtube: video
In addition to cropping and color alignment in YouTube editing mode, there are many more useful features, such as changing playback speed, replacing the audio track (full and partial), rotating and much more. If you are a beginner video blogger, then it would be useful to “look around” a little and familiarize yourself with each of them. This will take your videos to a new level of quality.
This article was written to explain how to trim a video on YouTube. With its help, you will learn how to quickly and without unnecessary problems cut fragments from videos uploaded to video hosting. This method will significantly speed up editing your videos.
How to open and use YouTube video editor
The transition to the YouTube video editor is carried out through the settings of the video itself, that is, you must first open the video in the creative studio:
Then select “Editor”:
When a message appears about the updated video editor, simply click “Go to Editor”:
So far, its functions are dispersed across three sections and you have to go to different YouTube pages, which at the moment, of course, is not very convenient. Apparently in the future all editor functions will be combined on one page, at least I hope so 
Basically, you can trim the video (by the way, this can also be done in another section, which I will mention below) and add an end screen.
Let me clarify right away that to save any changes, click “Save” in the upper right corner of the editor.
Video trimming
To cut any episode from the video, click on the “Cut” button:
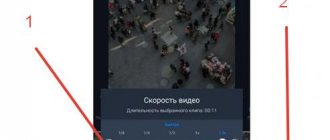
Place the slider [1] at the point in the video where you want trimming to begin and click “Split” [2]:
A blue stripe will appear on the marked area, indicating the initial trimming boundary. Pull [1] on it in the desired direction to separate the video interval that will be cut off [2]. If you need to zoom in on a track, use the corresponding buttons [3], and if you need to cancel the actions, click “Clear” at the bottom [4].
To now view the result and then save the changes, click “View” below.
If you decide to change the cropping boundary, then click the corresponding button above the track:
Creating a splash screen at the end of the video
To create an end screen at the end of your video, click Add End Screen:
Select one of the templates (or “empty”, so you can add everything yourself) and click “Apply”:
Now you can manage the splash screen elements in blocks 1, 2 and 3 that appear, for example, you can turn on a recommendation for someone else to watch another video at the end of watching this video, you can add a subscribe button, recommend a playlist or another channel. Here you can delete already added items by clicking the trash can button. And through block 4 you can add new elements, but no more than 4 pieces for the screensaver.
Add blur effects to faces and any areas of the video
If you need to add a blur effect to the video, click the corresponding button on the track:
In the YouTube section that opens, click the “Apply” button next to the desired blur function and the parameters will open:
If you choose face blur, YouTube will process the video (this can take from a few minutes to an hour or more, depending on the duration), identify faces and show them. You can mark the ones you want to blur and save the changes.
When blurring areas, in the preview window, draw rectangles [1] directly on the video, on those places and objects that you want to “shade”, then using the slider [2] on the track, stretch the interval over which this shading will act. To save, click “Done”.
Example of a blurred area:
Don't forget to save changes to this video. Or save it as a new video (so that the old one remains intact) and restore the original video. All this is done in the panel at the top:
Adding music from a YouTube collection to a video
To add additional audio tracks to a video, on the main page of the editor, open the “audio” element and click “Add Audio”.
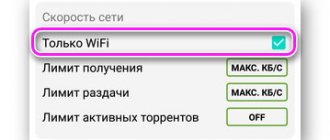
On the music page, you can listen to a collection of YouTube music and sounds, and also filter tracks by mood, genre and duration by clicking on the appropriate column [1]. And to add the selected audio to your video, click “Add to Video.”
The track will appear under the video in the preview window, where you can move it to the desired location (where it will be played), and also change the duration:
Click "Save Changes" to save the added tracks.
How to take a photo from a video using Media Player Classic
Media Player Classic is another very popular video player. If you use it, then in order to take a photo from a video you need to open the “File” drop-down menu and select “Save Image”.
After this, a window will appear in which you need to specify the folder to save this frame. It should also be noted that in Media Player Classic you can save frames using the ALT+I key combination, without opening the “File” menu.
In addition to saving a single frame, Media Player Classic can cut frames from a video. To do this, open the “File” menu and select “Save Thumbnails”.
The result is a picture like the one in the screenshot (below).
This picture displays the name of the video file, its size, duration and resolution. Under this information there is a cut of frames from the video with a time display.
Features of the Youtube video editor
Although the possibilities for working with videos on YouTube are very small, you can still correct or add something, namely:
- Trim unnecessary sections of the video: episodes marked for deletion will be cut out in this case, but not joined in any way by planned transitions, that is, one part of the video will simply be connected to another, which may result in sharp frame changes for the eye.
- Add audio: you can select any of the audio tracks presented on YouTube and overlay it on the video, placing it at the desired interval and stretching it in duration.
Unfortunately, you can’t upload your tracks from your computer or anywhere else, but it would be great!
However, then people would download everything, violating copyrights. - Add a splash screen at the end of the video, which you don’t have to do yourself on the computer during the editing process.
- Blur faces and specific areas of the video. Interesting thing, though! YouTube can detect faces in a video and you can blur them, all or selected ones, if, for example, you don’t want to “shine” a specific person or several. Well, you can take and “cover up” any area in the video.
Let's move on to the tool itself - the YouTube video editor and learn how to work with it.
Programs for cutting video on your phone
Just a few years ago, it was not possible to trim a video on a phone; it was easier to transfer the video to a computer and edit it there using special software. Nowadays, computers and laptops are gradually fading into the background; most actions are carried out using a smartphone and tablet.
You can trim the footage using Google Photos.
The application is available for any smartphone, regardless of operating system. In some devices, the application is installed as a basic one by default; if it is missing, it can be downloaded for free from the store.
To trim a video on a smartphone, follow a series of steps:
- Launch the application using the icon on the screen or through the menu, create a new project and open the video that needs trimming.
- Go to the edit menu. Using the two white cursors, select the part of the video that you want to leave in the end.
- Click on the "Save" button.
The new edited video can be viewed through the “Gallery” or in the Google Photos application itself.
You can trim a video on an iPhone using the application described above. You can also use the special program “Photos”:
- Launch the program and open the video.
- Click on the "Change" button.
- Select a part of the recording using the sliders on the timeline.
- Click on the "Done" button and save the video.
The best online video trimming services
Today there are quite a lot of video editors that offer users tools for working with video materials. Here we propose to consider the most easy-to-use and effective of them. You may also need to add music to the video.
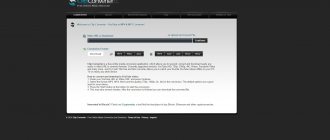
Service 1. Online Video Cutter - will help you trim AVI, 3GP, MP4, MPG files,
To begin with, you can consider a site that offers an easy-to-learn but quite powerful tool for resizing video files Online Video Cutter (https://online-video-cutter.com/ru/).
The main advantages of using it are an intuitive interface and high speed, however, the resource allows you to process files of no more than 500 MB, which is not always acceptable. Although he edits videos that fall within the recommended range in just a few clicks. In addition, to work on the site you do not need to go through the registration procedure, which can also be considered a plus.
To trim a video online, you need to go to the main page of the resource, where you can see a visual action menu. First you need to click the “Open file” button.
Home page of the Online Video Cutter resource
After this, an additional context menu will open, using which you need to select the file that you want to split.
Selecting the file to change
As soon as the choice is confirmed, video downloading will begin automatically. In this case, the data transfer rate will be limited by the network bandwidth.
Adding a file
After uploading the file to the resource, the “Crop” menu item will become available, providing three main tools:
- dividing the video into frames (1);
- the ability to preview a selected segment or the entire file (2);
- and rotate the picture 90 degrees (3);
- You will also be able to see the main line for changing the file size, the sliders of which indicate the beginning and end of the required segment (4).
Cutting off unnecessary parts of the video
Once the preliminary options have been selected, you will be able to make some additional settings, such as changing the format and output quality of the video. If everything is set as it should be, you can press the “Crop” button.
After the process is completed, a list of possible further actions will appear - downloading the file to local storage or saving it to one of the cloud services.