Windows 10 is much more than a simple OS designed for home computers. While it can perform exceptionally well in this role, its Enterprise and Professional editions are complete enterprise management suites.
To harness the full power of Window 10 and start remotely managing other computers on your network, you'll need to use the Active Directory Users and Computers (ADUC) feature. Let's dig in and see how to enable this.
Windows 10 versions
To enable Active Directory Users and Computers on a Windows 10 PC, you first need to install RSAT - Remote Server Administration Tools. If you are using an older version of Windows 10, i.e. 1803 or lower, you will need to download the RSAT files from the Microsoft Download Center.
On the other hand, all versions of Windows 10 since the October 10, 2020 release have enabled RSAT as a “Feature on Demand.” You don't need to download the tools, just install and enable them. Please note that only the Enterprise and Professional editions support RSAT and Active Directory.
RSAT for Windows 10 v1809
In Windows 10 v1809, RSAT can be now downloaded and installed through the Settings app or with the following PowerShell one-liner. Code:
Get-WindowsCapability-Online | Where-Object { $_.Name -like "RSAT*" -and $_.State -eq "NotPresent" } | Add-WindowsCapability -Online
Settings
>
Apps
>
Manage Optional Features
>
Add a feature
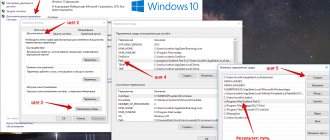
An example of displaying information about the remote administration tools installed on the system (administrator rights required): In the Russian version of
Windows 10 1809
, to install
RSAT
, you need to go to
Settings
->
Applications
->
Applications and features
->
Manage additional components
->
Add component
.
Profile
bga68
Latest Month
| January 2020 | ||||||
| S | M | T | W | T | F | S |
| 1 | 2 | 3 | 4 | |||
| 5 | 6 | 7 | 8 | 9 | 10 | 11 |
| 12 | 13 | 14 | 15 | 16 | 17 | 18 |
| 19 | 20 | 21 | 22 | 23 | 24 | 25 |
| 26 | 27 | 28 | 29 | 30 | 31 |
View All Archives
Tags
View my Tags page
Install RSAT for versions 1809 and higher
Follow these steps to enable RSAT on Windows 10.
- Right-click the "Windows" icon in the lower left corner of the screen.
- Select the Settings option from the pop-up menu.
- When the Settings window opens, you must select the Applications tab from the list.
- Then click on the “Manage additional features” link on the right side of the settings window. It is located in the "Applications Features" section.
- Click on the “+Add Feature” icon.
- Windows will show a list of available add-ons. Scroll down and select the RSAT: Active Directory Domain Services and Lightweight Directory Tools add-on from the list.
- Click the "Install" button.
- Once the installation is complete, RSAT should appear in the Administrative Tools section of the Start menu.
Create an Active Directory Domain Services domain controller
This article describes the process of installing Active Directory, configuring a domain controller, and creating AD users on a VPS running the Windows Server operating system.
1cloud services
Windows-based virtual server
- License included in price
- Testing 3-5 days
- Unlimited traffic
Read more >>
What it is?
Active Directory Domain Services (AD DS) is a Microsoft directory service implementation that provides centralized authentication and authorization services. AD DS on Windows Server provides a powerful directory service to centrally store and manage security information such as users, groups, and computers, and provide centralized, secure access to network resources. Active Directory Domain Services is used to organize local area networks.
Windows Server Preparation and Network Configuration
Network creation and configuration
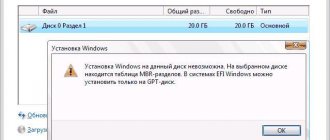
First, in the control panel you need to create the servers necessary for the network and one of them will be a domain controller.
Important: to work with Active Directory, when ordering a server in the control panel, check the box “Perform Windows system preparation.”
After creation, you need to combine all machines into a single private network through the control panel in the “Private Networks” section, as a result of which they will receive local IP addresses.
Configuring a domain controller network adapter
First, connect to the virtual server using the RDP protocol.
How to configure a network adapter is described in our instructions.
Specify the local IP address, subnet mask and default gateway from the Network section of Control Panel. Set the Preferred DNS Server to the Default Gateway IP address. Save your settings.
Installing Active Directory Domain Service
Open Server Manager
and select “
Add roles and features
”.
Role-based or feature-based installation as the installation type
.
Select your server from the pool.
In the next window, check Active Directory Domain Services
.
Add components.
Install all marked components on the VPS using the Install
.
Settings
In the search enter dcpromo
and open the utility of the same name.
In the window that opens, click Ok.
After that, open Server Manager
, you will see an
AD DS
.
In the horizontal menu, click on the exclamation mark and select Promote this server to a domain controller.
.
In the settings window that appears, select Add a new forest
(since the actions are performed for the first time) and enter your domain name.
Notes: - The forest root domain name cannot be a single-label name (for example, it must be "company.local" instead of "company"); — The domain must be unique; — We recommend using a unique domain name from the local list (eg company.local) to avoid DNS name resolution conflicts in case of identical names. — the account from which the settings are made must be a member of the administrators group.
In the next step, enter and confirm the Directory Services Restore Mode password.
At this step just click Next
.
Specify a friendly NetBIOS domain name.
Specify the paths to the AD DS database, log files, and SYSVOL folder. We recommend leaving the default values.
Check the configured settings.
Wait for the prerequisites to check and then click Install
. After installation, the server will reboot.
Creating Accounts
To create new accounts and administrators, open the Active Directory Users and Computers
, to do this, open Server Manager and go to the AD DS section. In the server context menu, select the appropriate equipment.
In a new window, expand your domain tree and find the Users directory. Right-click on the directory and select New -> User
.
For a new user, specify personal information and login name.
Next, enter the password, which should be quite complex and contain letters of different case and numbers. Select additional options at your discretion.
Create a new user.
Before a user can manage Active Directory services, they must be added to the Domain Admins
.
To do this, use the right mouse button to open the user properties and go to the Member Of
.
Click the Add
to add to the group.
Search for the Domain Admins
using the
Check Names
. Click OK.
Save the changes with the Apply
.
Now the created user will be able to connect to the domain controller.
We recommend that you immediately make sure that Firewall is enabled for the public network adapter, and disabled for domain/private networks.
PS Other instructions:
- Active Directory storage structure
- Problems connecting via RDP
- How to disable Internet Explorer Enhanced Security Configuration in Windows Server 2012
- Setting up a network adapter in Windows
Install RSAT for versions 1803 and below
Installing RSAT and enabling Active Directory on an older version of Windows 10 takes a little longer. Please note that the limitation for Enterprise and Professional editions still applies. Let's see how to enable Active Directory in versions 1803 and below.
- Launch your computer's browser.
- Go to the Microsoft Download Center and search for Remote Server Administration Tools for Windows 10.
- Click the "Download" button.
- Select the latest version for maximum compatibility.
- Click Next and wait until the download completes.
- Then press the "Win" key on your keyboard.
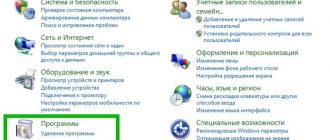
- Search for control panel.
- In Control Panel, click on the Programs tab.
- Next, select Programs and Features.
- Click Turn Windows features on or off.
- Expand the “Remote Server Administration Tools” section in the menu.
- Next, select “Role Administration Tools.”
- Select AD LDS and AD DS Tools.
- Select the AD DS Tools checkbox.
- Click OK.
The Administrative Tools option should now appear in the Start menu. You should find all the Active Directory tools there and you can use and change them through this menu.
Installing RSAT on Windows 10
Install the downloaded file by double clicking on it
Or install the RSAT msu file from the command line in silent mode:
wusa.exe c:\Install\WindowsTH-RSAT_TP5_Update-x64.msu /quiet /norestart
After completing the RSAT installation, you need to restart your computer.
All that remains is to activate the necessary RSAT functionality. For this:
- the Start button and select Control Panel
- Select Programs and Features
- In the left pane, click the Turn Windows features on or off
- In the component tree, expand Remote Server Administration Tools-> Role Administration Tools -> AD DS and AD LDS Tools
- Check the AD DS Tools and click OK .
Installing the ADUC snap-in can also be done from the command line. Execute 3 commands in sequence:
dism /online /enable-feature /featurename:RSATClient-Roles-AD dism /online /enable-feature /featurename:RSATClient-Roles-AD-DS dism /online /enable-feature /featurename:RSATClient-Roles-AD-DS- SnapIns
After installing the management snap-ins, a link to the Active Directory Users and Computers console will appear in the
Administrative Tools of the Control Panel.
Now you can launch the ADUC snap-in and connect to any domain controller. If this computer is a member of an Active Directory domain, the console will connect to the domain controller based on the current Logon server.
Finding the problem
In most cases, installing RSAT goes smoothly. However, there are two problems you may encounter.
The first is the inability to install RSAT. If this happens, make sure Windows Firewall is turned on. RSAT uses the standard Windows Update backend and requires the firewall to be up and running. If it's off, turn it back on and try installing RSAT again.
The second problem may occur after installation. Some users are missing tabs or experiencing other problems. The only solution to problems after installation is to uninstall and install RSAT again.
If you have problems with ADUC, you should check if its shortcut is connected correctly. This should lead to %SystemRoot%\system32\dsa.msc. If this is not the case, reinstall the program.
Data collection
Shared Resources
In an Active Directory environment, network shares and file servers are often used. These commands will display a list of shares on the local host, a list of networked computers, and a list of shares on the remote computer:
> net share > net view > net view COMPUTER_NAME /all
But what if the security policy prohibits the use of network commands? In this case, wmic will help us out. The list of shared resources on the local host and the list of shared resources on the remote computer can be viewed using the commands
> wmic share get /format:list > wmic /node: COMPUTER_NAME share get
A useful tool for finding data is PowerView. It automatically discovers network shares and file servers using the Find-DomainShare and Get-DomainFileServer commands.
By the way, PowerView is built into the PowerShell Empire framework and is represented by two modules:
- situational_awareness/network/powerview/share_finder;
- situational_awareness/network/powerview/get_fileserver.
Continuation is available only to members
Option 1. Join the “Xakep.ru” community to read all materials on the site
Membership in the community during the specified period will give you access to ALL Hacker materials, allow you to download issues in PDF, disable advertising on the site and increase your personal cumulative discount! More details
What can you use Active Directory Users and Computers for?
The Active Directory Users and Computers add-in can cover most AD administrator tasks and responsibilities. It has its limitations - for example, it cannot manage Group Policy Objects.
But you can use it to reset passwords, edit group memberships, unblock users, and more. Here are some basic tools at your disposal when you enable ADUC on your computer.
- Active Directory Domains and Trusts. With this tool, you can manage forest functional levels, UPNs (user principal names), multi-domain functional levels. It also allows you to manage trust between forests and domains.
- Active Directory Administration Center. In this section of ADUC, you can manage your PowerShell history, password policies, and AD Recycle Bin.
- Active Directory sites and services. This tool gives you control and insight into sites and services. This allows you to plan replication and define the AD topology.
How to install AdminPack on Windows 10
Read: 2,952
Because Usually, as a working system in organizations where I work, the main operating system is Windows 10 Pro . Active Directory from your workplace, you have to install the AdminPack . Now I want to document the steps by which you can get a workplace environment that is convenient in terms of system administration with everything you need.
Task: Go through the steps of installing AdminPack on Windows 10
I have a system:
Windows 10 Pro Rus (Version 10.0.17134.112)
To find out which OS Build , you should read the document:
https://docs.microsoft.com/en-us/windows/release-information/
I made a small reminder table for myself.
| Windows | Version | OS Build |
| 10 | 1507 | 10240 |
| 10 | 1511 | 10586 |
| 10 | 1607 | 14393 |
| 10 | 1703 | 15063 |
| 10 | 1709 | 16299 |
| 10 | 1803 | 17134 |
| 10 | 1809 | 17763 |
| 10 | 1903 | 18362 |
From this table I see that I have Windows 10 Version 1803 , which means the RSAT package: WindowsTH-RSAT_WS_1803-x64.msu (95Mb) = KB2693643
Next, for installation you will need administrator rights on the system and by right-clicking on the downloaded msu file I select “ Run as administrator ”, thereby initializing the installation. In my case, the installer reported that it could not install the KB2693643 without indicating why, cool!!!
I'm figuring it out.
See logs: C:\Windows\WindowsUpdate.txt , the contents of the file are represented by the lines:
| 1 2 3 4 5 | "Windows Update logs are now generated using ETW (Event Tracing for Windows). Please run the Get-WindowsUpdateLog PowerShell command to convert ETW traces into a readable WindowsUpdate.log. For more information, please visit https://go.microsoft.com/fwlink/?LinkId=518345" |
I did as instructed:
Win + X → Windows PowerShell (Administrator)
| 1 | PS C:\Windows\system32>Get-WindowsUpdateLog |
and then I initialize the installation of WindowsTH-RSAT_WS_1803-x64.msu , only now the installation is completed, after the installation is complete, you need to reboot, click “ Reboot now ”
Then you need to enable the RSAT components:
Win + R - control.exe - View: Small icons - System - Enable or disable Windows components , or rather not “ System ”, but “ Programs and Features” - “Enable or disable Windows components ”, but alas, everything turned out to be wrong was in Windows 7 , the snap-ins themselves were added to the existing ones in the “ Administration ” section. What kind of equipment are these:
- Active Directory - Domains and Trust
- Active Directory - Sites and Services
- Active Directory Users and Computers
- Group Policy Management
- etc.
In total, I figured out step by step how to install utilities from the AdminPack in Windows 10 , there are slight differences compared to Windows 7 . With this I say goodbye, with respect, blog author Ollo Alexander aka ekzorchik.