Good day.
Many articles and guides usually describe the procedure for writing a finished image (most often an ISO) to a flash drive so that you can then boot from it. But with the opposite task, namely creating an image from a bootable USB flash drive, not everything is always simple...
The fact is that the ISO format is intended for disk images (CD/DVD), and a flash drive, in most programs, will be saved in the IMA format (IMG, less popular, but it is quite possible to work with it). That’s actually how to make an image of a bootable flash drive, and then write it to another - that’s what this article will be about.
USB Image Tool
This is one of the best utilities for working with flash drive images. It allows you to literally create an image in 2 clicks, and also write it to a flash drive in 2 clicks. No skills, special. knowledge and other things - nothing is required, even someone who is just getting acquainted with working on a PC can handle it! In addition, the utility is free and designed in a minimalist style (i.e., nothing superfluous: no advertising, no extra buttons :)).
Creating an image (IMG format)
The program does not require installation, so after extracting the archive with files and launching the utility, you will see a window displaying all connected flash drives (on the left side). To get started, you need to select one of the found flash drives (see Fig. 1). Then, to create an image, click the Backup button.
Rice. 1. Select a flash drive in the USB Image Tool.
Next, the utility will ask you to indicate the location on your hard drive where to save the resulting image (by the way, its size will be equal to the size of the flash drive, i.e. if you have a 16 GB flash drive, the image file will also be 16 GB).
Actually, after this the copying of the flash drive will begin: the percentage completion of the task is shown in the lower left corner. On average, a 16 GB flash drive takes about 10-15 minutes. time to copy all data into the image.
Rice. 2. After specifying the location, the program copies the data (wait for the process to complete).
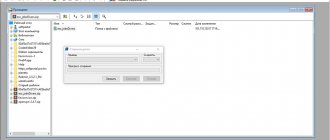
In Fig. Figure 3 shows the resulting image file. By the way, even some archivers can open it (for viewing), which, of course, is very convenient.
Rice. 3. Created file (IMG image).
Burning an IMG image to a USB flash drive
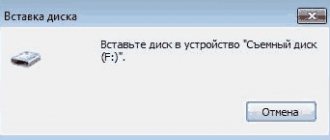
Now you can insert another flash drive into the USB port (to which you want to write the resulting image). Next, select this flash drive in the program and click the Restore button (translated from English as restore, see Fig. 4).
Please note that the volume of the flash drive on which the image will be written must either be equal to the size of the image or be larger than it.
Rice. 4. Write the resulting image to a flash drive.
Then you will need to indicate which image you want to burn and click the “Open” button. (as in Fig. 5).
Rice. 5. Choosing an image.
Actually, the utility will ask you the last question (warning) whether you really want to write this image to a flash drive, because all data from it will be deleted. Just agree and wait...
Rice. 6. Image recovery (last warning).
U LTRA ISO
For those who want to create an ISO image from a bootable USB flash drive
This is one of the best utilities for working with ISO images (editing, creating, burning). Supports Russian language, intuitive interface, works in all new versions of Windows (7, 8, 10, 32/64 bits). The only drawback: the program is not free, and there is one limitation - you cannot save images larger than 300 MB (of course, until the program is purchased and registered).
Creating an ISO image from a flash drive
1. First, insert the flash drive into the USB port and open the program.
2. Next, in the list of connected devices, find your flash drive and simply, holding down the left mouse button, transfer the flash drive to the window with a list of files (to the upper right window, see Fig. 7).
Rice. 7. Drag the “flash drive” from one window to another...
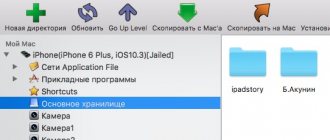
3. Thus, in the upper right window you should see the same files that were on the flash drive. Next, simply select the “Save as...” function from the “FILE” menu.
Rice. 8. Choosing how to save data.
4. Key point: after specifying the file name and the directory where you want to save the image, select the file format - in this case the ISO format (see Figure 9).
Rice. 9. Selecting the format when saving.
Actually, that’s all, all that remains is to wait for the operation to complete.
Deploying an ISO image to a USB flash drive
To burn an image to a flash drive, run the Ultra ISO utility and insert the flash drive into the USB port (to which you want to burn this image). Next, open the image file in Ultra ISO (for example, the one we made in the previous step).
Rice. 10. Open the file.
Next step: in the “SELFBOOT” menu, select the “Burn Hard Disk Image” option (as in Fig. 11).
Flash drive image using UltraISO
UltraISO is a very popular program in our latitudes for working with disk images, creating and burning them. Among other things, using UltraISO you can make an image of a flash drive, and there are two ways to do this. In the first method, we will create an ISO image from a bootable USB flash drive.
- In UltraISO with a connected flash drive, drag the entire USB drive onto the window with a list of files (empty immediately after launch).
- Confirm copying all files.
- In the program menu, open the “Boot” item and click “Extract boot data from floppy disk / hard drive” and save the boot file to your computer.
- Then, in the same menu section, select “Load Download File” and download the previously extracted download file.
- Using the “File” - “Save As” menu, save the finished ISO image of the bootable USB flash drive.
The second method, by which you can create a full image of a USB flash drive, but in ima format, which is a byte-by-byte copy of the entire drive (i.e., the image of even an empty 16 GB flash drive will occupy all of these 16 GB) is somewhat simpler.
In the “Self-loading” menu, select “Create a hard disk image” and follow the instructions (you just need to select the flash drive from which the image is taken and indicate the location where it will be saved). In the future, to burn the flash drive image created in this way, use the “Burn hard disk image” item in UltraISO. See Creating a bootable USB flash drive using UltraISO.
How to create a flash drive image
03/22/2016 windows | programs
Several times remontka.pro readers asked about how to create an image of a bootable flash drive, make an ISO image from it for subsequent recording on another flash drive or disk. This instruction is about creating such images, not only in ISO format, but also in other formats, which represent a complete copy of the USB drive (including the empty space on it).
First of all, I want to draw your attention to the fact that you can create an image of a bootable flash drive and there are many tools for this, but usually this is not an ISO image.
The reason for this is that ISO image files are images of CDs (but not any other drives) on which data is written in a certain way (although an ISO image can be written to a flash drive).
So there is no "USB to ISO" type program or easy way to create an ISO image from any bootable USB flash drive and in most cases it creates an IMG, IMA or BIN image. However, there is an option to create a bootable ISO image from a bootable USB flash drive, and it will be described first below.
Flash drive image using UltraISO
UltraISO is a very popular program in our latitudes for working with disk images, creating and burning them. Among other things, using UltraISO you can make an image of a flash drive, and there are two ways to do this. In the first method, we will create an ISO image from a bootable USB flash drive.
- In UltraISO with a connected flash drive, drag the entire USB drive onto the window with a list of files (empty immediately after launch).
- Confirm copying all files.
- In the program menu, open the “Boot” item and click “Extract boot data from floppy disk / hard drive” and save the boot file to your computer.
- Then, in the same menu section, select “Load Download File” and download the previously extracted download file.
- Using the “File” - “Save As” menu, save the finished ISO image of the bootable USB flash drive.
The second method, by which you can create a full image of a USB flash drive, but in ima format, which is a byte-by-byte copy of the entire drive (i.e., the image of even an empty 16 GB flash drive will occupy all of these 16 GB) is somewhat simpler. In the “ menu Self-removal”, select “Create a hard disk image” and follow the instructions (you just need to select the flash drive from which the image is taken and indicate the location where it will be saved). In the future, to burn the flash drive image created in this way, use the “Burn hard disk image” item in UltraISO. See Creating a bootable USB flash drive using UltraISO.
Creating a full flash drive image using the USB Image Tool
The first, easiest way to create an image of a flash drive (not only bootable, but any other) is to use the free USB Image Tool program.
After launching the program, on the left side you will see a list of connected USB drives. Above it there is a switch: “Device Mode” and “Partition Mode”. The second point makes sense to use only when your drive has several partitions and you need to create an image of one of them.
After selecting the flash drive, just click the “Backup” button and indicate where to save the image in IMG format. Upon completion, you will receive a complete copy of your flash drive in this format. In the future, in order to write this image to a flash drive, you can use the same program: click “Restore” and indicate from which image it should be restored.
Note: this method is suitable if you need to make an image of some flash drive you have in order to someday restore the same flash drive to its previous state. It may not be possible to write an image to another drive, even of exactly the same size, i.e. it's a kind of backup.
You can download the USB Image Tool from the official website https://www.alexpage.de/usb-image-tool/download/
Creating a flash drive image in PassMark ImageUSB
Another simple free program that does not require installation on your computer and allows you to easily create a full image of a USB drive (in .bin format) and, if necessary, write it back to a flash drive - imageUSB by PassMark Software.
To create a flash drive image in the program, follow these steps:
- Select the desired drive.
- Select Create image from USB drive
- Select a location to save the flash drive image
- Click the Create button.
Creating a full flash drive image using the USB Image Tool
The first, easiest way to create an image of a flash drive (not only bootable, but any other) is to use the free USB Image Tool program.
After launching the program, on the left side you will see a list of connected USB drives. Above it there is a switch: “Device Mode” and “Partition Mode”. The second point makes sense to use only when your drive has several partitions and you need to create an image of one of them.
After selecting the flash drive, just click the “Backup” button and indicate where to save the image in IMG format. Upon completion, you will receive a complete copy of your flash drive in this format. In the future, in order to write this image to a flash drive, you can use the same program: click “Restore” and indicate from which image it should be restored.
Note: this method is suitable if you need to make an image of some flash drive you have in order to someday restore the same flash drive to its previous state. It may not be possible to write an image to another drive, even of exactly the same size, i.e. it's a kind of backup.
You can download the USB Image Tool from the official website https://www.alexpage.de/usb-image-tool/download/
Creating a bootable USB-Flash image
Creating a bootable USB-Flash image
There was an urgent need to create a bootable USB-Flash image. After a little googling, I found a small utility called USB Image Tool , which allows you to create images of any USB drives: USB-Flash, MP3 players, bootable flash drives designed for installing operating systems and other drives that have a USB interface. USB Image Tool saves the image in the usual img , which, if necessary, can be written to another flash drive, shared with your friends, posted online, or connected as a virtual disk. You don’t have to install USB Image Tool , you just need to unpack the downloaded archive, run the utility and you can begin the process of creating an exact USB image. This utility is very easy to use. download the utility in a ZIP archive using the link USB.Image.Tool.1.80_RU. It would not be superfluous to post screenshots taken during its practical use. 80 launch the file USB Image Tool.exe. In the program window that opens, we will see a lot of both useful and completely unnecessary information for a simple user.
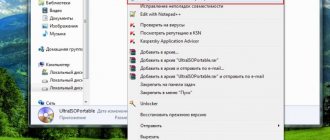
If the USB drive is already connected or several are connected, then select the one you need. If you connected the flash drive after starting the program, then click “Scan again.” To backup and create an image of the USB drive you have selected, click on “Backup”.
Let's select a place to save the backup, enter the file name and select the required type from the possible ones: img , ima , with ZIP compression - imz , GZIP compression - img.gz. Then click “Save”
And the backup process proceeds quickly and depends only on the speed and capacity of the drive. The process takes place in sector-by-sector mode, so all information from the drive will be saved. At this stage, you can also interrupt the process by clicking on “Cancel”. Restoring information on storage media from an image created earlier or downloaded on the Internet is also simple: click on “Restore”, select the image and confirm the selected action.
USB image tool download in Russian USB.Image.Tool.1.80_RU I hope the article will be useful to many. In my case, this program turned out to be a simple and quick solution to creating a bootable USB-Flash image.
The program works very quickly and now I do not need to constantly have a bootable flash drive. I can use it for any purpose, and if necessary, restore it from the image in a matter of minutes. On my computer, and the one at work is not very new and fast, the process of creating a bootable USB-Flash image takes up to seven minutes, this is for 8 Gb. I don't think it's bad at all. Thanks to the author of the utility.
Creating a flash drive image in PassMark ImageUSB
Another simple free program that does not require installation on your computer and allows you to easily create a full image of a USB drive (in .bin format) and, if necessary, write it back to a flash drive - imageUSB by PassMark Software.
To create a flash drive image in the program, follow these steps:
- Select the desired drive.
- Select Create image from USB drive
- Select a location to save the flash drive image
- Click the Create button.
In the future, to write the previously created image to a flash drive, use the Write image to USB drive item. Moreover, for writing images to a flash drive, the program supports not only the .bin format, but also regular ISO images.
How to create an ISO image of a flash drive in ImgBurn
Warning: Recently, the ImgBurn program described below may contain various additional unwanted programs. I do not recommend this option; it was described earlier when the program was clean.
In general, if necessary, you can make an ISO image of a bootable flash drive. True, depending on what exactly is on the USB, the process may not be as simple as it was in the previous paragraph. One way is to use the free ImgBurn program, which can be downloaded from the official website https://www.imgburn.com/index.php?act=download
After launching the program, click “Create Image File from Files/Folders”, and in the next window, click the folder icon under the “plus”, select the source flash drive as the folder to use.
Create an image from a USB flash drive using UltraISO
Probably many have heard about the UltraISO program, which allows you to burn an existing image to a flash drive or to a CD or DVD disc. It turns out that this program also allows you to do the opposite - remove an image with recorded data from a flash drive (bootable flash drive)!
Creating an image in UltraISO
To do this you need to do the following:
- Download UltraISO from the official website, and then install it on your computer
- Run the program
- In the “Boot” section, select “Create a hard disk image”
- Select a bootable USB flash drive and the location where the IMA image will be copied
- And wait until all the data is copied
Burn the image to a new flash drive
- Run the program
- Select “File” -> “Open” in the panel and select the previously created bootable USB flash drive image
- Then on the panel go to the “Bootboot” section and select “Burn Hard Disk Image”
- Select the media, format it and write data
- All you have to do is wait a little and the new boot drive is ready
Installing Windows 7 from USB on systems with Intel 100 and 200 series chipsets
Those who install the Windows 7 operating system for the first time on platforms with an Intel 100/200 series chipset using a USB drive will be unable to continue the installation due to the lack of a special driver.
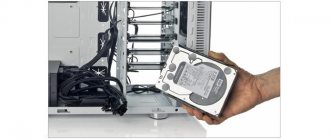
Actually in my new Fractal Design Define Mini C
(which we will talk about separately) there is no space at all to install a DVD drive (ODD), so the only option is to install the operating system from a USB flash drive.
The problem is that Windows 7 uses an outdated set of drivers, while all motherboards based on 100 and 200 series chipsets require a new driver. This limitation applies to a huge number of motherboards based on Intel B150, B250, H110, H170, H270, Z170 and Z270
; in particular, these are all new configurations based on Intel Skylake and Kaby Lake processors (LGA1151 socket, 6th and 7th generation processors).
GA- Z170 M- D3 H motherboard
manufactured by Gigabyte and an
Intel Core i5-6500
. And yes, it was possible to take the i5-7400/7500, but the PC was assembled in January 2017, while I am only writing this note now. So that's not about that now.
In general, if you try to install Windows 7, you will receive the following error:
No device drivers were found. Make sure that installation media contains the correct drivers, and then click OK.
Select the driver to be installed.
Translated, this means: device drivers were not found. Make sure that the installation device contains the correct drivers and then click OK. Select the driver to install.
What to do? There is nothing complicated, the problem is solved quite simply, although you will need:
- additional computer or laptop with a free USB port;
- disk with Windows 7 (x32 or x64) or ISO image;
- USB flash drive 4-8 GB
Also, for further work you need to download 2 additional utilities, about everything in order.
Create a bootable USB flash drive with Windows 7
You cannot simply copy Windows distribution files to a flash drive, since you additionally need to create boot records.
To create a bootable installation flash drive with Windows 7, I personally prefer to use a proprietary utility from Microsoft called “Windows USB/DVD Download Tool”. You can download it absolutely free from Microsoft resources using the link just above.
Step 1. Launch Windows USB/DVD Download Tool
and follow the wizard's instructions.
At the first stage ( Shoose ISO file
), you should select the source ISO file (image) with the Windows 7 distribution. Which image and which version to use is up to you, it can be either an image of the original DVD you have, or an official MSDN image . Personally, I prefer to use an official image, without third-party interference from “craftsmen”. The main thing is that the version of Windows 7 matches the license you have, otherwise you will not be able to activate the OS with the existing key.
Opposite Source file
Click
Browse
and specify the distribution, in a specific example it is ru_windows_7_professional_with_sp1_x64_dvd_u_677024.iso, then click
Next
.
Step 2. In the second stage ( Choose media type
) you should select the type of final media on which the distribution will be written.
There are only 2 options available - USB device and DVD. As you might guess, we need the first option, click USB device
.
Step 3. In the new window that appears ( Insert USB device
) you must select the destination drive in the drop-down list, and then click
copying
.
Step 4: The process of copying files and creating a bootable USB device
) takes some time, be patient and wait for the process to complete. The speed depends on the characteristics of the flash drive; the faster the flash drive, the faster the creation process. Sometimes it may seem that the process is frozen, do not rush to cancel the task, just wait a couple of minutes.
Status Bootable USB Device created successfully
indicates that the disk has been successfully created, click
Start over
or close the window and move on to the next step.
Patching the Windows 7 installation disk
After you have successfully created a bootable installation disk, you need to patch it, or rather, add the necessary drivers to it. You can’t just copy files, so we use software called Windows USB Installation Tool.
Create an image from a USB flash drive using the USB Image Tool
Unlike UltraISO, USB Image Tool is free and not a trial! It has an intuitive interface and perfectly creates images from a USB flash drive and records it!
Create an image in USB Image Tool
- Download USB Image Tool from the official website, and then unzip it to your computer
- Run the program
- Select the drive and click the “Backup” button
- After which you will be offered a place to save the future image.
Burn the image using the USB Image Tool to a new flash drive
- Launch USB Image Tool
- Select the drive and click the "Restore" button
Installing an operating system from a flash drive
Before starting the installation process, you must first open the BIOS and change boot priorities. This is done so that the computer immediately starts booting from the media on which the image is recorded. As a rule, in all standard BIOS versions this option is located in the Boot tab. You may have to do an additional search in the Advanced Boot section.
When everything is ready, you can proceed to installation. Here the process is very different depending on the choice of system to be deployed. You can show everything using the example of Linux Ubuntu and Microsoft Windows 10. Both systems are almost identical in their hardware requirements, and the installation process is devoid of any difficulties for the average user.
Linux Ubuntu
Unlike the Microsoft OS, the installer does not issue warnings that it will boot from USB and you need to press any key. It boots straight into the Grub shell . There you need to select the installation option that is most suitable. It is not recommended to install an older kernel: there may be problems with the compatibility of some programs and the compilation of packages.
The start window prompts you to select the language and method of interaction with the distribution. A person who has not previously worked with the system can quite freely load it directly from a flash drive and try out some basic capabilities. Don't worry that a reboot will be required to move from this option to the installation. In fact, the shortcut for launching it is placed in advance directly on the desktop.
The installation begins by checking that your computer's configuration meets the minimum requirements and that you have an Internet connection. It is also suggested to install third-party software for MP3 decoding. Practice shows that the function is practically useless.
Create an image from a USB flash drive using ImageUSB PassMark
A simple utility, ImageUSB PassMark, without the need to install it on your computer, creates and writes images in BIN format.
Creating an image from a bootable USB flash drive using ImageUSB PassMark
- Download, extract from the archive and run ImageUSB PassMark
- Select a drive
- Select "Create image from USB drive"
- Click “Browse” to select a location to save the image on your computer
- Click the "Create" button
Burn the image using ImageUSB PassMark to a new flash drive
- Download, extract from the archive and run ImageUSB PassMark
- Select a drive
- Select "Write image to USB drive"
- Click "Browse" to select a previously saved image
- Click the "Create" button
Do you still have questions? Write them in the comments, tell us what you did or vice versa!
That's all! Read more articles and instructions in the section Articles and Android Hacks . Stay with the Android +1 , it will be even more interesting!