Preparing for installation
The Android SDK supports most modern operating systems based on the x86 and x86_64 architecture, including Windows, many Linux distributions and Mac OS X. The Java Development Kit (Java 7 or Java , which will definitely be required for many of the SDK's features, because Android is inextricably linked with Java.
It is worth noting that the built-in Android emulator requires good hardware on the PC, as, in principle, for other modern development tools.
Android SDK features:
Using the tools, libraries and components presented in this package, you can adapt applications to function with a global positioning system, Wi-Fi, camera, gyroscope, network adapters and a fingerprint scanner built into any Android device. In addition, users have the opportunity to integrate their projects with system services. Some components of this package also support working with multimedia files, such as videos, audio recordings and images, and also have the ability to emulate the Dalvik virtual machine.
Installation using Android Studio
Android Studio has been around for a long time - the official IDE (Integrated Development Environment) for Android development. Everything you need is already included and can be installed in one click. You just need to install the IDE and you can also use all the features of the SDK, integrated within the development environment.
You can download Android Studio from the official website. There you can also find many useful guides on working with the Android SDK, but, unfortunately, they are only available in English.
Android Studio Reviews
Android application developers prefer this program. According to reviews left by IDE users, the software provides more opportunities and a more flexible development environment than its competitors. What does the presence of such a multifunctional emulator and several other tools that are included in the Android Studio package say? It can be seen that with each update the IDE only gets better; new functionality is integrated into it, without forgetting the old one.
With its smart design and simple tools, Google's Android Studio is one of the best software for Android app development.
Installing a separate package
If you do not expect to use such a powerful tool as Android Studio or you already have Intellij IDEA installed, on the basis of which this development environment works, then you can install the Android SDK separately. However, this installation method will not provide any other advantages and it is recommended to use the previous method.
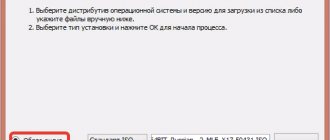
To download a separate package of tools for development without an IDE, you must use the Android Developer site . Ignoring all possible mentions of Android Studio, we go down to the very bottom of the page and find the section “Get just command line tools” - you can also use the search on the page. After downloading the appropriate package for your operating system, just unpack it to any storage location convenient for you - it is also recommended to specify the location of the SDK in Intellij IDEA (Project Structure > SDK).
Installing the latest Android SDKs
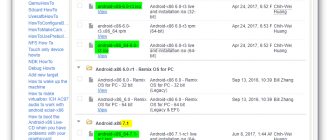
Previously, we had already installed Java, an Android IDE, and a set of current Android SDK packages supplied by default. Before you continue, it's worth taking some time to check what packages are installed and install any missing packages. This can be done using the Android SDK Manager, which can be launched from within Android Studio via Configure -> SDK Manager or from the startup welcome window.
In Android SDK Manager, make sure the following packages are checked in the Status column:
- Tools > Android SDK Tools
- Tools > Android SDK Platform-tools
- Tools > Android SDK Build-tools
- SDK Platform (most recent version)> SDK Platform
- SDK Platform (most recent version) > ARM EABI v7a System Image
- Extras -> Android Support Repository
- Extras > Android Support Library
- Extras -> Google Repository
- Extras -> Google USB Driver (Required on Windows systems only)
- Extras > Intel x86 Emulator Accelerator (HAXM installer)
If any of the above packages are not installed (the Status column is Not Installed), simply check the boxes next to them and click on the Install packages button to begin the installation process. In the dialog box that appears, accept the terms of the license agreement, click on the Install button, after which SDK Manager will begin downloading and installing the marked packages. During installation, an indicator will appear at the bottom of the manager window indicating the installation status.
Launch and opportunities
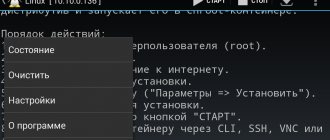
To get access to all the functionality of the Android SDK, just run the android batch file if you are running on Windows, or in the terminal run the command “android” in the “tools/” folder of your SDK to run on Linux and MacOS X. You will be prompted to install the tools for different API versions, the more tools installed, the better. Downloading packages may take a long time depending on your system and internet connection speed.
Let's move on to a description of the main tools:
- Platform-tools includes basic Android interfacing tools such as ADB, fastboot and systrace. Android Debugging Bridge will help you track down errors in the operation of applications on your smartphone, as well as perform some actions on working with APK; fastboot, familiar to all fans of flashing firmware for their Android devices, works in tandem with ADB and helps to get the device working before loading the OS, and systrace is able to analyze the speed of processes in the operating system;
- Build-tools works together with Platform-tools, but can be updated separately. This includes utilities such as ProGuard to protect your APK files, JOBB to work with *.obb extensions, and Zipalign to optimize your finished applications;
- In addition, the SDK includes an advanced Android OS emulator, in which you can test any applications and try out the functions of the latest versions of Android. However, for high-quality emulation you need good hardware on your PC; it is also recommended to use x86 emulation.
How to use the software?
After installing the software package, Android Studio is configured. When you first launch the utility, you will be asked about integrating user settings. If you have no experience using this development environment, you should click “OK”. You can import your settings. The program will launch in the standard configuration by default.
Having dealt with the previous window, the user will see a new one, which shows the progress of downloading the Android SDK to the computer. The time it takes to complete this process depends solely on the speed of the Internet connection on the working PC.
The download can be stopped if necessary. Then click “Finish”. If the SDK download is interrupted and an error appears, click on “Retry”. Now you can work with Android Studio.
Creating a Project
You should start your journey in Android Studio by creating your first project. In the main window that opens after launching the program, the user needs to select “Start a new Android Studio project”. This will open a dialog box that specifies several options:
- The name of the new project. You can rename it later.
- Company domain.
- Storage location on disk.
The Android operating system identifies applications using the package name, which is made up of the company domain and the name of the project.
The next step is to select the gadgets for which the application will be developed:
- Phones and tablets.
- Watch.
- Android TV set-top boxes.
- Virtual reality glasses.
- Android Auto.
The minimum API version for creating applications is 16. Although Android Studio even provides early versions to choose from, they are no longer recognized by modern devices.
By clicking next, the user is taken to the next tab, where the “Empty Activity” item is available to choose from. If the goal is to write an application from scratch, choose this. You can check out other options as well.
Go to the next tab, click “Finish”. It will take some time before Android Studio generates a new user project. The speed of processing requests depends on the performance of the PC.
Project files
IDE Android Studio is in no way distinguishable from other famous analogues. The workspace is very similar to Microsoft's Visual program. The development environment is made in a classic form. Programmers who have not previously worked with Android need to get used to how applications are created for it. All games and utilities are a set of components that perfectly synergize with each other, and not a complete program code.
Simply put, the design of a new project is contained in the .xml file (for example, its icon), while the functionality is hidden in Java. To access project files, look at the left side of the window. Switching between them is carried out using tabs that are displayed directly above the work area.
Project files can also include its resources, such as fonts, images, cache and documentation. They are located in the res folder, which you will find on the left side of the window.
Visual XML editor
When working with XML files, two tabs appear at the bottom of the editor: “Text” and “Design”. In them you can edit the program code responsible for the appearance, select widgets that interest the user, and add them by dragging them onto the project.
Using GRADLE
Android Studio is a well-designed development environment that is a pleasure to work with. The functionality of the software is clearly designed and simplified to the maximum, so that even inexperienced programmers can succeed.
The Gradle tool is something that many other IDEs lack. Thanks to it, all elements created during the development of the application are combined into one APK file, and an assembly is performed.
Building and Debugging
To test an application in the final stage of development, there are two options: test it directly on a smartphone, tablet or other target device, or use an emulator.
To run the finished utility on an Android device, connect it to the computer on which development is taking place via USB. “USB Debugging” and “Install applications from unknown sources” must be enabled.
After connecting the gadget to your PC, select “Run” and then “Run App”. Next, a window will open in which you need to select a real/virtual device to launch the application. After the choice is made, the project will immediately launch on the gadget.
In the Monitors tab, you can monitor the load that the application puts on your smartphone.
ADV Manager
One of the main advantages of Android Studio over its competitors is the presence of an Android device emulator built into the package, on which you can test ready-made projects and the correct operation of utilities that are under development. This is much more convenient than using a real device for all tests.
The Android Studio emulator has rich functionality. It is enough to test the application on different screen configurations, simulate the exact aspect ratios, required resolutions, and technical characteristics of a smartphone, tablet or other Android device.
To test on an emulator, you should follow the path: “Tools” button – “Android” – “ADV Manager”. In the window that opens, you need to select “Create Virtual Device”, and then determine the model of the device that the program should emulate, simultaneously downloading the firmware for it.
To work with the emulator you will need a good PC. You can use it to test not only your own utilities and games, but also those downloaded from other sources.
SDK Manager
Android Studio SDK is a tool that allows you to test Android software on a specific OS version, or develop applications only for it. Available in the “Tools” – “SDK Manager” tab, which contains all SDK Manager components. They can be turned on/off by checking or unchecking the box, respectively.
APK packaging
Android Studio allows you to create a signed APK so that you can later upload the application to Google Play. To do this, click on the “Tools” menu, and in it the “Create signed APK” item. Afterwards, select or create a keystore - confirmation that it was you who developed the application. This is required for Google Play. Save the file created at this stage and never lose it - without it you will not be able to update the application in the future.
By selecting the "Release" build type and clicking the "Finish" button, the creator will complete development of the application at this stage. You can exit the IDE and proceed to downloading the program to the network.
Welcome to Android Studio: First Project
OK it's all over Now! The headache with installing Android Studio is over. Previously, you had to tell Android Studio where the JDK and Android SDK were located - now this happens automatically.
Now let's look at how to create your first project:
To name a new project (application), simply after launching Android Studio, click on Start a new Android Studio project if you are already in Android Studio from the top menu and select File > New > New Project .
Click on Start a new Android Studio project
Now you need to come up with a name for your application and also add your company domain.
Select Activities to start
Now you need to select Activiti to start. Android applications consist of activities and fragments. Simply put, activities are the screens that you navigate between when using applications. Applications typically start with some kind of splash screen or navigation window to show the user what the application can do.
Select Empty Actyvity
What you choose will be the main activity of your application. To avoid getting confused in the code right away, I recommend starting small and selecting Empty Actyvity , then clicking Next .
Setting up the project configuration
In this window we will give a name to our application and a name to the layout file that will handle the appearance of the application and the position of elements.
Activity files are written in the Java programming language and have the “.java” extension, layout files are written in the XML markup language and have the “.xml” extension.
If you're building a large application, you'll end up with a large number of different activities, all with different names. This can be confusing, so it's important to give them logical names.
- Name - this is the actual name of your application. You can call it whatever you want. In the case of this example, My Application .
- Package name is a unique namespace in the Java language. In the case of the example, this is ru.xpcom.myapplication . Where ru is the country, xpcom is the company and myapplication is the name of the application without spaces. The Package name must be unique; there cannot be two applications with two identical names in the Google Play Store.
- Save location - the folder in which all project files will be stored.
- Language - the language in which programming will take place, I recommend Java; at the moment there are more examples, libraries, etc. for it on the Internet.
- Minimum API level l - take API 21, this is Android 5.0, there is no point in taking it lower. Nobody actively uses smartphones running Android 4; they are usually used as regular dialers.