» Operating Systems » Windows 7
Anton Nazarenko 03/16/2019
Sometimes when installing a new operating system, in particular Windows 7, the question arises of how to install Windows 7 on a GPT disk.
Often during installation an error appears that informs the user that it is impossible to complete this task.
Setting up UEFI and installing Windows on a GPT disk
This method is only applicable to computers with UEFI firmware, so the first thing you need to do is make sure that it really is present. If you see a graphical interface with mouse support when you enter the BIOS, it is more likely that your PC is running UEFI firmware, hence you can install the system on a GPT drive. You can get into the new BIOS in the same way as into the old one - just hold down the F2 or Del button during boot.
Next, in the BIOS Features or BIOS Setup section, you need to find and enable UEFI boot instead of CSM, and in the Peripherals section, select AHCI instead of IDE for the SATA operating mode. If you are installing Windows 7 or an earlier version of the system, you must also disable the Secure Boot feature (usually located in the Boot section).
After these manipulations the message “Windows cannot be installed. GPT Partition Style" should no longer appear.
Important: the system installed on the GPT disk must be 64-bit, these are the terms of Microsoft policy. If you want to install a 32-bit version of Windows, the partition will have to be converted to MBR. If the system is installed from a flash drive, it is recommended to recreate the bootable USB drive so that it supports UEFI. To do this, you can use the command line, or even better, the special Rufus utility.
Setting up UEFI before installing Windows 10 from a flash card
UEFI is a graphical interface that is responsible for the pre-boot environment of the operating system.
UEFI is essentially a replacement for the outdated BIOS basic input/output system, which has been successfully used in computer technology for decades. The world does not stand still, but moves forward by leaps and bounds, so it’s time to part with an old, trusted “friend” who has repeatedly helped when various problems arise. Created back in 2005 and improved over the past ten years, the “Extensible Firmware Interface” is much more responsive to the requirements of modern computer hardware. The need for its implementation arose a long time ago, and now all new models of personal computers are released with UEFI installed.
The UEFI-boot boot program, which controls the startup of a laptop or desktop computer, similar to the BIOS, begins to start when the computer is turned on before Windows 10 starts. With its support, all components and modules are polled to determine their readiness for operation, and then Windows 10 itself is checked. License code of the program , which prevents viruses from modifying the bootloader and installing pirated copies of Windows 10, can be located in a long-term storage device chip built into the motherboard, in a hidden area of the hard drive, or in its own network storage. UEFI management and debugging are easy to use and tailored to create maximum user convenience.
If you have an idea about BIOS debugging, then there will be no problems setting up UEFI:
- Hold down the Delete or F2 key (the specific keyboard combination is indicated in the technical description) while turning on the computer.
- The UEFI launch pad will open.
- Press the F7 key on your keyboard or the More key in the menu on the display.
In Control Panel, press the Advanced key
- In the start panel, click on the “Download” tab. Select the “USB Support” option and select “Full Initialization” in the drop-down menu.
In the menu, select “Full initialization”
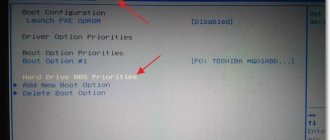
- Expand the Compatibility Support Module option. Set it to "Available". There, in the additional tabs, set “Setting up boot devices” to the “UEFI only” option.
- Put “Both, but UEFI first” in the “Boot from media” line.
- Set "Windows UEFI Mode" in "Secure Boot".
- Select the flash card as the initial boot module in the “Boot Menu”.
- Save your selections by pressing F10.
- Press Enter to reboot.
After completing this algorithm of actions, you can begin installing Windows 10.
Video: how to configure UEFI before booting Windows 10 from a flash card
Converting GPT markup to MBR
If your PC is using a regular BIOS, installing Windows on a GPT drive will not be possible. In this case, the most correct solution would be to convert the GPT style to MBR immediately before installing the system. When you receive a notification that Windows cannot be installed, close the wizard window and press Shift + F10 . In the command line that opens, run the following commands sequentially:
diskpart list disk select disk 0 clean convert mbr
The first command launches the Diskpart utility, the second displays a list of all physical disks connected to the PC, the third command selects the desired disk (in this example it is disk 0), the fourth completely cleans it (all created partitions are deleted), the fifth command converts the GPT partition style to MBR. When executing the list disk command, pay attention to the asterisk in the GPT column, it just indicates that the disk has the GPT style.
To make sure that the conversion was successful, you can display the list disk again - the asterisk in the GPT column should disappear. That's all, use the exit command to exit the Diskpart utility, close the command line and continue installing Windows, after restarting the computer. After cleaning, the partitions will have to be created again, but this time no notifications about the impossibility of installing on the selected partition should appear, since the disk will already have MBR partitioning.
Operating system installation
After the preparatory work is completed, you have everything in order to correctly install Windows 10 or the desired “seven”, we invite you to familiarize yourself with the algorithm of actions, following which strictly you will not encounter any difficulties.
Algorithm of actions
Insert the bootable USB flash drive into the USB connector and restart the computer. After the subsequent launch, you will immediately be redirected to the operating system installation menu. First, do not forget to indicate the language you are comfortable with. Do not ignore this rule, since the download process, although performed automatically, will occasionally require your participation, which is why it is so important that the message appears in a language that you understand perfectly.
First step - specify your language and region
Next, select the “Full installation” option, at the next stage information will appear that your disk has several partitions, you can ignore this and proceed further.
During the installation process, your disk will be converted to GPT. We warn you that after completing all procedures, your hard drive will be completely clean. For this reason, if you have some important documents, photos, videos saved on your PC, first transfer them to other drives, and only then start loading your new Windows.
By the way, you can reformat a disk from MBR to GPT not only when you are trying to install a new OS. If Windows 10 is already installed on your computer at this moment, you can carry out the reformatting process without even having to reinstall the operating system.
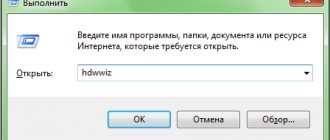
Windows 10 comes with such a successful tool as Disk Management. You can call it if you click on the “Start” button, then click on “Run”, then enter “diskmgmt.msc” in the line.
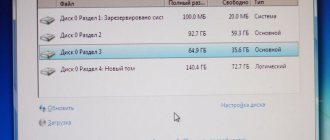
A window will appear on the screen, it will display all the disks into which your hard drive is divided. You will have to remove each of them in turn. This is not difficult to do, just click on the disk so that it is highlighted, and then right-click and select the “Delete volume” option in the context menu.
After you delete all disks in this way, the “Convert to GPT disk” option will still be available in the context menu, which we suggest you use. This formatting process is fast, but only if there are no bad sectors.
Conversion to version 10 is much easier
Once the process is completed, you can re-partition the disk into several partitions, one of which will be active. It is on it that you can reinstall Windows 10 or your beloved “seven” if necessary.
Installation problems
Unfortunately, occasionally you have to deal with various problematic situations. If you were unable to install the OS so easily, delete all partitions and format the disk in GPT, then you are missing something, so you need to take some other steps to eliminate the mistakes you made.
So, restart your computer, after launching the boot disk welcome window, select the “System Restore” option. Next, you will have the opportunity to work with the command line again.
We have already worked with the first four commands, so it will not be difficult for you to enter them:
- diskpart;
- list disk;
- select disk X;
- clean.
Next, write the convert mbr command, which instructs the system to reformat the disk space. The following command “create partition primary size xxxxxxx” allows you to specify the size of the future disk. It is thanks to this command that you split the hard drive into several sections with the desired size.
It is important to make one of the disks active
It is important to make one of the disks active, since the operating system is supposed to be installed on it later. To do this, use the active command. Format this partition using the following command “format fs=ntfs quick”. All that remains is to assign a letter to your drive using the assign command. Of course, to exit the command line, you need to type the last exit command.
Now click the “Update” button and continue installing Windows. Unfortunately, if this time you are faced with another technical glitch, then the problem most likely lies somewhere else.
Often, users do not pay attention to the bitness of their system, so they start the installation with a 32-bit system, which leads to unsuccessful results. It is important to have a 64-bit operating system; only in this case can you take steps to format the disk in GPT and install a new operating system.
So, this process cannot be called radically easy. Since several actions are expected to be performed, accompanied by the introduction of commands. However, if desired, each user will be able to figure out how to achieve what they want if they follow the proposed algorithm.
Using third party programs
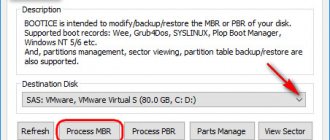
It is unlikely, but it may happen that you will need to convert the GPT partitioning style to MBR on a disk with data already on it. The method described above using Diskpart is not suitable in this case, since the clean command removes all partitions from the disk, and along with them the data they contain. In such a situation, you can use third-party applications, for example, Minitool Partition Wizard Bootable, Paragon Hard Disk Manager or AOMEI PE Builder.
All of these programs allow you to convert a basic GPT disk to MBR and vice versa, and the conversion procedure is simple and accessible to users with any level of experience.
Booting Windows from a GPT disk
According to the official Microsoft documentation https://msdn.microsoft.com/en-us/windows/hardware/gg463525.aspx, all of its operating systems, starting with Windows Server 2003 SP1, support GPT volumes as data disks, but boot Only 64-bit versions of Windows installed on motherboards that support the new UEFI (Unified Extensible Firmware Interface) specification will be able to use GPT volumes. Thus, it will not be possible to install or boot Windows from a GPT disk on older computers with a classic BIOS.
Advice . There are several workarounds that allow you to boot Windows 10/7 x64 on BIOS systems with a GPT disk. To do this, you need to use a boot disk containing an emulator of the UEFI development environment - DUET (Developer's UEFI Environment) , which simulates EFI. In this configuration, the computer's BIOS starts booting with SYSLINUX installed, which loads the UEFI emulator (DUET). DUET, in turn, calls the standard Windows bootloader - bootx64.efi. It is also possible to switch the disk to hybrid MBR mode using the Linux gdisk utility. However, in both cases the procedure is quite complex and requires the user to have good knowledge of the Linux OS.
Once again, we note an important fact that should be forever understood: booting Windows x64 from a GPT disk is only possible on a system with UEFI.
Thus, if your computer runs on a BIOS, and you need its disk to contain a GPT partition table, the easiest way would be to add another hard drive (regular or SSD) with MBR partitioning to the system, install Windows on it and then boot from him.
We will try to slightly modify this technique. To do this, we will need a small USB flash drive or SD card (at least 64 MB) with MBR markup, on which we will place the Windows boot manager - bootmgr. This bootable flash drive will provide the initial boot of the system and transfer control to the main system bootloader located on the GPT volume.
Important . The system must support booting from a USB flash drive or SD card at the BIOS level.
This way we can ensure that any (both 32 and 64 bit versions of Windows !!! ) can boot from a GPT disk on a system with a BIOS that does not support EFI.
Installing the system in unallocated space
In some cases, you can do without using the command line or additional applications. If, when installing Windows 7/10, the wizard writes “installation on this disk is not possible,” and the disk size does not exceed 2.2 GB, it is worth trying this method. Using the installation wizard, delete all created partitions and try installing Windows into a single unallocated space.
If no error occurs, the system itself selected the MBR style and converted the disk to it. However, in this case, you will have to create the user partition D separately after installation. Also, you will not have a hidden “System Reserved” partition on the disk, which will somewhat reduce the fault tolerance of Windows.
- 40shared
- 1Facebook
- 36Twitter
- 3VKontakte
- 0Odnoklassniki
System requirements
Windows 10 is a hardware-intensive system. Developers set not only the minimum requirements for comfortable work. Lack of support for certain technologies will prevent the installation from running.
Therefore, you need to make sure that all requirements are taken into account.
- The microprocessor clock must be at least 1 GHz.
- The amount of free space on your hard drive must meet the requirement of 16 GB for 32-bit systems and 20 GB for 64-bit systems.
- The amount of RAM should not be set below 1 GB for the 32-bit version and 2 GB for the 64-bit version.
- The video adapter must support the WDDM architecture driver and must have a memory capacity of at least 128 MB.
These are the basic requirements for creating a minimally comfortable environment for Windows 10. If the computer hardware does not meet these requirements a little, then the “ten” will be able to work, but it will be terribly slow.
Moreover, given the built-in resource-intensive technologies ( SuperFetch ), it is better to build a PC focused on more productive components.
WDDM support was included in Vista, and for the normal functioning of the WDDM driver, a package of at least DirectX 9 version is required.
- Microprocessor support for No-eXecute (NX) . This option allows you to protect the system from malicious code attacks. The NX function is defined in processors of the AMD family, while in the Intel family a similar function is called eXecute Disable (DX) .
- Microprocessor support for PAE (Physical Address Extensions) for 32-bit versions. This technology is necessary for NX to work and allows a 32-bit system to “see” more than 4 GB of memory.
- SSE2 instructions . As a rule, a microprocessor with NX function also supports this instruction set.
- An important condition is support for the PrefetchW, LAHF/SAHF and CMPXCHG16B .
These requirements are considered mandatory by developers. Therefore, if the 32-bit processor does not support PAE , the installation of the system will be blocked.
Installation is blocked if there is no support for NX, SSE2 .
How to install Windows 10 on UEFI BIOS
Then nothing prevents us from installing Windows 10 via UEFI on almost any computer with sufficient hardware parameters.
It is possible in both formats for organizing files on your hard drive. The second of them, GPT, is better suited for computers with large disk space - 2 TB or more, while the older one will not allow the use of this resource. Our website has a large selection of applications for your iPhone and iPad.
Installing Windows 10 UEFI BIOS on MBR
Many people would like to receive instructions on how to install Windows 10 via UEFI with MBR. Often this doesn't work out. The computer reports that "yuefai" is incompatible with this partition table. But the situation is not hopeless.
You can either convert the hard drive style to a more modern one, or run the BIOS mode in “UEFI”, provided by most motherboard manufacturers (Figure 6). It's called Legacy. It is set in the bootloader menu (listed there as USB boot without UEFI). Priority in the boot menu is given to a flash drive without “yuefai”, and the type is defined as “legacy” or CSM.
Figure 6. Appearance of the error window when trying to install UEFI
Installing Windows 10 UEFI BIOS on GPT
This option usually does not cause any problems, since the 64-bit “ten” is specifically designed for hard drives with such a file organization. The main thing is to have the appropriate distribution kit on a disk or USB drive.
If it is still an MBR type, then before installing Windows 10 on a laptop with UEFI, you can reformat it as described above.
Figure 7. Instructions for installing the Windows 10 operating system