Many laptop users, including such a well-known manufacturer as Hewlett Packard, quite often complain that they cannot boot from a removable device in the form of the most ordinary flash drive containing an operating system installation distribution or specialized recovery tools, despite the fact that that the flash drive is inserted into the appropriate port and seems to be detected by the laptop. The fact is that many current laptop models are equipped with built-in tools that allow you to access certain functions of the device, including changing the default boot parameters or even resetting the parameters to the factory state. Next, we suggest you see how to boot from a flash drive on an HP laptop. Despite the seemingly narrow focus, some points from the material proposed below will be useful for many other users who are faced with such problems.
Booting from a USB flash drive on an HP laptop: general principles
Like many other manufacturers, HP laptop developers decided to make it somewhat easier for their owners to access some important settings by building into most of the latest lines of such devices special menus that are not directly related to the primary or installed (installed) operating system. It is this menu that allows you to access both the BIOS parameters and the boot start menu with the selection of the required device to be used in each specific case. Despite such research, you shouldn’t discount installing Windows on an HP laptop from a flash drive using standard boot methods. Roughly speaking, the user has two options, but neither of them may work if some important conditions are not met and the necessary parameters are not set.
How to boot an HP Pavillion laptop from a flash drive or disk
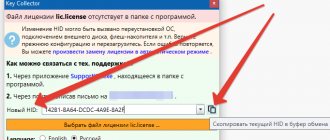
Hello friends! Our reader does everything right until the last screenshot. It was only necessary to correctly translate this message:
“To change Safe Boot Mode, please enter the code below to complete the change. If you did not submit this request (to change), then press ESC to exit without changing." I think you already understand that in this message we are asked to enter this code 8721 on the laptop keyboard (in your case the code will naturally be different) and press Enter, after which your changes in the UEFI BIOS settings will be saved and the laptop will reboot,
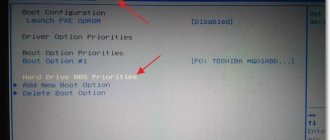
And after the reboot, press ESC, get to the “start menu”, press F-9 Boot Device Options (change boot settings),
We get to the boot menu and our Kingston flash drive is already present here, select it and press Enter, our laptop boots from the flash drive.
What we were dealing with now is nothing more than an additional means of protection from us (malicious users), oh, sorry, that’s not what I meant, of course, this is a remedy against rootkit malware, used on HP laptops.
At the end of the article I also want to say this. All new laptops have the Windows 8 operating system installed and the BIOS interface has been replaced by the UEFI interface. Many readers have questions. What is UEFI BIOS, who invented it and why? What is the Secure Boot tab for and is it possible to disable it, and if so, how to do it? You will learn all this from our next article entitled " ".
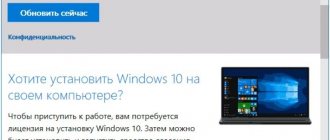
HP laptops usually come with a pre-installed Windows 8 operating system, which many users prefer to change to the more familiar Windows 7 and turn to service centers for help. We want to help you a little and tell you how to reinstall Windows on an HP laptop yourself.
How to boot from a flash drive on an HP laptop using the standard built-in menu?
So, to begin with, let’s focus on the built-in tools, which can be found in the start menu, which in most cases is called up by pressing the Esc button immediately after turning on the laptop (this is directly evidenced by the appearance of the corresponding line on the screen).
Next, a list of all those actions that you can choose from appears. But in the context of booting, we are most interested in the start points with the ability to select a device (Boot Device Options - F9) without setting similar parameters in the primary system and the BIOS settings item (BIOS Setup - F10). Logging into the primary system may be required to change some settings that may block the use of removable drives to start from them, which makes it impossible to install another operating system other than the one you already have.
After pressing the F9 key, if the blocking options are not active, select your drive from the list, after which the HP Pavilion laptop will boot from the flash drive. But sometimes the start may not occur. Why then does the installed OS load, but the flash drive is ignored? It's all about some parameters of the primary system.
How to boot an HP Pavillion laptop from a flash drive or disk
Hello friends! Our reader does everything right until the last screenshot. It was only necessary to correctly translate this message:
“To change Safe Boot Mode, please enter the code below to complete the change. If you did not submit this request (to change), then press ESC to exit without changing." I think you already understand that in this message we are asked to enter this code 8721 on the laptop keyboard (in your case the code will naturally be different) and press Enter, after which your changes in the UEFI BIOS settings will be saved and the laptop will reboot,
And after the reboot, press ESC, get to the “start menu”, press F-9 Boot Device Options (change boot settings),
We get to the boot menu and our Kingston flash drive is already present here, select it and press Enter, our laptop boots from the flash drive.
What we were dealing with now is nothing more than an additional means of protection from us (malicious users), oh, sorry, that’s not what I meant, of course, this is a remedy against rootkit malware, used on HP laptops.
At the end of the article I also want to say this. All new laptops have the Windows 8 operating system installed and the BIOS interface has been replaced by the UEFI interface. Many readers have questions. What is UEFI BIOS, who invented it and why? What is the Secure Boot tab for and is it possible to disable it, and if so, how to do it? You will learn all this from our next article entitled " ".
Not long ago, the American company Hewlett-Packard released its line of g6 laptops, which are positioned as mid-budget with entry-level business class. The main elements of the external decoration of the body of such devices were glossy plastic elements using the structured surface of the cover, as well as metal elements of the moving body structures. Screen matrices are used by TN-film, providing the necessary level of display of both information for work and multimedia applications. The hardware of the devices varies from initial working capacities to initial gaming ones, which allows the user to choose a device “for themselves.” G6-series laptops run Windows, Linux and ChromOS. The connecting link between the operating system and the hardware of these laptops is a special BIOS settings system. Here the user can enable and disable those integrated into the product, change the boot priorities of hard drives and external media, and also fine-tune individual elements of the laptop.
How to set the settings in the primary BIOS system?
The inability to use a flash drive as bootable media is explained by the fact that the primary system itself has a special lock called Secure Boot mode. By default, it can be in the active state.
Bypassing the blocking is quite simple. Enter the BIOS by pressing the F10 key, and then set the Disabled parameter for the specified mode, then exit the settings while saving the parameters (!), and when rebooting, use the start from removable media option again.
In some models, such actions are not enough. It also happens that to activate booting from a BIOS flash drive on an HP laptop after disabling Safe Start mode, confirmation is required, which many users ignore.
The system displays a line with a message stating that you need to enter the specified code and press the enter key!!! If this is not done, booting from removable media will remain impossible.
What to do after installation
Once the download is complete, the system will need to be configured. The user will need to go through a little configuration of some parameters. For example, set the date, system time, create your Microsoft account using your email address, Skype or mobile phone number.
Once you get to the Windows 10 desktop, you will also need to configure it. For example:
- Activate Windows if this was not done during installation.
- Establish an Internet connection via Wi-Fi connection.
- Download the necessary software from the global network for comfortable work at the computer.
The operating system will prompt the user to create a login pin after turning on the laptop. You can refuse this.
Setting up Windows 10 after installation
What to do if the flash drive is not detected in the BIOS?
Now a few words about user complaints about the fact that the flash drive is not detected either in the BIOS or in the boot menu. Usually this situation is resolved quite simply, and not only on HP devices. Most users either do not know or forget that the flash drive must be inserted into the USB port before turning on the laptop. How to boot from a flash drive on an HP laptop in this case? Completely turn off the device using standard Windows tools, insert the media into the desired port, turn on the laptop and only after that perform boot manipulations (in theory, the device will be detected).
Creating a Windows 10 installation flash drive
Step 1 . We go to the Microsoft website and download a special program that will automatically create an installation flash drive. Click " Download Tool Now " and the download will begin. Next, insert the flash drive into your computer or laptop and run the downloaded MediaCreationTool utility.
Step 2 . After launching the tool, follow the recommendations on the screen, select “ Create installation media (flash drive, disk or ISO) ”, in the new window “ USB flash memory device ”. Next, select the flash drive that you inserted into the USB port and click “Next”. The automatic process of downloading Windows 10 will start and the system will be further recorded on the USB flash drive as an installation one.
USB check
If for some reason the flash drive is still not detected, check the BIOS settings. This is the System Configuration section. Here the USB Boot item must be set to Enabled. If such loading is disabled, change the parameter, save the changes and try to start again.
Note: Please note that in some cases, the name of the flash drive in the primary system or in the boot menu may be preceded by the designation HDD, corresponding to the hard drive, after which the name of the removable device will be indicated. This is normal.
Properly creating bootable media
There is another problem regarding HP laptops. Installing another Windows OS from a flash drive may not start for the simple reason that the bootable media itself was created incorrectly (for example, it has an EFI bootloader, not an MBR, which is intended for devices with BIOS, not UEFI.
Try rewriting the system image for installation, for example, in the Rufus program, selecting a universal scheme as the bootloader, which can be used for both BIOS and UEFI.
If you use the UltraISO program, burn the image exclusively from the boot menu and under no circumstances change the USB-HDD+ recording method.
Options for starting from a removable device in the eighth and tenth versions of Windows
Now let's briefly look at how to boot from a flash drive on an HP laptop using standard Windows tools of versions 8 and 10. Go to the options menu, go to the recovery and security section, and in the recovery option select special boot options.
After this, after a couple of tens of seconds, a menu will appear in which you can select to start from removable media. Again, booting may not be possible if the security settings in the BIOS have not been changed as described above.
Reinstalling Windows 10
In the example below, Windows will be reinstalled on the same disk (though on a completely formatted and partitioned slightly differently).
If you have configured the BIOS correctly and burned the USB flash drive, then after selecting the boot device (F9 button (photo 5)) you should see a welcome window and offers to install Windows (as in photo 6).
We agree with the installation - click the “Install” button.
Photo 6. Welcome window for installing Windows 10.
Next, when you get to the installation type, you need to select “Custom: Windows installation only (for advanced users).” In this case, you can format the disk as needed and completely remove all old files and OS.
Photo 7. Custom: Windows installation only (for advanced users)
The next window will open a (sort of) disk manager. If the laptop is new (and no one has “commanded” it yet), then most likely you will have several partitions (including backup ones, for backups that will be needed to restore the OS).
My personal opinion is that in most cases, these sections are not needed (and even the OS that comes with the laptop is not the best, I would say “stripped down”). It is not always possible to restore Windows OS using them; it is impossible to remove some types of viruses, etc. And a backup on the same disk as your documents is also not the best option.
In my case, I simply selected them and deleted them (every single one. How to delete - see photo 8).
Important! In some cases, removing the software that comes with the device is a reason for refusing warranty service. Although, as a rule, software is never covered by a warranty, and yet, if in doubt, check this point (before deleting everything)…
Photo 8. Deleting old partitions on the disk (which were on it when the device was purchased).
Next, I created one partition of 100GB (approximately) for Windows OS and programs (see photo 9).
Photo 9. Everything was deleted - there was only one unallocated disk left.
Then all that remains is to select this partition (97.2GB), click the “Next” button and install Windows into it.
Remark! By the way, the rest of the space on your hard drive doesn’t need to be formatted at all for now. After Windows is installed, go to Disk Management (through the Windows Control Panel, for example) and format the remaining disk space. Usually, they just make another partition (with all the free space) for media files.
Photo 10. One section created
100GB for installing Windows on it.
Actually, then, if everything is done correctly, the installation of the OS should begin: copying files, preparing them for installation, updating components, etc.
Photo 11. Installation process (you just need to wait :)).
There is no point in commenting on further steps. The laptop will reboot 1-2 times, you will need to enter the computer name and the name of your account (can be anything, but I recommend entering them in Latin), you can set the Wi-Fi network settings and other parameters, and then you will see the usual desktop ...
PS
1) After installing Windows 10, virtually no further action was required. All devices were identified, drivers were installed, etc. That is, everything worked the same as after the purchase (only the OS was no longer “stripped down”, and the number of slowdowns decreased by an order of magnitude).
2) I noticed that when the hard drive was actively operating, a slight “crackling” sound was heard (nothing criminal, some drives are noisy like that). I had to reduce its noise a little - how to do this, see this article: https://pcpro100.info/shumit-ili-treshhit-zhestkiy-disk-chto-delat/.
That's all for now, if you have anything to add about reinstalling Windows on an HP laptop, thanks in advance. Good luck!
HP laptops usually come with a pre-installed Windows 8 operating system, which many users prefer to change to the more familiar Windows 7 and turn to service centers for help. We want to help you a little and tell you how to reinstall Windows on an HP laptop yourself.
Disable disk encryption if it is active
Finally, another important problem associated with HP laptops. How to reinstall the system from a flash drive if the hard drive is locked in the form of the Bitlocker encryption tool (this, alas, also occurs).
In this case, you need to call the “Control Panel”, go to the encryption section, and then, if there is such an item, disable Bitlocker. If there is no such item, you can generate a code, enter it when using special boot options, and after unlocking the disk, install another OS instead of the existing one.
Basic BIOS settings for installing Windows
Before you start Windows on an HP g6 series laptop, you need to set the appropriate settings in the BIOS.
We place HP Pavilion g6 at the workplace. How to enter BIOS is already known. Go to the “System Settings” menu and open the Boot settings sub-item. Here, using the F5 and F6 keys, we move the device with the Windows installation image (flash drive, CD) to the very top of the priority tree. This action will allow the system to start the installation process from the specified media upon startup. Before exiting the BIOS settings, in the “Exit” menu, you must select the option to save the settings and confirm your choice. After rebooting the laptop, the installation process will begin.
Having mastered the information on how to enter the BIOS on the HP Pavilion g6, Windows 8, 7, XP can be installed without much difficulty.
Epilogue
As you can see, there is nothing particularly difficult in choosing the correct configuration for using a flash drive as an external boot device. As for the most important conclusions and results, they are as follows:
- disable safe start mode in BIOS;
- be sure to confirm the change in parameters by entering the specified code;
- insert the flash drive into the desired port before turning on the laptop;
- Properly create bootable media for a specific primary system or disk partition;
- do not disdain boot tools for the latest modifications of Windows;
- unless absolutely necessary, do not replace the hard drive, and if you do, clone it if possible;
- Never, under any circumstances, experiment with deleting hidden hard drive partitions that may contain backup copies with factory settings and system utilities “built into” the laptop.
Finally, even if you follow the above rules, do not forget to periodically clean the system and promptly check it for viruses, since they can also play a fatal role in making it impossible to boot from a removable device.