Resetting BIOS settings via the BIOS menu
This method is suitable if you can access the BIOS when you turn on the computer. To do this, when you turn on the computer, press a special button, which is responsible for entering the BIOS settings. Most often this button is the Del (Delete) button.
Further actions depend on the manufacturer of the motherboard and the BIOS in it. It should not be difficult to visually distinguish which BIOS is on the motherboard; just look at the explanatory pictures for the instructions for each type of BIOS.
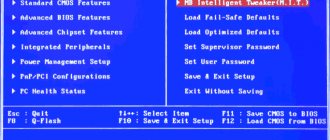
Reset BIOS Settings in Award Bios
Using the keyboard, go to the “Load Optimized Defaults” item. Press the Enter key, then when prompted for confirmation, select “OK” using the keyboard arrows. Press Enter.
Now go to the “Save & Exit Setup” item. Press Enter, after which the computer should reboot and the BIOS settings should be reset.
Reset BIOS Settings in Phoenix Bios
Use the keyboard arrows (left, right) to go to the top menu tab called “Exit”.
There we find the item “Load Setup Defaults”. Select it using the up and down arrows and press the Enter key. A window will appear in which you need to confirm your desire to reset the BIOS settings - select “OK” and press Enter.
Now you need to select “Exit & Save Changes”.
Go there, press Enter, if it asks for confirmation, select “OK”, and press Enter again. The computer should restart and reset the BIOS settings.
Reset BIOS Settings in ASRock UEFI BIOS
In the top menu, go to the “Exit” tab.
Select the item “Load UEFI Defaults”.
To the question “Load UEFI Defaults?” We answer “Yes”.
Now select the “Save Changes and Exit” item.
To the next question in the form “Save configuration changes and exit setup?” We answer “Yes”.
After this, the BIOS settings will be reset and the computer will restart.
Resetting BIOS settings in ASUS UEFI BIOS
ASUS motherboards have two UEFI interfaces - one was used on older motherboards released before about 2014, the second is used on all currently produced motherboards. Therefore, if you do not visually recognize the interface of your BIOs/UEFI, do not rush to close the page with these instructions, but simply scroll further.
First option
In the lower right corner, look for the “Default (F5)” button and click on it.
A window will appear asking you to confirm the action being performed. Select "OK".
Now the main menu will open in front of us again. In the upper right corner we find the “Exit/Advanced Mode” button and click on it.
Select “Save Changes & Reset”.
The computer will reboot and the BIOS settings will be reset.
Second option
Press the F5 key, or the “Default (F5)” button at the bottom of the screen.
In the window that appears, select “OK” or press the Enter key.
Then select “Save & Exit(F10)” (or press the F10 key).
And press “OK” again, or the Enter key.
Reset BIOS Settings in MSI UEFI BIOS
In the BIOS main menu, select “Mainboard settings” (“Settings”).
Select the item “Save & Exit”.
In the menu that opens, select “Restore Defaults”.
A window will appear asking you to confirm the action - “Load Optimized Defaults?” We answer “YES”.
Now you need to exit, saving the reset BIOS settings. To do this, go to the “Save Changes and Reboot” item.
When asked if we really want to reboot - Save configuration and reset - we answer “YES.
The computer will then restart and its BIOS settings will be reset to default settings.
Booting using the "Boot Menu"
There is an easier and more convenient way to boot from a DVD or flash drive for both BIOS and UEFI - boot using the “Boot Menu”.
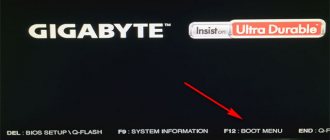
To call the boot menu, the “F8”, “F10”, “F11”, “F12” or “Esc” keys can be used. They can often be seen in prompts on the initial boot screen of your computer. You can also find out this information from the instructions, on the website of the motherboard or laptop manufacturer, by searching on the Internet, or at random.
Immediately after turning on the computer, press and hold the “Boot Menu” key until the boot device selection menu appears.
Use the down and up arrows to navigate to the DVD drive or flash drive and press Enter. Sandisk Cruzer
The advantages of this method are obvious - you don’t need to delve into the BIOS, you don’t need to return the BIOS settings back later (although this is not always necessary), and it’s enough to call this menu just once, since after you start installing Windows, this will no longer be needed. Additionally, using the "Boot Menu" does not change the BIOS or UEFI settings.
Resetting BIOS settings by removing the battery
First you need to turn off and unplug your computer.
To do this, you need to find the power supply on the back of the system unit and turn it off with a special button. Also, it would be a good idea to pull out the power cord from it; this is necessary if there is no power switch.
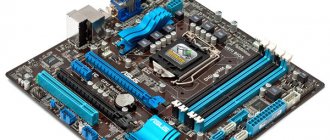
Next you need to open the system unit, most often this is achieved by simply unscrewing the bolts from the side cover and removing it.
Inside you need to find a round CR2032 battery, most often it is located at the bottom of the motherboard. In order to remove the battery, you need to press the special holder.
After the battery is removed, you need to hold down the power button for 10-15 seconds. Since the system unit is de-energized, it will not turn on, but it will completely discharge any existing accumulated electricity in the computer. At this point, the BIOS settings will be reset.
Next you need to return the battery to its place. To do this, simply place it on the battery connector and press lightly so that it fits into it.
Now you can close the system unit by returning the cover to its place, plug in the power cord and turn on the power supply, after which you can turn on the computer.
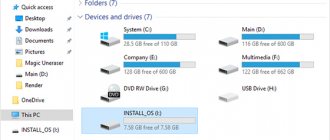
Removable device in BIOS
First of all, let's translate it into Russian. Removable device translated from English sounds like a removable device. Removable devices include USB flash drives, USB external hard drives, external CD/DVD drives and all those removable media that are usually connected via the USB interface.
Removable device may also have names such as:
Usually it looks like a separate submenu in the BIOS, by going into which you can set the boot priority from removable media.
Setting priority in Removable Device may be necessary when you use several bootable flash drives or bootable media are presented simultaneously in the form of a USB flash drive and an external hard drive.
To indicate which of them you need to boot from first is the Removable device in the BIOS.
Removable device is in first place in the bios boot list
Also, if your bootable flash drive is not recognized by the BIOS by its name, then to boot from it, put Removable device first in the boot priority.
source
Resetting BIOS settings via jumper
We de-energize the system unit by turning off the power supply with a special switch located near the entrance to the power cord.
It is also recommended to remove the power cord itself.
Next, remove the cover of the system unit and get inside the computer. Now we are looking for a special jumper on the motherboard. It looks like a blue (in most cases) jumper that is connected to two pins; there should be three pins in total. Typically, such a jumper is labeled as “Clear CMOS”, “CLR”, “CLEAR”, “PSSWRD”.
To reset the BIOS, this jumper must be moved one pin to the side. Those. Initially, the jumper covers pins 1 and 2 - we need to connect it to pins 2 and 3.
After this, you need to hold down the computer's power button for 10-15 seconds to completely discharge the remaining electricity in the system unit. After this, the BIOS settings will be reset.
We return the jumper to its original place (pins 1 and 2), close the system unit, plug the power cord back in and turn on the power supply, and then the computer.
Password on boot what is this in the BIOS?
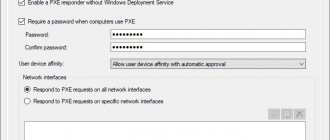
Password on boot is a useful option that allows you to set a boot password. That is, it’s like in Windows, only here you will be required to enter a password on the PC before the system boots. Good security can be arranged
Final thoughts:
- Useful if you have children and have important or secret data on your computer.
- The password will help protect your PC from strangers.
- You can protect your PC from your wife.
Option in BIOS:
Like many options in the BIOS, Password on boot has two values - Disabled (off) and Enabled (on):
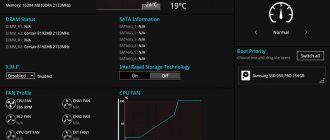
Monitor
This tab monitors system parameters. You can control the temperature of the processor and motherboard (no one I ask, no one knows where exactly this sensor is located, if you know, please write in the comments, I’ll add it to the article, everyone will be interested)
You can also see the rotation speeds of the fans connected to the motherboard here. All of this is tracked by default; if you don’t need it, then any or all of them can be disabled by selecting the desired item, pressing Enter and selecting Ignore.
The BIOS has a function that controls fans - Q-Fan Control. You can control the CPU fan and case fans separately.
Using CPU Fan Speed Low Limit, you can set the minimum rotation speed of the processor fan. In theory, if it drops below there will be a warning and the computer will not turn on. My silent computer does not have a CPU fan, so I have to disable this feature.
CPU Fan Profile—sets fan control parameters. Silence is important to me, so I chose Silent
You can also see the voltage supplied to the processor along the +3.3V, +5V, +12V lines. You can track whether any voltage is outside the limits (it seems 5%). If it does, then you can think about replacing the power supply.
BIOS: problems and solutions
BIOS related issues:
1. Unstable operation of the system and constant failures.
2. The operating system does not boot.
3. Devices connected to the laptop are not recognized.
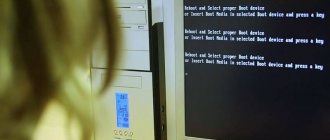
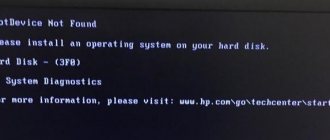
4. When the computer boots, an error appears on the screen prohibiting you from turning on the operating system.
The most effective solution
As a rule, such problems arise due to incorrect BIOS settings. You can solve the issue this way: return all settings to their original version (factory mode). Completed in three simple steps:
1. The power of the laptop is turned on. As soon as the loading starts on the screen and the manufacturer's logo appears, you need to quickly press F2 or DEL on the keyboard. This action allows you to open the BIOS.
2. It may happen that the BIOS still has not appeared. In this case, the F9 key will work. Next you need to go to the settings, which are called: Load Default Settings. Control occurs using the arrows on the laptop.
3. Setup is complete.
Press F10 to save the changes made.
What is an operating system?
An operating system (OS) is a series of programs that are interconnected by a certain mechanism and allow a person to control his laptop. The task of the operating system is to open programs in a timely manner and fulfill all user requirements for loading the laptop. In other words, this is the base or foundation of any modern device. From this it is clear that the quality of the operating system affects the performance of the computer. There are various operating systems for mobile phones today: Android, Badu and many others. For personal computers and laptops, the Windows OS is used, distinguished by markings: Windows 7, Windows 8. Each increasing number is an improved version. The operating system can be managed. To do this, you need to go into the BIOS and change some settings.