Booting from an Acer laptop flash drive
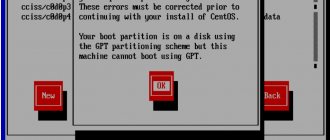
Note: Friends, keep in mind that we have a separate article on our website How to boot a new Acer laptop with UEFI BIOS from a flash drive and install Windows 7. Let's start with the Acer laptop, first of all we connect our Corsair Voyager flash drive to the laptop, then press F12 when loading, then you need to select our flash drive in the boot menu that appears and press Enter, it will boot from the flash drive. If you are unable to enter the boot menu of your Acer laptop using the F12 key during boot, then the Boot Menu option is disabled in the BIOS and needs to be enabled. When loading, press F2, the initial Information tab, go to the Main tab, see the F12 Boot Menu parameter, set it to Enabled, then press F10 to save the settings, reboot, press F12 when loading and our boot menu appears, select our flash drive in it and Press Enter and it will boot from the flash drive. If the boot menu of the Acer laptop still does not appear, then go to the BIOS again (when loading F2), the Boot tab. We select our flash drive and put it in the first position using the F6 key, then press F10 to save the settings, reboot and boot from the flash drive.
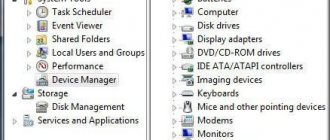
We set boot from a flash drive on an Asus laptop
We go into the BIOS. For me, and most likely for you, this is the F2 (if not, then try DEL). Press it immediately after starting the laptop.
The flash drive should already be connected to the laptop!
Next, go to the Boot and select Hard Drive BBS Priorities .
As you can see (in the screenshot below), I have a hard drive under Boot Option #1 . And under Boot Option #2 flash drive. You need to install a flash drive under #1.
To do this, click on Boot Option # 1 and select the USB flash drive. And the hard drive will automatically take second place.
You can return to the previous menu by pressing Esc and you will see that a USB device is installed under Boot Option #1.
Don't forget to press F10 and Yes to save the settings.
See also:
That's it, after rebooting the laptop, it should boot from the flash drive (if it was created correctly).
There is one caveat. Perhaps I made a mistake when setting the parameters in the BIOS; there I probably just needed to create another boot rule (Add New Boot Option). But it's okay.
If you did everything like I did, then most likely during the Windows installation process, after a reboot, booting from the flash drive will begin. And you need from drive C to continue the installation. pulled out the flash drive during the reboot . And when the download started from drive C, I inserted it back (although it seems that it is no longer needed for installation, the files have already been copied, but I could be wrong).
Possible problems when installing Windows 7 from a USB 3.0 flash drive
You may have noticed that my USB drive has the new USB 3.0 interface. But Windows 7 does not support USB 3.0, special drivers are required.
If the drive itself is USB 3.0 , then it’s okay. Just connect it to the USB 2.0 and everything will work.
This is what a USB 2.0 connector on a laptop looks like:
And this is what a USB 3.0 connector looks like:
The third one is blue and there are two letters SS next to the icon.
Well, if you have everything USB 3.0, then you will have to integrate the drivers into Windows 7. This is a topic for another article. Perhaps I’ll write how to do this. In the meantime, you can find this information on the Internet.
You can also find and download an assembly with Windows 7, which already has integrated drivers for USB 3.0. There are such people.
This site probably contains all the information that may be useful for installing the operating system and for solving problems that may arise during the installation process. You can use the site search. And if you can’t find something, then ask in the comments, I’ll tell you :). Good luck!
Booting from a Toshiba laptop flash drive
To enter the boot menu of a Toshiba laptop, first of all we connect our flash drive to the laptop. Next, to get into the boot menu of this laptop, we need to press F12 when loading, as we can see, the laptop itself tells us this, displaying this message when turned on: press F2 go to setup utility, F12 go to boot manager (press F2 to enter in the BIOS, and F12 to enter the boot menu). When loading the laptop, press F12 and get into the boot menu, select our flash drive here, if you connected a flash drive to the laptop, its name will be here. Press Enter and if your flash drive is bootable, it will boot from the flash drive. If for some reason you cannot boot your laptop from a flash drive using the boot menu, then you can enter the BIOS and change the boot device priority there. We often press F2 when booting a Toshiba laptop and get into the BIOS of this laptop. The initial Main tab, go to the Boot tab (responsible for loading the laptop) and see our Corsair Voyager flash drive in sixth position. We select it using the keyboard and press F6, thus moving our flash drive to the first position, then press F10 to save the settings we changed, the reboot occurs and the laptop boots from the flash drive.
Booting from a Samsung laptop flash drive
Friends, if you have a new Samsung laptop, for example 2012-2013, then read this article “Loading a Samsung laptop from a flash drive”; for all others, this instruction is also suitable. When loading, press Esc or F10, go to the boot menu and select our flash drive. If the boot menu does not appear, then go to the BIOS and press F2 or DEL when loading. In the BIOS, Boot tab, select the first parameter Boot Device Priority and enter it, here we select our flash drive and use the F6 key to put it in the first position. Next, press F10 to save the settings and reboot, reboot, then boot from our flash drive.
Installing Windows 7 on an Asus netbook
The lack of a CD/DVD drive makes it impossible to boot the operating system (OS) from a disk with installation software, but there is a solution in the form of a drive.
Before you start loading a new OS, it is recommended that you make backup copies of important files from the type of hard drive partition where you plan to load the operating system, and copy them to an external memory device.
Creating a Windows 7 installation USB flash drive
You will need:
- A second computer, not on Android, for proper preparation of the flash drive and other devices.
- Data storage device - USB flash drive.
- Disc with Windows 7 for 32- and 64-bit systems or its ISO image.
- Software WindowsSetupFromUsb 1.0.
- If there is support for booting from SD, install the Windows installer on this card. The installation disk must be original; a build version is not recommended.
Before downloading the image, check the processor type. Asus Eee PC is based on the 32-bit Intel Atom N550, for which the image name must contain the x86 label. For 64-bit - x64.
WindowsSetupFromUsb 1.0 is needed to convert a flash drive or SD into boot or installation formats
.
Step-by-step instructions for creating a bootable USB flash drive
Download the WindowsSetupFromUsb 1.0 program from the Internet, unpack it to any convenient folder and run it.
Follow these steps step by step:
- In the upper half of the window, click on the RM PrepUSB button.
- In the 3BOOTOPTIONS form, click on the first item, in the 4FILESYSTEMandOVERRIDES field, specify the NTFS system and Prepare Drive.
- Wait for the installation process to complete.
- After preparing the flash drive, close the RMP repUSB window. In the main part of the software, in the place Add to USB Disk, select the line “Vista/7/Server 2008...”.
- Insert the disk with the program into the Disk Drives of the PC or mount the virtual image using Daemon Tools software. Through the WinSetupFromUSB application window, in the selected row, specify the path to the information files.
- Click on the Go button and wait until the copying process is completed.
When everything is ready, Windows 7 files should open on the USB flash drive.
Booting from the installation USB flash drive on a netbook
Windows 7 can also be installed on an Asus netbook from a flash drive.
By default, this device boots from the HDD. The configuration can be changed through the Asus BIOS.
First, before turning on the netbook, make sure that the drive is in the USB port. Turn on the PC and when booting, click on the BIOS item. During the startup process there should be an inscription “Tap{key} for Setup”. On Asus laptops this is F2.
In the BIOS you will need to set the startup order from drives in the Boot category. Click on the HDD function and specify your personal flash card in the program window. After that, return to the window, select the Boot Device Priority function, set the boot frequency so that the flash drive is first in the list.
Go to the main Windows installation window and at the exit point click on SaveChanges&Exit. The next time you turn on the netbook, it will boot from the flash drive, and during the startup process, a bootloader window will appear, which is installed by the WSF USB software on the data drive.
Open Start Vista/Win7/Server 2008SetupOrPE/Recovery ISOfrompartition and press Enter. A Windows OS window will appear, then you need to act on the requests that appear on the screen.
After copying each file, the netbook will restart. It is important to remember to remove the flash drive so that the download does not have to be done again.
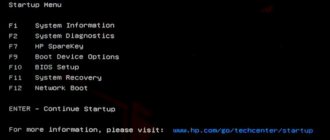
Booting from an HP laptop flash drive
I have never had any problems with this laptop, but if you have a new HP Pavillion laptop and it has a UEFI BIOS, then these instructions may not help you, read our other article How to boot an HP Pavillion laptop from a flash drive. This manual will work for all other HP laptops. We connect our flash drive to the laptop. When you turn on the laptop, a message appears on the screen: “Press ESC to load the start menu,” click. Next, press F-9 Boot Device Options (change boot settings) and get to the boot menu. The first device is now the disk drive, if your flash drive is connected to the laptop, then its name will also be present here, select our flash drive here and press Enter or F10, it will reboot and then boot from the flash drive. If you cannot enter the boot menu of an HP laptop, then go to the BIOS, press ESC when loading, then F-10, get into the BIOS, go to the System Configuration tab, then Boot Options, press Enter
As you can see, the Secure Boot option in the BIOS is enabled, disable it, put it in the “Disabled” position, and set the “Legacy support” option to the “Enabled” position, a warning appears, select Yes, then press F-10 and confirm saving the settings by pressing Yes and reboot. After rebooting, a message window appears
A change to the operating system secure boot mode is pending. Please enter the pass code displayed below to complete the change. If you did not initiate this request, press the ESC key
This message translates to: To change Safe Boot Mode, please enter the code below to complete the change. If you did not send this request (for a change), then press ESC to exit without changing, I think you already understand that the message asks us to enter a code on the laptop keyboard and press Enter 8721, after which your changes in the UEFI BIOS settings will be saved and the laptop will reboot, and after the reboot, press ESC, get to the “start menu”, press F-9, select Boot Device Options (change boot settings), get to the boot menu and your flash drive is already present here, select it and press Enter. That's all, your laptop will boot from the flash drive.
For security, I advise you to turn everything back on, since this option was invented specifically as an additional means of protection against rootkits malware used on HP laptops.
Booting from a Sony laptop flash drive
When loading, press F11; if we don’t get into the boot menu, then press F2 when loading and enter the BIOS, go to the Boot tab. First, we set the External Device Boot: parameter to Enabled, this allows us to boot the laptop from a flash drive, but that’s not all. We see that the first boot device is set to the disk drive, select it using the keyboard and press Enter, in the menu that opens, select External Device (this is our flash drive), press Enter. Now the first boot device is our flash drive. Press F4, this saves the settings and reboots, then boots from the flash drive.
Booting from an Asus laptop flash drive
When loading, press the delete key and enter the laptop’s Bios, go to the Security tab and set the “Secure Boot” option to Disabled. Then go to the Boot tab, and set the Fast Boot option to Disabled. Next, press the F10 key (save the changes we made to the laptop BIOS) and the laptop reboots. Once again we enter the BIOS and go to the Boot tab, set the Launch CSM (advanced boot) option to Enabled, Go down to the Boot Option Priorities and Boot Option #1 option and enter it by pressing Enter in the menu that appears using the arrows on the keyboard select the name of our flash drive and press Enter. Here we also put our Corsair Voyager flash drive in first place. We press F10 to save the settings, reboot and our Asus laptop boots from the flash drive. You can also use the boot menu of the Asus laptop; to do this, in the initial phase of booting the laptop, often press the Esc key, you will get to the boot menu, use the arrows on the keyboard to select your bootable USB flash drive in it and press Enter.
How else can you boot from a flash drive on a laptop?
Through the computer's BIOS is not the only option. For example, it is possible to boot from a flash drive on an Asus, Toshiba, Samsung, etc. laptop and through a special boot menu. It's called the Boot Menu (by the way, it's also part of the BIOS). You can enter it during the initial loading phase. You just need to press Esc, F8, F11 or F12 quite often. Which key exactly depends on the manufacturer of the motherboard and the BIOS version used in it.
Once in the Boot Menu, you need to select and enable boot from a flash drive using the arrows on the keyboard. Then all you have to do is press Enter. Agree, it’s quite convenient and simple. However, it is not always possible to go to the boot menu. The fact is that on some laptop models the Boot Menu option is deactivated in the BIOS. Therefore, additional steps are required to enable it.
It is worth paying attention to one more point. The Boot Menu does not have a unified design. It can also be called differently: “MultiBoot Menu”, “BBS Popup”, “Boot Agent”, etc. However, any boot menu contains a list of devices from which booting can be done.
How to boot a Packard Bell laptop from a flash drive
When loading, press the F2 key, or less often F6, and get into the UEFI BIOS of the laptop, here we go to the Boot tab. If you connected a flash drive to it before turning on the laptop, it may not be detected immediately in this menu. Set the Boot Mode option to Legacy BIOS. And set the Secure Boot option to Disabled. Next, press the F10 key, this saves the settings we made in the BIOS of the Packard Bell laptop, then we reboot, press the F2 key when loading and enter the BIOS again. Now the flash drive should be detected. Place the flash drive in the first position, save the settings and reboot. If the bootable flash drive is made according to our articles, then the download will be successful.
If you have questions, write in the comments.
You can also help the project, THANK YOU everyone in advance!!!
.
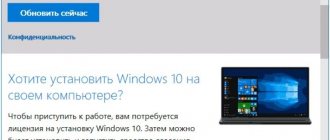
How to install Windows 7 on new laptops?
Windows,Computers 21 comments » Aug 14, 2018
Our patient today is the Asus x541n laptop, which initially does not accept the installation of Windows 7, only Windows 10. But for some reason we need to install an older version. So in my case, a person asked to install an old Windows 7 on his brand new laptop. The methods described below will be useful not only for the Asus x541n, but also for any other new laptops on which you need to install Windows 7 or older versions.
First you need to correctly write Windows 7 to a USB flash drive. In our case, it is better to do this using the “Asus EZ Installer” program, you can download it here. In other cases, you can use the “Rufus” program (easy to Google, the first link is to the official website). Below I briefly describe how to properly configure Rufus:
- We select a flash drive on which we will record Windows 7. It must be at least 4 GB in volume.
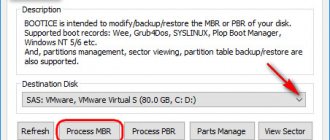
- Be sure to select the item “MBR for computers with BIOS or UEFI” .
- We select the file system NTFS. This is not such a mandatory item, but in this version everything is recorded and then installed as needed.
- Click on the icon under item “4” on the screen, select the Windows 7 image . Place the same marks as in the screenshot.
- Let’s check again that everything has been set up and selected correctly. Click "Start" .
Now that Windows is recorded, we need to perform a number of manipulations in the BIOS ( after the settings indicated below, the current Windows will no longer start ):
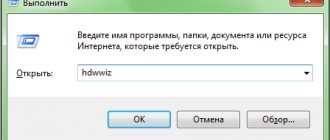
- When you turn on the laptop, press F2 (or DEL) and you will be taken to the BIOS.
- In the BIOS, switch to the BOOT (by the way, it may be called Boot Options ) and look for a section with a similar name to “UEFI/BIOS Boot Mode” (or “Boot List Option” , or simply “Boot Mode” ), in which select “Legacy” .
- Then in the same place in the BOOT tab (or in the Security or System ) find an item with a similar name “Secure Boot Control” and select “Disabled” .
Above were the basic points that are in any BIOS , now we still need to check other settings options. I’ll say right away that they may not exist and that’s not scary .
- In the BOOT tab, look for the item “CSM Support” and select “Enabled” .
- Still there we look for the item “Fast Boot” , in which you need to select “Disabled” .
- Sometimes you also come across items with a similar name “Type OS” or “Support OS” , in which you can choose direct support for Windows 7 and other versions.
I would like to draw your attention to the fact that in some BIOS tabs with the above options may be called “Boot Feature” or “Advanced” . But if you can’t find some option in the tab I indicated, then don’t be afraid to just switch to others and look there. Often laptops from different manufacturers have different BIOS structures.
Write comments, share the article on social media. networks! Thank you