All methods
This procedure can only be performed using the built-in functionality of the operating system. You don't need third-party software. First, check if Update is running by default on your computer. You can do it like this:
- Launch Task Manager using the combination Ctrl+Shift+Esc.
- Open the Services tab. Here, look for a service named "wuauserv".
Thanks to it, auto-update works in the background in the operating system. If you don’t have “wuauserv”, then go to one of the inclusion methods:
- through group policy;
- through "Windows Settings";
- using the command line;
- through registry settings;
- via Services.
Let's consider each method in detail.
Where is Windows 10 Update Center and what is it?
The Windows 10 Update Service is a special operating system tool, software that scans and automatically installs updates that come to your computer. Moreover, if the software package fails to install, the utility will also undo the changes in automatic mode.
Windows 10 Update Center
Sometimes “Update Center” can be disabled by default on Windows ten, so the user has to manually enable the option. This usually happens when using dozens of “crooked” assemblies.
Enable in Local Group Policy
You can restore the operation of this service in the “top ten” as follows:
- Open the “Run” program using the Win + R key combination. Enter the command “services.msc” and start execution with the OK button.
- The “Services” window will appear in front of you. In the right list, find the line “Windows Update” and using RMB in the menu, select “Properties”.
- In the “General” tab, find the “Startup type” line and set the “Automatic” option in the menu, then apply the changes with the “OK” button.
- Restart your PC.
In this way, you can start the CO in the Windows 10 operating system. This method can help you get rid of error code 0x80070422.
Inclusion options
The Windows 10 Update Center is located in the Settings directory under Updates and Security.
Launch via control panel
Automatic updating of Windows 10 is usually performed independently, but there are cases when automatic updating does not occur, then you need to configure it manually.
Microsoft developers have moved the update center from its usual place to the Settings application. To do this, go to the Start Menu. Then select “Options”. In the window, go to the “Update and Security” tab, then find the “Windows Update” item.
Enable in Local Group Policy
If Windows 10 Update is not working, you need to follow these steps:
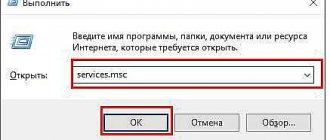
- By holding down the Win+R keys, open the “Run” command.
- We write in the line “Open:” services.msc
- Click on the OK button (Figure 2).
Thus, we will call the “Services” window. In the list on the right is “Windows Update”. We hover the cursor and right-click, after which a list with the “Properties” item will appear. In the new window, on the “General” tab, select the “Startup type” line and set the “Automatic” option. Don't forget to click on the OK button.
The final step is to reboot the device.
Figure 2. Entering the service.msc command in the service window
Launch via task manager
How to enable Windows 10 update service? To do this, you need to launch the “Task Manager”; you can quickly do this by simultaneously holding down the CTRL+SHIFT+ESC keys. We move to the “Services” directory and find the “wuauserv” service. This service automatically updates the device in the background (Figure 3).
Figure 3. The wuauserv service running in the task manager for auto-updating the OS
Via command line
It happens that receiving an update is prohibited through the system settings. In this case, updating your machine using the above methods will not work - this can be done forcibly using the command line. How to forcefully enable Windows 10 update? Right-click on the Start menu and find “Command Prompt” or Windows PowerShell from the list. In the window that appears, you need to write the following command: wuaclt.exe/updatenow and hit the Enter key (not too hard) (Figure 4).
Figure 4. Windows Update window showing available updates
Correct the value of a parameter in the registry
To check for an update for your computer, you need to click on the “Check for updates” button. It may also not work unless you correct the setting in the registry. To correct this misunderstanding you will have to perform the following steps:
- Open the “Run” window, hold down the Win+R keys and then enter the “regedit” command.
- In the “Registry Editor” window, in the search bar, paste this path: HKEY_LOCAL_MACHINE\System\CurrentControlSet\Services\wuauserv.
- In the list we find the “Start” parameter we are interested in and right-click on it to select the “Change” item.
- Surely you will see the value of parameter 4. To start the service we need and start loading, change the value to 1 (Figure 5).
Figure 5. Correcting the values of parameters in the registry to activate the update
WSUS Offline Update Program
The WSUS Offline Update utility is a life hack for users who don’t want to keep up with the latest updates for Windows and Office. After all, it is through this utility that you can install various add-ons for devices, and this is convenient because you can install the update offline - no Internet connection is required. To the list for downloading components, you can add and remove service packs, various libraries and other “chips” (Figure 6).
Note : WSUS Offline Update provides the ability to verify downloaded updates.
It is also possible to collect data into ISO images, which can be useful for their further use. Also on our website you can find a huge number of useful programs for Windows.
Figure 6. Appearance of the WSUS Offline Update application interface
"Local Group Policy Editor"
To run the program, follow these steps:
- Go to “Run” using Win + R. Write the command “gpedit.msc”.
- Open the “Windows Update” branch, which is located along the path “Computer Configuration” - “Administrative Templates” - “Windows Components”.
- On the right side of the window, find the line “Setting automatic updates” and right-click on it. In the menu, go to “Edit”.
- Set the setting to Enabled (1). In the "Options" section, select the settings according to which automatic updates will work (schedule, installation, notifications about available downloads, etc.). Apply the changes with the “OK” button.
How to enable auto-update in Windows 10
How to enable SMB1 on Windows 10 - step-by-step instructions
The system installs automatic updates independently. To activate them, you need to go to Windows Update, for example, through the Start menu and set the appropriate value.
Disabling auto updates on Windows 10
There is no particular need for automatic updates, since notifications about them arrive almost every day, thereby annoying the user. In addition, auto-updates will be installed after exiting the operating system and the PC will not be able to be turned off until the procedure is completed. This recommendation especially concerns selective auto-updating of drivers.
Command line
Using the Windows 10 command line, you can disable or enable Update Center. This will force you to start the “wuauserv” service.
- Open a command prompt with administrator rights. Type the command “net start wuauserv” and press Enter.
- The program will start the service, after which you will see a corresponding message. The process will start every time you turn on your PC, so you won't have to repeat this procedure. To disable the Windows 10 CO, you must enter the command “net stop wuauserv”.
Via Options
Let's start with the simplest method.
1. Hold down the Win + I keys and go to the last section in the window that appears.
2. Click on the “Check for updates” button.
3. Wait a little while the assistant establishes a connection with Microsoft servers and finds the latest patches for Windows 10.
The same result will be obtained after launching the “Check for updates” application through the search bar in Start.
How to disable Windows 10 Update
Self-installation of Windows 10 from a flash drive
How to clear the update cache in Windows 10
Registry
Also, the central heating center will not work unless the value of the parameter in the registry is corrected. You need to do the following:
- In the Run window (Win+R), enter the command “regedit”.
- In the registry editor, find the HKLM\System\CurrentControlSet\Services\wuauserv branch. Just copy the path from these instructions and paste it into the search bar at the top of the window.
- On the right side of the window there will be a “Start” option. Right-click to select “Edit” from the menu.
- In the disabled state, the parameter will have a value of 4. For the CO to start downloading updates, set the value to 1.
The launch of this service is not affected by any others, so malfunctions and performance problems should not arise. You can also check the HKEY_LOCAL_MACHINE\SOFTWARE\Microsoft\Windows NT\CurrentVersion\Hotfix branch, which contains information about all update files.
How to restore the classic version?
If you are used to using the classic application to update your computer, restore the classic Update Center.
Important! This method only works in early builds of Windows 10.
- Search window → enter “Notepad” → RMB → Run as administrator.
- Paste the text into the notepad field: Windows Registry Editor Version 5.00 [HKEY_LOCAL_MACHINE\SOFTWARE\Microsoft\WindowsUpdate\UX] “IsConvergedUpdateStackEnabled”=dword:00000000 [HKEY_LOCAL_MACHINE\SOFTWARE\Microsoft\WindowsUpdate\UX\Settings] “UxOption”=dword: 00000000
- Menu File → Save As → specify the name of the document and set the extension “ .reg ” for it (in the “File type” line, select all files).
- Run the created file → confirm your actions in the warning window → Ok.
More detailed instructions are provided in the video.
Third party programs
What to do if you can’t set up automatic downloading? Starting the service doesn't help, but you don't have the time or knowledge to find workarounds? Then try updating the operating system using the WSUS Offline Update utility. Download it from the official developer website using the link. On the main page, click on the button marked in the screenshot. The creators guarantee complete security for users and their personal data on their PC. After downloading, follow the following procedure:
- In the program folder, open the UpdateGenerator.exe file.
- Select your OS version: Windows 10 x32 or x64. To start downloading files, click “Start”.
- Once the download is complete, you will see a log on the screen with a list of all downloaded files. The download and installation time depends on how long it has been since you updated Windows. Now you need to go to the “client” folder and open the UpdateInstaller.exe file.
- In the program window, click “Start” to begin installation.
If WSUS Offline Update starts to freeze or stops searching for files, try using an earlier, more stable version of the program.
You only need to update the operating system in this way once, since after installing the patch, troubleshooting will be carried out and the default central processing center will be launched.
Settings
Let's move on to adjusting the Center, the fact is that the Windows 10 operating system gives very little freedom to users, almost no choice. The only thing highlighted to users in this case is the More Options feature.
Only thanks to them you will be able to at least slightly adjust this process to suit yourself, but where are they located and how to disable them? That's right, the files may be located in additional debug files. Let's start with the fact that in that menu you will be offered how the installation will proceed, automatically or with a reboot notification.
Of course, the checkbox will be for automatic updating, change it to a button associated with the notification. Now that you have these settings, you do not need to constantly save information on your PC, which is due to not knowing the exact update date. Now, knowing when the update will occur, you can already prepare for it, let's move on.
And finally, the most important thing, in the version of Windows Professional, in that menu there will be a function called Postpone Update, but we remind you that such, one might say, services are provided only by the tenth Windows, unfortunately, users of the tenth version who do not have the Pro function on their PCs do not will be able to postpone and disable updates; if you want to reinstall Windows to a more convenient version, on our website you can find an article on reinstalling it.
What to do if you can’t turn on the software, setting up Windows 10 updates doesn’t work
There is no point in listing all the methods for eliminating such an error. It’s easier to go to the most universal one if the service could refuse to work. We are talking about launching a system troubleshooter, with which you can get rid of a lot of problems in the functioning of the operating system.
wuauserv service in Windows 10 Task Manager
Specifically, in the case of updates, the procedure is performed as follows:
- Go to system settings and select “Windows Update”.
- Scroll down the window and click on the “Troubleshooting” line.
- View the utility interface and follow all system prompts, clicking on the “Next” button so that you can later update system components.
Note! The troubleshooter should point out the specific problem and also suggest ways to solve it.
Third-party programs that help you learn how to check for Windows 10 updates
Within the framework of this article, only one means of this purpose will be considered. The rest of the programs are similar and there is no point in talking about them.
Windows Updates Disabler
This is a simple utility that allows you to activate and deactivate updates on Windows operating systems. Its operating principle is as follows:
- Download, install and run the software. To download software, you can use both the home Internet and the corporate network, gaining access to it.
- Configure the software at your own discretion. It can also be updated regularly.
- In the software interface, switch to the “Enable” section. Here you will be presented with several options that you can activate.
- In this situation, you need to check the box next to “Enable Windows updates” or remove it.
- Click on the “Apply Now” button and restart your computer. Using this software, you can control the display frequency.
Win Updates Disabler program interface
This makes Windows 10 updates easy to turn on and off as needed. To begin to understand the topic, just carefully study the information presented above.
Solving possible problems
There are ways to manually launch Update Center or restore its files. Before you start fixing the Update Center, make sure that the problem is not an unstable Internet connection. Interruptions in downloading updates and the appearance of errors may be caused by connection problems.
“Update Center” has disappeared or does not open, the update does not start
If any problems arise with the Update Center, you need to check whether the corresponding service is running. If it is deactivated, then Update Center will not be able to perform any actions. The service is sometimes disabled on purpose, but it can also end on its own. To enable the service:
- Expand the standard “Services” application; it can be found using the system search bar.
Open the “Services” application
- Find the service responsible for Update Center in the general list and expand its properties by double-clicking or through the context menu.
Go to the properties of the Windows Update service
- In the window that appears, click on the “Run” button to enable the service. In the Startup Type option, select Automatic so that the service will turn on automatically after the system restarts.
If the startup type is specified in the properties of the Windows Update service, for example, “Manual,” then change it to “Automatic”
Before manually trying to fix the problem, trust Easy Fix - this is an official program from Microsoft. Previously, the Fix It program collection was used to automatically fix errors, but its support has now been discontinued, and the current collection is Easy Fix. On the official Microsoft website you can find a complete list of mini-programs, each of which is aimed at correcting errors in a specific system process.
- Find Easy Fix on the official Microsoft website.
- In the list of solutions, click "Fix Windows Update errors."
Click "Fix Windows Update errors"
- In the first step, select Windows 10.
Select your OS - Windows 10
- Start downloading the wu170509.diagcab file by clicking on the “Windows Update Troubleshooter” link.
Download the wu170509 utility by clicking on the link “Windows Update Troubleshooter”
- Run the program with administrator rights, in the first step select “Windows Update” and click “Next”.
Select Windows Update and click Next
- Wait while the program finishes searching for the problem, this may take several minutes. Upon completion of the work, information about the result will be displayed. And if problems with the Update Center have been identified and corrected, you will see it.
Scan the update center using Easy Fix
Alternative options for receiving updates
You may not want to fix Windows Update if you find out that there is another way to get Windows 10 updates. There are a couple of alternative options:
- third-party official and unofficial programs;
- manual download of update files.
All of the methods described below allow you to perform an update without losing user data. The process is identical to a regular update through the standard Windows 10 tool.
Third party official programs
There are two programs from Microsoft, both are located on the corporation's official website. Look for them on the page with a tool for upgrading to Windows 10 from previous versions of the Windows operating system.
- We will talk about an update tool that can be used not only to switch to Windows 10, but also to update the same version of the system. Just run the tool and:
- In one of the steps, indicate that you want to update this computer;
We indicate that we want to update this computer
- in the next step, indicate that information stored on the computer should not be affected.
- The second program is Windows 10 Updates. It is located on the same page as the Windows Update tool. The link to download it appears only if you access the site from a computer running Windows 10.
Download Windows 10 Updates using the “Update Now” button
- Once Windows 10 Updates launches, click Update Now.
Click the "Update Now" button to update via Windows 10 Updates
Third party unofficial programs
There are several non-Microsoft programs that allow you to update your system and selectively download updates. For example, you can use Windows Update Minitool. The program has Russian language and a clear interface.
- Check available updates by clicking the “Check for updates” button.
Click the “Check for updates” button to search for available updates
- Check the checkboxes for the updates you need and:
- or download updates using the “Download Only” button and install later;
- or start the download and automatic installation by clicking the “Install” button.
Clicking the “Download Only” button will download the update files, and clicking the “Install” button will launch the download and automatic installation