With the advent of new smartphones with good cameras, people are increasingly eager to record videos and share them with others. However, no one canceled the editing process. We still need to trim off the excess somewhere, remove jitter somewhere, increase color saturation somewhere, and so on. While it is still possible to trim posts on some social networks, to implement more serious tasks you will need a full-fledged video processing program. One of these is Movavi Video Editor - https://www.movavi.ru/videoeditor/. It has all the basic functions for film editing:
● Adding effects ● Adding transitions ● Overlaying text ● Adding music and voiceovers ● Replacing the background ● Censoring ● Crop and rotate an image
In this article we will show you step by step how to create a project and edit it in the Movavi video editor.
Results
We are constantly making videos. Before sharing them with friends or publishing them on social networks, it is advisable to edit them. Many people mistakenly believe that even editing such as cutting fragments and adding music is something unattainable for the average user. However, as we can see, film editing is not as complicated a process as it seems at first glance. Easy to learn and functional, Movavi video editor will help you edit a cool video in a few minutes that is sure to impress the viewer.
Transition Effects
When working in a video editor, most often there is a need to stitch together one video from different cuts. To make transitions look more natural, special effects called transition effects are applied to them. Let's look at how to use this tool in the program.
- In the sidebar, go to the desired menu. It is located third from the top: an icon depicting two frames put together like a puzzle.
- As with filters, transitions will appear on the right.
- To add them to a track, you just need to drag the transition you like onto the video, after holding LMB on it.
- A transition icon will appear between the two cuts. To remove it, you need to right-click on it and select the appropriate item.
- Also in the menu you can select the “Properties” item, when you click on it, an additional window will open. Here you can increase or decrease the duration of the transition.
Now you know how to apply transition effects to clip cuts. But this is not the last point in the instructions on how to use the Movavi program.
Movavi Video Editor interface
simple enough. Click on the screenshot and you will see the main program windows
Like any video editor, Movavi has the following zones:
- The menu is at the top of the program. Here are the main functions of the video editor.
- View Window – This is where you can view all the changes you have made to the video.
- timeline with video and audio tracks, as well as separate tracks for titles and images.
- A toolbar with which you can add media files or go to video editing sections, such as “Effects”, “Titles”, etc.
Getting started with the program
Work in almost any program begins with creating a project. Same thing in Movavi Video Editor. You can create a project in two ways: File –> New Project (hot keys CTRL + N) or using a special button on the toolbar.
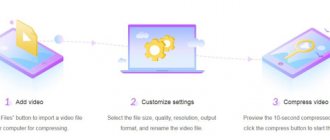
The next stage of working in the program is adding video files or images. These are the ones that will be worked on. A special “Add media file” button will help you.
How to create a slideshow in the editor
First, upload a large number of photos to the video editor through the “Add Media File” button. You can add many images at once; you just need to hold down the CTRL key and click on the desired files one by one or the SHIFT key. Then you will have to click on the first and last file -> all the photos located between them will be loaded.
You will see all your photos at the top of the program. Select all photos (keyboard shortcut CTRL + A) and move the photo to the timeline:
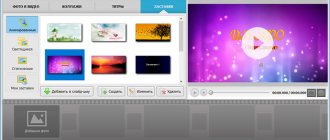
A window will appear asking: “Do you want to create a slide show?” Check the parameters - random transition, slide and transition duration:
Your slideshow is ready! You can fix transitions or apply effects. These functions are available in the corresponding program tabs. We add transitions by dragging them to the selected place on the timeline.
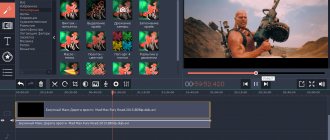
Let's take a closer look at the “ Effects ”
Video effects are located in folders divided into categories:
Select the desired effects, click on its icon. Immediately its effect will be visible in the viewing window. Click on the “Settings” button to change the intensity of the effect. If you are satisfied with everything, then click the “Apply” button. Cancel the effect – “Delete” button.
How to add sound to a video or slide show.
Slideshows are often made with sound. To add an audio track - click “Import” -> “Add media file” -> Move the downloaded mp3 to the timeline. Everything is similar to adding a photo to the editor.
Filters
Continuing the guide on how to use Movavi Video Editor, let's move on to working with filters.
That's how easy it is to work with filters. Having dealt with this, you can move on to the next step of the instructions - how to use Movavi Video Suite.
Applying Shapes
If you decide, for example, to record a video in which you instruct users on how to perform some action, then most likely you will need to overlay various shapes (for example, rectangles, arrows or circles) on the recording. Let's look at how to do this:
- On the already familiar sidebar, go to the corresponding section, it is located fifth in a row: the icon of geometric shapes.
- The shapes themselves will appear on the right side of the panel.
- To add what you need to a video, you need to drag it onto the video track below. Please note that to add on top of the video, you must move the selected shape to the appropriate area of the track. And to display before or after recording - on the track itself.
Otherwise, all the actions are clear: to delete or edit you need to right-click on the shapes and select the appropriate item.
Now let's move on to the most important point of the instructions on how to use Movavi Video Editor.
Program settings
The video editor settings will be described here. To access them, select the “ Options ” menu item.
The window consists of three tabs. On the first “ Main ”, you can select the location for saving temporary files and the program language. There is also the option to enable background rendering, which will allow you to create a small copy of the project for viewing, and also allow you to process the project in the background.
You can enable hardware acceleration if the video card and processor are from the corresponding manufacturer and support this function. If this is not the case, then these options will be blocked. However, there may be times when the hardware should support a feature, but it is not available. In this case, it is worth updating the driver to the latest version.
additional tab does not contain many items. An interesting option is Fast Track HD . It allows the editor to create a small copy to preview the project. After the user saves the project, it will be replaced with the original. This feature will allow you to see the final project in real time and immediately make changes.
Why do you need Dropbox and how to use it
On the Other tab , there are few options. Perhaps it’s worth checking the box to check new versions.
You can also disable the sending of work data to the manufacturer. In general, all data is sent anonymously, but if you don’t like this, you can disable this option.
Adding media files
First, let's look at the possibility of adding files. To do this, click on the desired item, and then select either add a file or add a folder .
In the first case, one file is added, in the second, you can add several at once. Then all you have to do is select the required data. Then they will appear in the program, sorted in the same order as they were in the catalog. You can also simply drag and drop files directly into the program window.
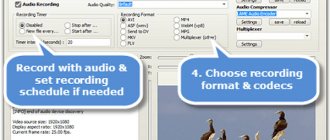
It is possible to capture video directly from the device. To do this, you need to click on Import, and then select Video Capture . In the next window you will need to select a video recording device, and then audio if they are connected to the computer. Next you will need to select a folder to save. And then click on Start capture ; when you need to stop it, select Stop capture . After which the file will be saved and added to the editor.
Capture from connected devices is done using the Capture Video .
Editing
Editing tools are available in the converter. Namely:
- Stabilization: Reduce judder in videos
- Sound: volume normalization, noise reduction
- Correction: manual and automatic adjustment of brightness, contrast, white balance, noise reduction
- Effects: edge fill, fisheye, vignette, various color filters
- Subtitles: adding external subtitles, syncing, deleting tracks
- Watermark: text or graphic
- Cropping
- Turn
- Trimming
Options for rotating and cropping without conversion are also available, but under certain conditions:
- to rotate without conversion, the video codec must be H.264
- Trimming without conversion is available for videos in MP4, M4V and MOV formats
Creating a new project
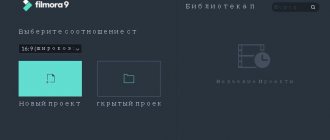
This section provides instructions for creating custom projects. In the very first window you will need to select parameters for the future project . If you haven’t worked with video editors before, you can leave everything at default; these settings are suitable for most projects. If the user knows what he needs, he can find here many settings for every taste.
Here you can change the aspect ratio, as well as the size of the future frame. You can set a resize, which will also have its pros and cons.
It is possible to set the frame rate per second; at the bottom you can configure the audio stream.
Creating a Slideshow
Not everyone will use a video editing program; some will need the ability to create slideshows, which will be discussed later.
Manual creation
Everything is quite simple here, you need to switch the editing table to script mode , after which you can drag and drop all the images from which the slide show will be made.
All that remains is to apply different effects and add transitions between pictures.
Automatic slideshow creation
If you just want a standard show with the same type of transitions, then you can simply drag all the images onto the editing table and set the transition and its time in the settings. There you can choose a random option , which will allow you to diversify the effects.
How to download Movavi Video Editor
Go to the official website and download the program
, go to the Russian version of the site and download the program for free. You can familiarize yourself with all the editor's functions. Who will benefit from the program : - for people with home video. You can make video editing yourself, cut out unnecessary parts of the video, add music, titles, effects, etc. - for those who are engaged in professional video shooting. - for video bloggers or for those who dream of fame on YouTube.
The video editor supports the Russian language, is very easy to use, so it is suitable for everyone - from an amateur to a professional.
I already wrote in what other editors you can create slideshows. First of all, it is ProShow Producter and also you can try to create slideshow online.