Start menu settings
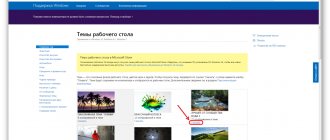
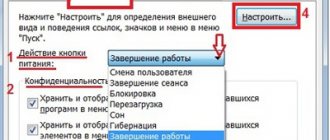
Like any element of the Windows interface, the Start menu can be “customized” using the Settings Personalize Start menu. However, there are few settings here: you can disable the Frequently Used and Recently Installed Applications folders at the top of the menu, as well as the Recommended Applications for Installation panel (this is the first thing you should do). Additionally, Start menu settings allow you to open the Home screen in full screen mode and choose the list of folders that appear in the tile bar.
Open the Start menu in full screen
If you want to make the Start menu the same as it was in Windows 8, so that it opens in full screen, go to Start => Settings => Personalization => on the left side select Start => from on the right side, enable the “Open Start screen in full screen” option
Now when you open the Start menu you will see it in full screen.
Organize, edit, delete or add items
You can easily manage your Start menu folder structure through Explorer to edit, change, or even add new items. It also gives you the ability to search for new shortcuts you create. Of course, you can do this by dragging items individually (or together) into the Start menu, but rearranging through File Explorer is much faster if you need to change a lot of items at once.
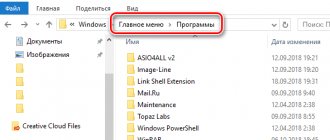
To open the Start menu folder directory, paste the following link into the address bar of Explorer:
%appdata%\Microsoft\Windows\Start Menu
It's worth noting that the Start folder doesn't show universal apps that you've installed, so they need to be managed directly from the Start menu window.
For the most part, you can uninstall any app, with the exception of some built-in apps, by right-clicking them in the Start menu and selecting Uninstall.
How to hide or show folders in the Windows 10 Start menu?
The Windows 10 Start menu can be configured so that it displays folders such as Documents, Downloads, Network or HomeGroup and others. By default, they don't appear in the Start menu, but you can add them with a couple of clicks.
How to display and how to select folders to display in the Windows 10 Start menu
If no significant changes have been made to the Start menu, the left column will look something like the image below. You might be interested in: “How to pin a folder to the taskbar in Windows 10?”
With a few steps, you can display additional folders in the Start menu. To do this you need to open . Read about ways to open settings in Windows 10. Or click on in the menu.
The next step is to select in the settings window.
Next, in the window that appears again, you need to click on in the column on the left.
After this action, on the right you can see the link Select which folders will be displayed in the Start menu. This is the link you need to follow.
Now you can choose which folders should be displayed. Here you won’t be able to select absolutely any folder on your computer; the choice can only be made from the suggested options: Explorer, Settings, Documents, Downloads, Music, Pictures, Videos, Homegroup, Network, Personal Folder.
To enable the display of any of the available folders in the menu, you just need to set the position to , and if hidden, then to the position.
The Start menu will appear based on the number of folders you select.
Setting up adding additional folders to the Start menu is very simple and quick, and hiding unnecessary folders is also done. Unfortunately, there is no option to add your own folders to the list (the left side of the Start menu), but on the right side it is possible to pin various elements of Windows 10.
Resizing the Start Menu
You can quickly resize the Start menu by simply dragging the top or right edge of the menu with your mouse.
Resizing vertically works as we expect. When you resize horizontally, you can expand the Start menu with one full column of icon groups to four columns. Unfortunately, you can reduce the size of the entire menu to the width of one column.
You can also configure Windows to display several additional snippets in each column. Just go to Settings → Personalization → Start and turn on the option Show more tiles in the Start menu.
When the Show more tiles option in the Start menu is enabled, you can see that the tile column expands to the width of one medium-sized tile.
Note that if you enable the Show more tiles option, you can resize the Start menu horizontally, but only to three icon group columns instead of four.
Pinning and removing tiles
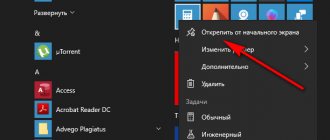
You can easily remove or pin app tiles from the Start menu by right-clicking on each one and selecting Unpin from Start Screen.
If you want to pin an app, find it in the list of apps on the left side of the Start menu, right-click and select Pin to Start.
How to remove full screen mode from the Start menu in Windows 10
are arranged as follows: when you open the start menu, it spreads across the entire screen. We will show you how to return the start menu from Windows 7. Use these instructions:
Step 1.
Go to “Personalization” of the system. Through the desktop context menu (right mouse button on the table -> last item).
Step 2.
On the left side select “Start”.
Step 3.
How to enable Start screen with tiles in Windows 10
To return to the standard system default settings and display tiles again, set the switch to the default value, following the algorithm described above.
Note!
The main problems why the Start menu may not open in Windows 10. - A common reason that causes problems is Explorer crashing.
Change tile sizes
You can resize tiles in the Start menu by right-clicking it, expanding the Resize menu, and choosing the size you want.
Four small tiles fit into the size of a medium one. The four middle tiles fit into the larger tile. A wide tile is the size of two adjacent medium tiles.
Unfortunately, the "shingles" can end up a little weird, so if you have an odd number of small tiles, you may end up with empty space.
Disable Live Tile Updates
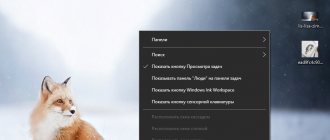
If all those flashing tiles are annoying you, just right-click them and select "Turn off live tiles."
For the most part, live tiles needlessly distract our attention, but they can be useful in the case of tiles like Weather or Calendar when it's important to have access to up-to-date information.
Grouping tiles into folders
You can also group tiles in the Start menu - provided you've updated Windows 10 to the Creators Update. These folders work just like application folders on a smartphone. To create a new folder, simply drag any tile and drop it onto another tile. These fragments will then be grouped into a folder. You can add other tiles to the folder by dragging them on top of the created folder.
Once you already have tiles in a folder, you just need to click on the folder to expand it. You can then click on any slab inside to launch the application. Click the arrow above a folder to collapse it again.
If you want to remove tiles from a folder, simply drag them back out of the folder and drop them directly into the Start menu. You can also remove a tile from the Start menu and then add it again if dragging it around is too awkward.
Remove all live tiles
If you really don't like the tiles in your Start menu, you can remove them. Just right-click them and then click "Undo from start" until they disappear.
Once you've separated the last tile, you can resize the Start menu horizontally by grabbing the right edge and dragging until the tile section disappears. After this, only the semi-classic list of applications will remain.
Change the color of the Start menu (and taskbar)
You can easily change the color of your Start Menu and Taskbar. Go to Settings → Personalization → Colors to get started. Windows allows you to select one accent color from a pre-created group, or you can fine-tune the accent color by clicking the More color button. Just click any color you want to use. You can also let Windows choose an accent color based on your current wallpaper by selecting the Automatically select your main background color option.
After choosing an accent color, the next step is choosing the places where this color will be used. Scroll down a bit to the Other options section. You will have two options available: “In the Start menu, taskbar, and notification center” and “In window title bars.” The first option uses an accent color as the background for your Start menu, taskbar, and action center, and highlights certain elements in those places—like app icons in the Start menu. The second option uses an accent color for the title bar of your active window.
Unfortunately, the Start Menu, Taskbar, and Action Center items are all grouped together and you can't set them to different colors. You can poke around a little in the registry, but this will not completely solve the problem.
On the color personalization screen, you'll also find a Transparency Effect option to make the Start menu, taskbar, and action center transparent. This setting does not affect the accent color if it is used for these elements.
Lastly, you can enable dark mode for settings and apps.
How to restart Explorer to fix errors in the Start menu in Windows 10
When the conductor refuses to function normally, do the following:
Step 1.
Open the “Task Manager”: hold down three buttons: Ctrl+Shift+Esc. If it has a simplified form, click the “Details” button.
Step 2.
In the “File” menu bar, select “Run a new task”.
Step 3.
The Run utility window opens.
Step 4.
Enter the request explorer.exe into the text field and click OK.
Video - How to restore the Start menu using Registry Editor
In the article, we looked at the topic “Start button and menu in Windows 10: setting up and solving problems.” We hope our step-by-step tips were useful and you were able to solve the problem.
How application lists appear in the Start menu
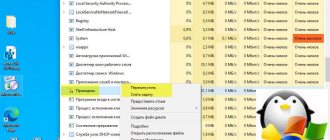
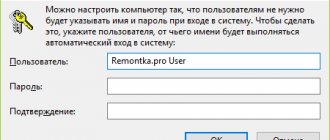
By default, the Start menu displays some of your recently installed and most frequently used apps on the left side, followed by a list of all the apps installed on your system.
If you don't like it, hide the list of new or frequently used apps. Open Settings → Personalization → Start. Find “Show app list in Start”, “Show recently added apps” and “Show most used apps” and turn off anything you don’t want to see in the Start menu.
How to remove shortcuts from the Start menu in Windows 8 and 8.1?
The Start menu in Windows 8 and 8.1 contains shortcuts to installed programs, games, applications, and more. Considering that there can be a lot of shortcuts, and navigating the Metro interface with a bunch of graphic elements (tiles) is not easy, the solution suggests itself - to remove unnecessary unused shortcuts.
Clearing the Start menu of shortcuts is very easy. Open Start itself and right-click on the unnecessary shortcut. A task line will appear at the bottom - select the very first action in it: Unpin from the start screen (that is, remove from Start). After this, the shortcut will disappear from the menu.
How to remove shortcuts from the All Apps menu in Windows 8/8.1
In Windows 8/8.1, from the Start menu you can go to the more comprehensive All Apps (or All Programs) menu. Here you can also right-click on any shortcut, but you can’t delete it - you can pin the selected shortcut in Start or unpin it.
To remove a shortcut in the All Applications menu, you need to open the system folder where they are stored. These are: C:\Users\Your_Username\AppData\Roaming\Microsoft\Windows\Start Menu\Programs
C:\ProgramData\Microsoft\Windows\Start Menu\Programs
What folders appear in the Start menu
The User, Settings, and Shutdown options are now semi-hidden in a tiny column to the left of the Start menu. Click the button in the upper left corner of the Start menu to expand this column.
You can see the classic options with their full names, as well as a lot of open space above them. You can add other items in this space.
Open Settings → Personalization → Start. Scroll to the bottom of the page and click "Choose which folders appear on the Start menu."
Select all the folders you want to appear on the Start menu.
Adding and removing folders to the Windows 10 Start menu
Hello again!
In some of my articles, I described solutions to issues and suggested logging into Windows 10 Settings by clicking the Start button and selecting the item of the same name in the menu. But recently I came across a laptop with a ten that did not have this item! I was surprised and decided to find out how to add and remove folders in the Start menu.
As a result, we were able to discover where the hiding and showing of folders is configured. True, you cannot place any folders you want in the Start menu, but only from a list predefined by Microsoft.
First of all, let's find out - how to go to Settings if they are not displayed in the Start menu? There are two ways. The first is to press the Win+i hotkeys. Second - click on the Notification Center icon and select All options, as shown in the picture:
A window with parameters will open in front of you. Go to Personalization, select Start on the left and click the link called Select which folders will be displayed in the Start menu.
And here is a complete list of folders, I have 10 of them. Perhaps yours will be somewhat different, but the essence does not change. Move the slider under the parameter name to the left or right, depending on which ones you want to keep and which ones you want to disable.
Personally, I turned on the Personal Folder, Options and Downloads items. I have Explorer pinned to the taskbar; other folders can be accessed through Explorer itself, they are always visible. The Network item opens the network environment (if there are several devices on the local network).
This is how you can change folders in the Start menu. The choice is not too big, as you can see. But if you need quick access to any of your custom folders, then I recommend that you read the article on the topic of pinning folders to the quick access panel.
Did you manage to add/remove a folder from the Start menu? Share in the comments.
Using the full screen menu
If you really like tiles. Go back to the days of Windows 8 - open the Start menu in full screen mode. Go to Settings → Personalization → Start. Enable the "Open Start menu in full screen" option.
Now, whenever you open the Start menu, you will see it in all its glory.
The Start Menu is back
The Start menu has been an integral part of the Windows OS interface for many years, but in 2012 it was decided to abandon its use in favor of the Metro desktop. Not everyone was happy with this innovation, and in the latest version of their OS, Microsoft decided to return it, having significantly improved it.
There was a lot of debate about whether the Start menu is needed in version 10 of Windows, but the majority of users were in favor of the need to return this interface element. It is not known whether Microsoft listened to the opinions of users, or was guided by ergonomics, but, one way or another, the modified Start menu has returned.
The main difference between the new implementation of this interface element is the combination of classic menu items and live tiles. The customization options have also expanded: now everyone can customize the Start menu for themselves.
Remove suggested apps
Since you've been using the Windows 10 Start menu, you've probably noticed that it sometimes prompts you to install other apps.
To get rid of such suggestions, all you need to do is go to Settings → Personalization → Start and turn off the “Sometimes show suggestions in Start menu” option.
Note that the suggested apps are different from the pre-installed apps like Candy Crush, which you also probably don't need. To get rid of them, you need to right-click each one and delete it.
Do you have other tips for customizing the Windows 10 Start menu? Let us know! And don't forget: if you don't like the Windows 10 Start menu, you can go back to the glory days of Windows 7 by replacing the Start menu with something like Start10 or ClassicShell.