By Andrey Share
For normal operation of games and a number of other applications on a computer, special frameworks are needed - these are sets of instructions and useful functions that developers use. Instead of writing the same code over and over again, creators use plug-ins, without which their applications will not work. One of the most popular libraries among developers is DirectX. It is mandatory software for any PC, regardless of the x32, x64, x86 bit capacity. If typical errors appear, you should immediately update DirectX. We will tell you how to reinstall DirectX on Windows 10 and answer other questions regarding this library.
Where is DirectX on Windows 10?
Often, when trying to enter a newly installed game, an error appears with files like d3dx9.dll. An inexperienced user may think that he needs to find the problematic DirectX 9 file, download it to the laptop and move it to the source directory. In fact, this is the wrong tactic; it is better to update DirectX on Windows 10 completely. This will resolve most errors.
If you still want to know the location of the DirectX files, they are located in the Windows\System32
on the system logical drive and start with d3dx.
DirectDraw error in Windows 10 and its fix
Having the latest version of DirectX is a prerequisite for running a number of games that use 3D graphics, but this does not guarantee the absence of errors. So, when launching games and 3D editors, you may encounter a DirectDraw error with one or another code. The reason for its appearance may well be damaged DirectX, but this problem may have other reasons. What else could cause this problem?
DirectDraw and Direct3D disabled
DirectDraw provides applications with direct access to video memory and is used to speed up 2D graphics rendering. Direct3D is similar to DirectDraw, but is responsible for working with 3D graphics. Both of these APIs must be in an active state.
To check their status, run the command dxdiag , switch to the “Screen” and look at the “DirectX Features” .
If the APIs have the status "Off" , open Windows Component Management, expand the "Legacy Components" DirectPlay box and reboot.
Enable compatibility settings
Since the DirectDraw error in Windows 10 is to some extent related to the resolution used by applications, you can alternatively try this trick.
Open the properties of the executable file of the application that gives an error when launched, switch to the “Compatibility” “Use screen resolution 640 x 480” checkbox .
The solution is not the best, since working in such a resolution will be clearly uncomfortable.
Outdated video drivers
The DirectDraw error can also be caused by incorrect operation of the video driver. Check that your video card driver is up to date and update it if necessary. It is advisable to use “native” drivers, and not those supplied by Microsoft as part of the operating system.
Reinstalling DirectX
If the error cannot be resolved, try reinstalling DirectX.
There is no option to remove this component in Windows, so you will have to act directly and even rudely by removing the DirectX libraries manually.
To do this, boot from any LiveCD with a file manager on board (this is necessary to bypass access rights), go to the C:\Windows folder and search for files that have “D3dx” .
Remove all these libraries, creating backup copies just in case.
We boot in normal mode, go to the website dlltop.ru/soft , go to the DirectX .
And download the latest version of Direct for your operating system.
Run the installer and follow the wizard's instructions.
As a result, all necessary component libraries will be downloaded and installed on your PC.
Which DirectX is better for Windows 10?
It is always better to install the latest DirectX for Windows 10. In fact, it is unlikely to be the latest, because it all depends on the video card. It should have built-in support for the latest DirectX 12 software. Older models only have DX9-DX11.
Healthy! You don’t even need to select the version of the DirectX library for Windows 10 yourself. It is distributed as an online installer. After entering the system, the program automatically detects the required software version and downloads it from the servers. The number of manual manipulations is reduced to a minimum.
How to use
Now that we have looked at the capabilities of the program, as well as its strengths and weaknesses, let's move on to the instructions for free downloading and installing DirectX 9 for a computer or laptop.
Download and Install
Let's download and install our driver for free. To do this, we take a series of simple 3 steps:
- Click the button that will allow you to download the archive with the file we need.
- Unpack the archive and extract the executable component.
- We launch the DirectX 9 installer and following the prompts, for example, where to install, whether to create shortcuts, etc., we install the system library from Microsoft.
- Close the installer and reboot our PC.
Some users ask - how to remove DirectX 9? Everything is very simple - for this, as in the case of a regular program, you need to use the control panel.
Now that the installation is finished, we can move on to the instructions for using our library.
Operating instructions
The whole point of using the DirectX library for Windows XP, 7, 8 and 10 comes down to the following: you simply launch a game or program that works in conjunction with DirectX 9. There is no need to make any additional settings. The only thing you should do after installing the library is to restart your computer.
In order to enable DirectX 9 on Windows 10, you need to visit the Control Panel, find the “Programs and Features” section there, select “Turn Windows features on or off,” and then check the box next to “Legacy Features.”
Another very common question is “how to change DirectX 11 to 9 on Windows 7?” There is no need to change them, the libraries work in parallel, and each of them is used for its own tasks.
By the way: this system library cannot be replaced with anything. Where DirectX 9 is needed, only it can be used.
How can I find out the installed version of the library?
If DirectX does not install on Windows 10 with a message that the current version is already installed, but the game still writes about an outdated library, you need to determine its real version. A special system tool is responsible for working with the software environment.
What DirectX is on Windows 10:
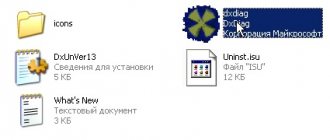
- Click on the magnifying glass symbol next to Start, enter the name dxdiag and run the command of the same name.
- On the first tab “System” at the end of the list we see the line “DirectX Version”.
Difficulties during installation
Sometimes Directx does not install on Windows 10 or the installation is interrupted. There may be three reasons:
- blocking by antivirus;
- broken installer files;
- contamination of the system with viruses.
Antivirus problems usually arise when you try to install illegal software. The original files can be corrected, and the antivirus will recognize them as malicious.
Sometimes Directx installation for Windows 10 fails due to file corruption. This happens with both pirated versions and legal ones, if an error occurred when downloading the executable. For the program to install, you need to download dxwebsetup.exe or the distribution kit again.
Also, failure often occurs due to viruses blocking processes.
Reinstalling DirectX on Windows 10
The easiest way to install DirectX 11 on Windows 10 is to run the automatic installation wizard. Without user intervention, it does a good job of detecting outdated versions of the library and, if necessary, adding updated DirectX.
Instructions:
- We go to the official Microsoft page distributing the library.
- Download the file.
- Double click on the loaded element.
- In the “Security Warning” window, click on the “Run” button.
- Select “I accept the terms” and click on the “Next” button.
- Uncheck “Install Bing Panel” and click “Next”.
- We wait until the installation wizard finishes.
Most likely, the procedure was completed successfully and the current DirectX appeared in the system. However, this is not always the case. Sometimes it appears that everything ended well, but in fact the old damaged files are still in the system and they interfere with normal operation. In this case, you must first completely remove the library and install it again.
Interest Ask! Do I need to install DirectX with the game? Probably everyone has noticed that each game comes with its own set of libraries. In fact, most games will work if the system already has the latest version of the software environment, but not all. There are developers who modify or use a specific helper library that is not included in the standard package. Our verdict: it is advisable to install DirectX with the game, but in most cases it is not necessary. If we agree to the installation, but the program finds the required software environment in the system, the installation will be interrupted.
DirectX 12 installation problems and solutions
When working with DirectX 12, two types of problems may arise:
- internal system error (during the installation process);
- constant failures in the operation of an already installed program.
What to do if an internal system error occurs
The most obvious reason for installation failure is a corrupted installer file. To avoid this, download updates only from the official Microsoft website.
Internal system error during DirectX 12 installation process
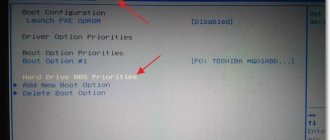
If you downloaded DirectX from Microsoft and an error occurs, you need to check your hard drive:
- Press Win + R to open Command Prompt.
The Win + R key combination is always used to work with commands - Write chkdsk in the text box and click OK.
The chkdsk command will launch a utility that checks the hard drive for file system errors - Wait until the hard drive scan finishes without closing the window. We are interested in the presence of damaged files.
Look at the line "Processing damaged files" to determine their presence - If there are no damaged files, then proceed to the next instructions. If there is, then you need to use the utility again. Open Command Prompt by pressing Win + R and type the command chkdsk /F. This utility will fix file system errors.
The chkdsk /F command will launch a utility that will fix damaged files - Wait for the Command Prompt window to automatically close. Correcting errors may take some time.
Next, you should check the system files and restore those that are damaged. Windows has built-in protection for system files, so if they are not executed correctly, it is easy to fix:
- Open Command Prompt using the Win + R key combination. Enter the command sfc /scannow and click OK.
The utility will scan and restore system files - Wait until the utility finishes.
The utility found and restored damaged files - Restart your computer.
It may also be that checking the hard drive did not help solve the problem. In this case, you need to check the compatibility of DirectX 12 with your system:
- Open the folder on your computer where you downloaded the DirectX 12 installer. Right-click on the file name and select “Fix compatibility issues.”
The “Fix compatibility problems” button opens the diagnostic mode we need - Select Use recommended settings in the Troubleshoot compatibility issues window.
Select the first option to match the DirectX settings to your computer's capabilities - Wait until the search for parameters is completed. Click "Check Program" to start the DirectX installation. After installation, click Next.
Using the "Check program" button you will install DirectX 12 on your computer - Select "Yes, save these settings for the program."
Save your settings to ensure DirectX works reliably in the future
Video: Troubleshooting a system error during the DirectX 12 installation process
What to do if DirectX 12 is not working correctly
DirectX is installed on the computer, but there are constant glitches in its operation. If the DirectX error warning window appears quite often, you can:
- update DirectX 12 in Windows Update (the sequence of actions is described in the paragraph “How to update installed DirectX to version 12”). The update is configured in such a way that the missing files are simply loaded into the existing library package on your computer. The system produces errors because it lacks some files for stable operation, and updating DirectX will fix this;
- uninstall DirectX 12 and install from scratch (step-by-step instructions are described in “How to completely remove DirectX 12” and “How to install DirectX 12 on Windows 10”). This option should only be used if the DirectX update did not help, as you will have to work with system files.
Why won't DirectX install?
If Windows already has a current version of the library, the online installer, having detected it, does not undertake to install the new DirectX on the system. Other problems can be caused by compatibility problems or incorrect operation of the antivirus. Most problems can be solved with the following instructions.
Directx does not install, what to do:
- Download DirectX from the manufacturer's website.
- We disable the antivirus for 10 minutes. We can do this through the tray (next to the system time) by right-clicking (RMB) on the antivirus software symbol.
- Right-click on the downloaded file and select the “Fix compatibility problems” option.
- Uninstall the previous version of DirectX.
By the way, we haven't mentioned how to enable DirectX 12 on Windows 10. Most games work successfully with both DX11 and DX12, but use the older version by default. It is more reliable and supported by most devices. To activate DX12, you should switch to DirectX 12 in the game settings, usually in the “Graphics” or “General” sections.
Where to find information about the installed version of DirectX
There are two ways to find out which version of DirectX is installed on your PC:
- through one of the Windows system tools;
- using third party software.
Let's consider both options.
To find out the version using only internal Windows 10 tools, you must:
- Launch the “Task Bar” (WIN+R keys) and enter the dxdiag value.
You can also open the task bar by right-clicking the Start menu and selecting Run. - After clicking OK, the DirectX Diagnostic Tool information window will open, where in the System tab you can find information about the installed version.
Go to the “System” tab, and at the bottom of the window you will see the installed DirectX version number
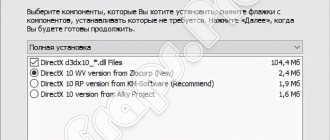
You can also obtain information about the installed version of DirectX using third-party software. To do this, you should use the utilities AIDA64, Astra32, GPU-Z, SysInfo Detector, HWiNFO and others. Let's consider an example using the Astra32 utility (the algorithm of actions for all listed programs is similar, with some minimal differences).
- Go to the official website of the developer, then to the “Download” tab, where click on the “Download now” line.
Select one of the two proposed versions of the utility: with or without an installer - After the download is complete, run the utility, and then follow the path “Astra32/Programs/Windows” in the root directory, where information about the DirectX version will be available in the information window.
In addition to information about the DirectX version, the utility is able to provide the user with complete information about the PC
Video: how to find out the DirectX version
Based on personal experience, the author of the article can advise using one of the three most well-proven utilities: Astra32 (has both a portable and installable version, the interface is entirely in Russian, the number of malfunctions is minimal), AIDA64 (gives a deeper and more detailed information about all PC components, but takes up a lot of space on the HDD) and HWiNFO (a very “light” utility that practically does not consume system resources, but is only available in English).
Direct3D Driver Downloads
Procedure for manual download and update:
This built-in Direct3D driver must be included with the Windows® operating system or be available for download through Windows® Update. The built-in driver supports the basic functionality of your Direct3D hardware. Click here to learn how to install built-in drivers.
| Manufacturer: | Direct3D | |
| OS: | Windows XP, Vista, 7, 8, 10 | |
| Install optional products - DriverDoc (Solvusoft) | License | Privacy Policy | Terms | Removal | ||
How to perform automatic download and update:
Recommendation: For most Windows users, we highly recommend using a driver update utility such as DriverDoc to update your Direct3D drivers. This utility automatically downloads the correct version of the Direct3D driver and updates it, preventing the installation of incorrect drivers.
The best part about using DriverDoc is that it automatically updates not only your drivers, but also all other drivers on your PC. With a constantly updated database of over 2,150,000 drivers, you can rest assured that we have all the drivers you need for your PC.
Solvusoft product
Download (Direct3D Driver Update Software)
| ABOUT SSL CERTIFICATES |
Install optional products - DriverDoc (Solvusoft) | License | Privacy Policy | Terms | Removal