Two-factor authentication is a topic that we touch on in one way or another in many of our posts. Last year we even recorded an entire podcast on this topic. However, due to the growing number of different services and the increasingly frequent attacks on user accounts (such as interceptions of control over iCloud accounts), we decided to devote a separate article to this type of authentication and talk about what it is, how it works and why it is worth it use wherever possible.
Two-step verification via SMS and voice call
So, go to the security settings of your Google account. There is an item called “Two-Step Verification” with the status “Disabled”. Feel free to click the “Change” button. At this and subsequent stages, Google may ask you to re-enter your account password. This is normal and there is nothing wrong with it.
A beautiful picture appears before us, clearly illustrating the principle of two-step authentication. If desired, watch a video with additional information, and then click “Proceed with setup.”
Now we need to specify the phone number to which account access codes will be sent. Then we select the option for delivering codes: via SMS or by incoming call. SMS is somehow more practical. Click “Send code”.
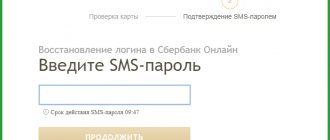
An SMS with a six-digit confirmation code will be sent to your number, which you must enter in the next step. Enter and confirm.
What is two-factor authentication?
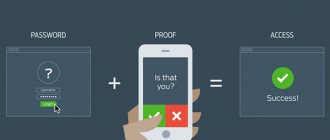
In a nutshell, to improve security, two-factor authentication simply adds a second step to the authorization process. Therefore, simply guessing or stealing your password is not enough to gain access to your account.
After you enter your normal password, your device or app will need a second password. This second password, which is more of a passcode, is sent to your designated device via text message. Only by successfully entering both codes will you be able to access your account, which cannot be accessed by those who do not have your mobile phone with your master password to boot.
Obviously, this method of authorization makes your account more secure. First, the two-factor authentication password will change every time you use it, making it nearly impossible to guess or hack, unlike a regular password, which you likely rarely change.
Secondly, only the person with the device that was specified as the recipient of the verification code message can access the account. The fact that the password is delivered via text message makes it more secure than using email since only one device can use the SIM card at a time. It is very difficult to get such a password from SMS, at least much more difficult than from email.
Reliable and unreliable computers
Next comes a very important part of the setup. Google asks you to determine whether the computer you are currently using is reliable. The point is that for reliable computers, entering the code to log into your account is enough to do once every thirty days. Reliability here refers to whether other people have access to this computer.
Perhaps, in this situation, only a home machine can be called a reliable computer, and only on the condition that no one but you uses it. We safely mark work and other computers as unreliable, that is, uncheck the “Trusted computer” checkbox. Click “Confirm”.
App and device passwords
The next step is to create passwords for applications. This is necessary because some applications access your Google Account outside of the browser. The process of creating passwords is much simpler than it might seem. Moreover, you only need to create these passwords once and do not have to remember them.
So, click the “Create passwords” button and at the same time remember which devices and applications access our Google account. For each such device and application, you need to come up with an identifier, that is, a name.
Among the most likely devices/applications will likely be an Android smartphone/tablet (if available). We write a name for the password (for example, “My Android”), and then click “Create a password.”
The system will generate a password that must be entered instead of the current password for your Google account on your mobile device.
You will also need to create a password for the Chrome browser settings and settings synchronization feature (for example, named “Chrome Sync”). If you're using the standalone Google Talk app, you'll need a password for that as well. As a result, you will have a list of passwords with names. In the future, if necessary, you can change or cancel any of the created passwords for applications and devices.
Completing setup
In fact, two-step authentication is already working, and now when you try to log into mail and other Google services, after entering your username and password, you will see this screen asking you to enter the code.
If we return to the Google account security settings, now the “Two-Step Verification” item has the status “Enabled”.
How to unlock your phone if you forgot your Google account - official methods
All options for bypassing the new generation of “Factory Reset Protection” can be divided into two categories: official and alternative. It is always advisable to start with the first ones, since such methods are universal and suitable for all versions of Android OS. These can safely include the following.
Login to seller account
If the device was purchased second-hand, it has likely been in use for some time and therefore has a Google Account associated with it. In this case, you should contact the former owner and ask him for login identification information (login and password).
Sometimes the new owner cannot get into the account even after entering valid IDs. This may be due to the fact that the seller changed the profile password specifically for the buyer, but the information has not yet been updated (usually the procedure is completed within 72 hours). In such a situation, it is advisable to wait a while and then try again.
Visiting your personal page
You can bypass Factory Reset Protection by logging into your own profile, which was linked to the phone you are using. If you cannot get to your personal page because you have lost your password, you should try to restore access using another work email or phone number associated with it.
Don’t forget about such an opportunity as a service center. If you contact employees and present a receipt for the purchase of a mobile device, they will easily restore access to the profile registered during the purchase.
Self-disabling FRP
Sometimes, before starting to restore the factory configuration, it is advisable to disable a function such as “Factory Reset Protection”. This is done in order to avoid problems with accessing your own device after it has been rebooted. "FRP" is present mainly in new versions of Android. But on those devices where it is present (starting from 5.1 and higher), you will need to do the following (the sequence of actions and names of points may differ depending on the manufacturer and the operating system shell).
- Open "Settings".
- Select the “Accounts” category.
- Find your Google account in the list and go to it.
- Using the appropriate button, delete your account.
- Next, enable developer mode and go to the corresponding menu.
- Activate the parameter “Unlock provided by src=”https://tarifkin.ru/wp-content/uploads/21c78bfc56.jpg” class=”aligncenter” width=”1090″ height=”499″[/img]
From now on, as soon as the settings are reset, the system will not ask for IDs to log into your Google account.
This is where the official methods for unlocking a Google account end. And since they are not available to all users, it is also worth considering alternative options.
Related additional actions
By the way, while you are on the settings page, do not be lazy to go to the “Password recovery options” section and make sure that you have a phone number for situations when you have forgotten your account password, or your account has been hacked.
Also make sure you remember the secret question/answer to gain access to your account.
In the application or web version, click on the profile picture and find the “Settings and Security” item. In the “Account” tab that opens, go to the “Security” section. There, enable login verification.
Here you can also generate a backup code for travel. It is also possible to create a temporary password for logging into devices or applications that require authorization on Twitter. The temporary password expires one hour after creation.
Download QR Code
Developer: Twitter, Inc.
Price: Free
Download QR Code
Developer: Twitter, Inc.
Price: Free
Alternative ways to receive codes
You may want to use an alternative method to obtain your account login codes. To do this, you need to return to the Google account security settings page, and then click the “Edit” button next to the “Two-Step Verification” item.
In the window that appears, there is a section “How to receive codes.” Here you can add an additional number to receive codes in case you don't have access to your main phone number.
How to protect Google mail?
Enable two-step verification
What it is? When you log into your Google account and enter your username and password, you will be asked for a code that will be sent only to you via SMS. This is an extremely effective method of protection, so I strongly recommend turning it on. Here's how it's done:
In the two-step authentication section, select Settings if you have the value Disabled
. If enabled, it means you are already using this feature.
Click the Proceed to Configure
on right
At this point you will probably be asked to enter your account password again, so do so. Next, you will need to enter your phone number:
And also choose how to receive the code. If SMS is selected, you will receive an SMS with a code. If there is a voice call, then a robot will call you and dictate a code. I choose SMS, it’s more convenient.
Click Send code
Within a couple of seconds, an SMS will be sent to your mobile phone from a Google subscriber with a 6-digit code. Enter and click confirm. Go to step 3
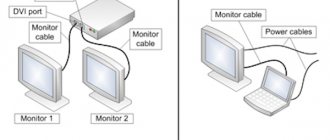
You are asked to set your computer as trusted so that when you try to log in from it, you will not be prompted for a code. This is how I mark my home computer, where there is an antivirus and firewall and to which strangers do not have access. If I lose my mobile, I can access my mail from this computer. If you are going on a trip and need access to your email account, turn on SMS roaming or print a table with one-time access codes. Read about it below. Click Next
.
A final confirmation is needed here. Click. Ready!
Advice:
when you access your mail from another computer, you will be asked to remember this computer and not request a code on it via SMS. You can use this for verified computers.
So after clicking confirm you will be taken here
Please note that your 2-Step Verification status will be ON
and date of inclusion.
Now let's add a backup phone number
, which you can use to get a code in case you lose your phone. You can specify both a mobile phone and a home phone (a robot will call your home phone and dictate a code). You can indicate the phone number of your spouse, children, grandchildren, sister or brother. Click Add number, a window will appear
Select the method for receiving the code and click Save
.
You can test it by clicking Send code
, it will be sent to the person whose phone number you indicated.
After completing the procedure, your settings will look like this:
You can add a few more numbers for good measure.
Backup codes for Google mail
Now let's look at backup codes for Google mail. They can be used if you cannot enter the SMS code. For example, you are abroad and cannot receive an SMS code or receive a call. Then you can simply enter the one-time code. You are given 10 codes, each can only be used once. Click on Show backup codes
.
You will be shown a page with 10 codes. Of course, there won’t be a few, I just replaced the codes for the sake of secrecy =)
We are very sorry that you did not like the article!
Help us improve it!
Send reply
Thanks for your feedback!
We protect your Google account using two-step authentication. Two-step authentication will protect your YouTube channel, blog on Blogger, Gmail and any other Google service from hacking and data loss. Read the first part about how to enable and configure it. However, enabling such protection may become an obstacle if you access Google services through mobile phone applications, or use programs on a computer when working with services. For example, if you publish entries to the Blogspot blog through the program, or create and publish video tutorials on YouTube using, slide shows using Proshow Producer, etc. With two-step authentication, you will not be able to enter your account login and password into the program for authorization. The password will simply stop working in them.
This is what application passwords are designed for.
Google Authenticator
If you have a smartphone on iOS, Android or a mobile device from RIM, then you can install a special Google Authenticator application, which will replace incoming SMS with codes.
Let's look at how the authenticator works using Android as an example.
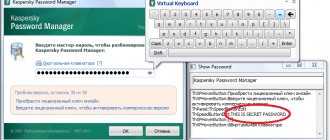
Following the instructions, download the Google Authenticator application from the Play Store to your smartphone. When you launch the application, you will be offered 2 setup methods: manually entering your account and password, or scanning the QR code, which is located on the page with instructions for installing the application.
If you select the QR code option, the authenticator may prompt you to install a scanner application. We agree and bet. After that, scan the QR code on the settings page and enter the code generated by the application.
In the future, if you need to enter a code, you just need to launch the application and enter the generated code.
Authy
Authy is an alternative to Google Authenticator for iOS and Android. Authy has an advantage over most 2FA app options - you can sync your accounts across multiple devices.
Typically, if you want to change your smartphone, you need to back up your settings and transfer your 2FA app data manually. This may take a long time. Also, if someone steals your phone, your 2FA codes and accounts will be lost. Authy eliminates this problem with a secure backup system. This means you can transfer your Authy 2FA accounts between devices.
Download: Authy for Android | iOS (Both Free)
Thanks for reading! Subscribe to my channel on Telegram and Yandex.Zen . Only there are the latest blog updates and news from the world of information technology.
Also, read me on social networks: Facebook , Twitter , VK , OK .
leaf way
A situation can happen to anyone when the phone is forgotten at home, and along with it an authenticator application and the ability to receive SMS. In such a case, it is useful to play it safe and use backup codes.
You can simply write them down on a piece of paper and print them out, then carry them in your wallet. Each such code is one-time use, and when the printed codes begin to run out, it is enough to request the generation of a new pack of codes.
We hope this guide helps you.