The Windows operating system has a feature that allows you to compress a disk to save hard disk space. In some situations, you need to compress disk space due to the lack of free space necessary to accommodate other files.
On computers with the NTFS file system, there is a function for compressing files and directories (directories, folders, disks, volumes) built into the Windows operating system. Thanks to this, there will be more free space on your hard drive.
Let's figure out what it means to shrink a disk; what happens if you shrink drive “C”? In this situation, not everything is as obvious as it seems at first glance.
Shrink disk to save space: what is it?
What does it mean to shrink a disk to save space? When compressed, the size of the occupied space on the disk decreases and there is more free space. The operation of the operating system tool resembles the work of an archiver.
Windows overwrites the data, so it takes up less space on the local disk. Everything seems to be fine, but there are some nuances to this:
- compressed files will get into RAM faster, therefore performance will increase;
- Opening compressed files will require more CPU resources, which will slow down your computer.
It should be noted that if you compress the system partition, then frequent compression will increase the fragmentation of compressed files, therefore reading and writing files will slow down, and this affects system performance.
The disk compression process takes some time, depending on the amount of space that files occupy on a given volume. Compressing a disk is a reversible operation. The user can uncompress a volume if it is no longer needed.
Considering all of the above, we come to the following conclusions:
- Compression works on the NTFS file system.
- Compression will free up some free disk space.
- Previously compressed files are not recompressed.
- There is a high probability that after compressing the disk, the PC will become slower.
- On some computers, after compressing the system disk, problems may arise when updating the system or when using drivers.
The user must decide whether to compress the disk to save space independently, taking into account various circumstances. The user can not only compress a disk partition, but also compress an individual folder or file without compressing the entire disk. In this case, system performance will not be affected.
Is it possible to shrink the C drive? Yes, but this should only be done in certain situations. For example, if there is not enough space to install the required update, or to get some important files from the Internet to your computer.
Once you have the data you need, perform Disk Cleanup and then disable volume compression in Windows.
The Windows 10 operating system independently compresses some system files during its operation if necessary, in addition, the Compact OS function has been added to the system for compressing system files.
In this guide, you will find several instructions on how to shrink your hard drive in several ways, or how to uncompress a disk, folder, or file.
Windows Disk Management, problem solution: 0 MB available for volume compression.
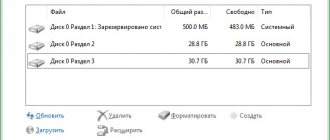
When trying to shrink a volume in Windows 7 (“Control Panel” – “Create and format hard disk partitions”), I encountered the problem that Windows does not want to shrink a 500 GB disk that has 300 GB free. It displays the message: “0 MB available for volume compression.” This problem occurs because the data on the disk is fragmented, i.e. are scattered over different parts of the hard drive, in addition, non-movable system files, such as MFT (Master File Table), pagefile, hibernate file, NTFS metadata, exclusively locked files, System Restore Points, may be located in different places on the disk. Here's how I managed to solve this problem. By the way, the same tools can be applied to other versions of Windows:
- First, I ran Disk Cleanup and restarted the computer. I ticked all the boxes. The program worked for about an hour, including restarting the computer. As a result, only 50 MB were added available for compression. A little, isn't it? Well, okay, the chicken will peck at the grain.
- Installed the free disk defragmentation program Auslogics Disk Defrag Free. The program ran for about 40 minutes. After defragmenting with this program, I had 50 GB available for compression. Very good, but still not enough!
- Installed and launched the free defragmentation program Power Defragmenter. The program also worked for about 40 minutes. Unfortunately, this program did not add any additional space available for compression. You might have better luck. Try it if all other means fail to give the desired result.
- I tried to solve the problem using the disk management program partition manager EaseUs. I fiddled around for 30 minutes, but didn’t get any results, although I saw good reviews on the Internet. And I didn’t like the program itself.
- Next, I downloaded and launched the PerfectDisk® Pro program. The program is paid, but the first 30 days are free. This program has a special function for preparing the disk for compression, “Prep for Shrink,” which transfers all files to the beginning of the disk. In addition, this program can move MFT files. As written in the description of the Prep for Shrink function, its purpose is not optimization and defragmentation, but to free up maximum space, and it can lead to disk fragmentation. Therefore, it is better to run this strategy first, then shrink the disk and create a new partition, and only after that optimize and defragment partition C. The program worked for me for the usual 40 minutes. But this did not add any free space for compression, i.e. you could simply run the Auslogics Disk Defrag defragmentation program and call it a day with the same result. However, at this stage it became clear to me what the problem was. The hard drive diagram from the Perfect Disk program shows that non-movable system files, which are highlighted in brown, are located on the hard drive, starting from the middle to the end. What a shame, this Windows of yours!
Then it became clear to me that I should try to move all these files to the beginning of the hard drive or simply delete them. I did it like this:
- disabled “System Restore” and at the same time deleted all restore points (Control Panel – System – System Protection – Configure – Disable System Protection);
- disabled the paging file pagefile (Control panel – System – Advanced system settings – Advanced – Performance – Settings – Advanced – Change – Without paging file);
- disabled recording of debugging information (Control panel - System - Advanced system parameters - Advanced - Boot and recovery - Settings - Recording debugging information - No (previously - Core dump));
- disabled hibernation mode. How to disable and re-enable hibernation mode;
- rebooted the computer. And thereby deleted the swap file (c:\pagefile.sys) and the hibernation file (c:\hiberfil.sys). To check this, you need to go to “Control Panel” – “Folder Options” and check the “Show hidden files, folders and drives” checkbox and uncheck “Hide protected system files”. This way you can enable hidden files to be displayed and ensure that the two files are gone.
Unfortunately, the measures taken also did not produce results, and only 50 GB remained available for compression.
Therefore, I did all the steps described in this paragraph in reverse order, only I did not turn the hibernation mode back on. So what really helped to quickly and completely solve the problem of compressing the C drive with the Windows operating system installed on it?
A free disk management program, an excellent replacement for the standard Windows tool: Partition Wizard Home Edition. In just 15 minutes, the hard drive was divided into two equal partitions, each 250 GB in size. Problem solved! Start with this program, and then defragment your disk using Auslogic.
If the latter method does not give quick results, then it is better to copy all important data from your computer to a safe place, i.e. make a backup and simply reinstall Windows again, and only then compress the disk. In this case, there will be no problems with compression. And considering how much time I spent solving the compression problem, next time I'd rather reinstall Windows right away. And if you install one of the Linux distributions as the second operating system, then the solution is even simpler - completely remove Windows during the Linux installation. In this case, the time costs will be minimal! When solving the problem, I was guided by information from the following articles:
- Working Around Windows Vista's “Shrink Volume” Inadequacy Problems;
- How To Extend System Partition In Windows 8.1.
- Disable System Restore in Windows 7 or Vista.
- Understanding the Windows Pagefile and Why You Shouldn't Disable It.
- What is hiberfil.sys and How Do I Delete It?
How to compress a file or folder on the command line
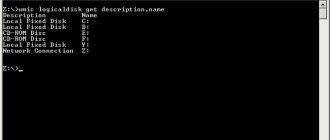
Using the system tool: command line, the user can compress a folder or file on the computer disk.
You may also be interested in:
- How to increase or decrease the size of the “C” drive in Windows
- How to partition a disk in Windows 7
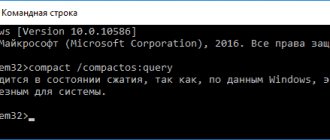
Run Command Prompt as Administrator.
To compress a folder with all its contents, in a command line interpreter window, run the command:
compact /c /s:”full path to the folder” /i /Q
To perform file compression, run the command:
compact /c “full path to file” /i /Q
Extend Volume feature is not available
Some users encounter that the “Extend volume” item in the built-in utility or during the installation of Windows 7 is inactive, that is, it is highlighted in a neutral color.
A similar problem occurs if you do not have space that can be allocated to one of the disks. That is, you do not have unallocated memory.
Please note that free disk space and unallocated space are two different things. To achieve the presence of a second one, you need to delete one of the volumes or compress it, moving the free space to unallocated space. How to do this is described in the paragraphs in the “Through the built-in utility” section above in the article.
How to compress a folder or file in Windows
In the Windows operating system, the process of compressing a folder or file occurs in a similar way to compressing a disk.
Do the following:
- Right-click on the folder or file.
- In the “Properties: X” window, click on the “Other...” button.
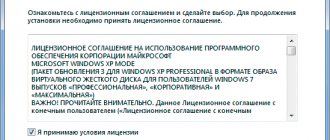
- In the “Additional Attributes” window, in the “Compression and Encryption Attributes” parameter, check the “Compress contents to save disk space” checkbox.
- Click on the "OK" button.
- After this, the individual file will be compressed. When you compress the folder, an additional window will open.
- In the “Attribute Change Confirmation” window, click the “OK” button.
Here you need to select the appropriate option:
- Applies changes only to this folder.
- To this folder and to all subfolders and files (this is the default setting).
After this, the folder compression process will begin.
In the Explorer window, symbols will appear on compressed folders and files warning you that the items have been compressed.
How to expand or reduce (shrink) a local disk using Windows 10, 8.1, 8, 7
Good day. Today we’ll look at a fairly popular topic for beginners, this is working with already created hard drive partitions (you’ve already bought a new hard drive? :) and we’ll look at operations such as reducing the volume (compression) of the hard drive and expanding it using unallocated area. To do this, we will not use any third-party programs, but will use the Disk Management utility built into the Windows operating system. So, why might we need this knowledge? Suppose you initially created two local disks on your hard drive, but over time you decided that one is enough to store movies, music and photos, it’s easier to search. Or another case, you have two local disks on your hard drive (let’s say 2Tb), one for the system (local drive C), the second for personal data (drive D), but when you partitioned them, you left too little space for drive C and this constantly creates discomfort for you.
It is to solve such situations that this article was written. In this article I will perform, sequentially: - Compression (reduction) of the local disk, - Expansion (increase) of the local disk due to a new unallocated area.
This is what we need.
1) The first thing we need is to open the Disk Management utility. For lucky owners of Windows 8.1 and 8, just right-click on the “Start” button (or in the lower left corner of the desktop for Windows and select “Disk Management”. Everyone else needs to go to “Control Panel → System and Security → Administrative Tools → Computer Management → Storage Devices → Disk Management".
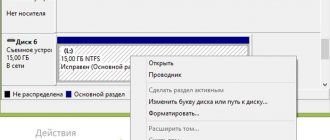
2) We look for the required hard drive at the bottom of the window. I have a G drive on it.
3) Right-click on the partition on the right side of the window and select “Shrink Volume”.
4) A dialog box will open asking you to select the volume to compress. This window shows the current partition size, available (unused) space for compression, and the size of the local disk after compression, in megabytes. To maximize disk compression, you must defragment the partition before this operation. I'm using an empty disk, so I have almost all of its capacity available for compression. Enter the required number of megabytes in the “Size of compressed space” line and click “Compress”.
5) After the operation is completed, an unallocated area on the hard drive will appear equal to your entered value (1GB = 1024 MB).
6) Now we will expand the partition using this unallocated area. To do this, right-click on the partition and select “Extend volume”.
7) The “Volume Expansion Wizard” will open, click next.
This page shows the available and selected unallocated areas, and you can also specify how much of the unallocated area should be used to expand the local disk (item “Select the size of the allocated space”). I use the entire volume, you look at your circumstances.
We check the data and click “Finish”.
The unallocated region was successfully attached to partition G.
That's all. I hope you found this article useful, click one of the buttons below to tell your friends about it. Also subscribe to site updates by entering your e-mail in the field on the right.
Thank you for your attention
Site material
- Author: Skesov
Rate this article:
- 5
- 4
- 3
- 2
- 1
(10 votes, average: 3.8 out of 5)
Share with your friends!
How to move desktop to another local drive in Windows 10, 8.1, 8, 7
How to move your Downloads folder to another local drive in Windows 10, 8.1, 8, 7
Undo disk compression from Explorer
To cancel the compression, you will need to perform the reverse operation. All actions are almost identical to those performed during the compression process.
- Launch Windows Explorer.
- Right-click on the computer drive.
- In the menu that opens, click on “Properties”.
- In the disk properties window, in the “General” tab, uncheck the box next to “Compress this disk to save space”, and then click on the “OK” button.
- In the “Attribute Change Confirmation” window, click the “OK” button.
- In the “Access Denied” window, click on the “Continue” button.
- Wait until the operation completes.
Disabling disk compression from the Local Group Policy Editor
In Windows Pro (Professional) and Windows Enterprise operating systems, users can use a system tool: the Local Group Policy Editor to disable compression of all disks.
- Press the “Win” + “R” keys on your keyboard.
- In the “Run” window, enter the command: “gpedit.msc”, click on the “OK” button.
- In the Local Group Policy Editor window, follow the path:
Computer Configuration => Administrative Templates => System => File System => NTFS
- In the "NTFS" policy setting, click on the "Prohibit compression on all NTFS volumes" option.
- In the “Prohibit compression on all NTFS volumes” window, activate the “Enabled” option, and then click on the “OK” button.
- Restart your computer.
For the reverse operation: canceling the prohibition of compression, go to Group Policy settings, in the “Prohibit compression on all NTFS volumes” window, select the “Not configured” option.
How to uncompress a file or folder
The user has the ability to cancel compression of a folder or file at any time. To do this you need to follow these steps:
- Right-click on the file or folder.
- Click on “Properties” in the context menu.
- In the properties window, in the “General...” tab, click on the “Other...” button.
- In the “Advanced Attributes” window, uncheck the “Compress contents to save disk space” checkbox, and then click the “OK” button.
- Next, click on the “OK” button in the folder or file properties window.
- For folder options, select the appropriate attribute for unpacking.
Compressing files and folders
The function is available from the context menu by right-clicking on the desired file/folder. She is here:
We activate the function, compression has begun. After this, you can force Windows to highlight compressed files. This is easy to do with a whole disk. Let's find a list of volumes in Windows Explorer and also call the context menu with the right mouse:
All options to compress and uncompress files and folders