The MTK hardware platform as the basis for building modern smartphones, tablet computers and other devices has become very widespread. Along with the variety of devices, the ability to choose variations of the Android OS has come into the lives of users - the number of available official and custom firmware for popular MTK devices can reach several dozen! To manipulate memory partitions of Mediatek devices, the SP Flash Tool is most often used - a powerful and functional tool.
Despite the wide variety of MTK devices, the software installation process through the SP FlashTool application is generally the same and is carried out in several steps. Let's look at them in detail.
All actions to flash devices using SP FlashTool, including following the instructions below, are carried out by the user at his own peril and risk! The site administration and the author of the article are not responsible for possible malfunction of the device!
Preparing your device and PC
In order for the procedure of writing image files to device memory sections to go smoothly, it is necessary to prepare accordingly by carrying out certain manipulations both with the Android device and with a PC or laptop.
- We download everything you need - firmware, drivers and the application itself. We unpack all the archives into a separate folder, ideally located in the root of drive C.
- It is advisable that the names of the folders for the location of application and firmware files do not contain Russian letters and spaces. The name can be anything, but you should name the folders consciously so as not to get confused later, especially if the user likes to experiment with different types of software loaded into the device.
- Install the driver. This point of preparation, or rather its correct implementation, largely determines the smooth flow of the entire process. How to install the driver for MTK solutions is described in detail in the article at the link below:
- We make a system backup. Regardless of the outcome of the firmware procedure, the user in almost all cases will have to restore his own information, and if something goes wrong, the data that was not saved in the backup copy will be irretrievably lost. Therefore, it is highly advisable to follow the steps of one of the methods for creating a backup from the article:
- We ensure uninterrupted power supply for your PC. Ideally, the computer that will be used for manipulation via SP FlashTool should be fully operational and equipped with an uninterruptible power supply.
Lesson: Installing drivers for Android firmware
Lesson: How to backup an Android device before flashing it
Installing smartphone drivers
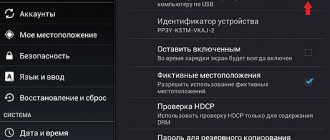
At this stage, you need to download and install a driver for your device that will allow it to interact normally with the computer. You should look for it in the following places:
- First of all, you need to look for the driver on the website of the manufacturer of your device. This way you can be sure that you won't get a computer virus.
- Sometimes the driver can be found on the disk that comes with some phone models. If so, then you need to insert the CD into your computer drive and follow the prompts.
- If the above two methods do not suit you, you can search for the driver on thematic forums. Keep in mind that this way you risk the security of not only your phone, but also your computer. Therefore, be sure to check all downloaded files for viruses before installing them.
Once you find the driver, you should download and install it. This is done by double-clicking on the archive and should not cause any difficulties. But sometimes problems still arise, so such cases should be given special attention.
Installing firmware
Using the SP FlashTool application, you can perform almost all possible operations with device memory sections. Installing firmware is the main function and to perform it, the program provides several operating modes.
Method 1: Download Only
Let's take a closer look at the procedure for downloading software to an Android device when using one of the most common and frequently used firmware modes via SP FlashTool - “Download Only”.
- Launch SP FlashTool. The program does not require installation, so to launch it, simply double-click on the flash_tool.exe located in the application folder.
- When you launch the program for the first time, a window with an error message appears. This point should not worry the user. Once the path to the location of the necessary files is specified to the program, the error will no longer appear. Click the “OK” button.
- In the main window of the program after launch, the operating mode is initially selected - “Download Only”. It should be noted right away that this solution is used in most situations and is basic for almost all firmware procedures. The differences in operation when using the other two modes will be described below. In general, we leave “Download Only” unchanged.
- Let's move on to adding image files to the program for further recording in the device's memory sections. To automate the process somewhat, SP FlashTool uses a special file called Scatter . This file is essentially a list of all partitions of the device’s flash memory, as well as the addresses of the starting and ending memory blocks of the Android device for writing partitions. To add a scatter file to the application, click the “choose” button located to the right of the “Scatter-loading file” field.
- After clicking on the button for selecting a scatter file, an Explorer window opens in which you need to specify the path to the required data. The scatter file is located in the folder with the unpacked firmware and is named MT xxxx _Android_scatter_ yyyyy .txt, where xxxx is the model number of the device processor for which the data loaded into the device is intended, and yyyyy is the type of memory used in the device. Select the scatter and click the “Open” button.
- It is important to note that the SP FlashTool application provides a check of hash sums, designed to protect the Android device from writing incorrect or damaged files. When adding a scatter file to the program, the image files are checked, the list of which is contained in the downloaded scatter. This procedure can be canceled during the verification process or disabled in the settings, but this is strictly not recommended!
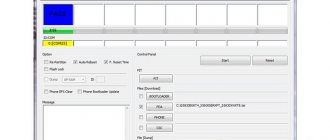
- After downloading the scatter file, the firmware components were automatically added. This is evidenced by the completed fields “Name”, “Begin Adress”, “End Adress”, “Location”. The lines under the headings contain, respectively, the name of each partition, the starting and ending addresses of the memory blocks for recording data, as well as the path where the image files are located on the PC disk.
- To the left of the names of the memory sections there are checkboxes that allow you to exclude or add certain image files that will be written to the device.
In general, it is strongly recommended to uncheck the box next to the “PRELOADER” section; this allows you to avoid many problems, especially when using custom firmware or files obtained from dubious resources, as well as the absence of a full system backup created using MTK Droid Tools.
- Checking the program settings. Click the “Options” menu and in the window that opens, go to the “Download” section. We check the boxes “USB Checksum” and “Storage Checksum” - this will allow you to check the checksums of files before writing to the device, and therefore avoid flashing corrupted images.
- After completing the above steps, we proceed directly to the procedure for writing image files to the appropriate sections of the device’s memory. We check that the device is disconnected from the computer, turn off the Android device completely, remove and reinsert the battery if it is removable. To put SP FlashTool into standby mode for connecting the device for firmware, press the “Download” button, indicated by a green arrow pointing down.
- While waiting for the device to connect, the program does not allow you to perform any actions. Only the “Stop” button is available, which allows you to interrupt the procedure. We connect the switched off device to the USB port.
- After connecting the device to the PC and identifying it in the system, the process of flashing the device will begin, accompanied by the filling of the progress bar located at the bottom of the window.
During the procedure, the indicator changes its color depending on the actions performed by the program. To fully understand the processes occurring during firmware, let’s look at the decoding of the indicator colors:
- After the program has completed all the manipulations, the “Download OK” window appears, confirming the successful completion of the process. We disconnect the device from the PC and start it by long pressing the “Power” key. Usually the first launch of Android after flashing takes quite a long time, you should be patient.
Attention! Loading an incorrect scatter file into the SP Flash Tool and further recording images using incorrect addressing of memory sections can damage the device!
Method 2: Firmware Upgrade
The procedure for working with MTK devices running Android in the “Firmware Upgrade” mode is generally similar to the “Download Only” method described above and requires similar actions from the user.
The difference between the modes is the impossibility of selecting individual images for recording in the “Firmware Upgrade” option. In other words, in this option, the device’s memory will be overwritten in full accordance with the list of partitions contained in the scatter file.
In most cases, this mode is used to update the official firmware of the entire working device if the user requires a new version of the software, and other update methods do not work or are not applicable. It can also be used when restoring devices after a system crash and in some other cases.
Attention! Using the “Firmware Upgrade” mode involves completely formatting the device’s memory, therefore, all user data will be destroyed in the process!
The firmware process in the “Firmware Upgrade” mode after clicking the “Download” button in SP FlashTool and connecting the device to the PC consists of the following steps:
- Creating a backup copy of the NVRAM partition;
- Complete formatting of the device memory;
- Write device memory partition table (PMT);
- Restoring an NVRAM partition from a backup;
- Recording all partitions whose image files are contained in the firmware.
The user's actions to perform firmware upgrade in the "Firmware Upgrade" mode are the same as the previous method, with the exception of certain points.
- Select the scatter file (1), select the SP FlashTool operating mode in the drop-down list (2), press the “Download” button (3), then connect the turned off device to the USB port.
- Upon completion of the procedure, the “Download OK” window will appear.
Method 3: Format All + Download
The “Format All+Download” mode in SP FlashTool is intended for flashing firmware when restoring devices, and is also used in situations where the other methods described above are not applicable or do not work.
The situations in which “Format All+Download” is used are varied. As an example, we can consider a case where modified software was installed in the device and/or the device’s memory was re-partitioned to a solution different from the factory one, and then it was necessary to switch to the original software from the manufacturer. In this case, attempts to write original files will fail and the SP FlashTool program will suggest using emergency mode in the corresponding message window.
There are only three stages of performing firmware in this mode:
- Complete formatting of the device memory;
- PMT partition table entry;
- Record all sections of the device memory.
Attention! When manipulated in the “Format All+Download” mode, the NVRAM partition is erased, which leads to the deletion of network parameters, in particular, IMEI. This will make it impossible to make calls or connect to Wi-Fi networks after following the instructions below! Restoring an NVRAM partition in the absence of a backup is quite a labor-intensive procedure, although it is possible in most cases!
The steps required to format and write partitions in the “Format All+Download” mode are similar to those in the methods described above for the “Download” and “Firmware Upgrade” modes.
- Select the scatter file, determine the mode, and click the “Download” button.
- We connect the device to the USB port of the PC and wait for the process to complete.
Firmware search
Now it's time to find and download the firmware that you will install on your smartphone. Here you have two options: use official software or custom one. In the first case, simply go to the phone manufacturer's website and find the latest update for your model. But if you decide to use custom firmware, then you should follow a few simple rules:
- Make sure that the selected firmware is suitable for your smartphone model. Failure to comply with this condition is fraught with serious problems, including turning the phone into a “dead” piece of plastic.
- Download files only from reputable sites and forums. In this case, even if some problem arises, you can count on the help of software developers.
- Carefully study the firmware reviews left by other users. It’s better not to take risks if there are many negative ones among them.
- Make sure that the smartphone firmware installed on you is older than the one you are going to download.
Remember, by following these simple rules, you will protect your phone from unnecessary damage.
Installing custom recovery via SP Flash Tool
Today, so-called custom firmware has become widespread, i.e. solutions created not by the manufacturer of a particular device, but by third-party developers or ordinary users. Without delving into the advantages and disadvantages of this method of changing and expanding the functionality of an Android device, it is worth noting that installing custom ones in most cases requires the presence of a modified recovery environment in the device - TWRP Recovery or CWM Recovery. This system component can be installed in almost all MTK devices using SP FlashTool.
- Launch Flash Tool, add a scatter file, select “Download Only”.
- Using the checkbox at the very top of the list of sections, uncheck all image files. Check the box next to the “RECOVERY” section only.
- Next, you need to specify the program the path to the custom recovery image file. To do this, double-click on the path specified in the “Location” section, and in the Explorer window that opens, find the required *.img . Click the “Open” button.
- The result of the above manipulations should be something similar to the screenshot below. Only the “RECOVERY” section is checked; in the “Location” field the path and the recovery image file itself are indicated. Click the “Download” button.
- We connect the switched off device to the PC and watch the process of flashing the recovery firmware into the device. Everything happens very quickly.
- At the end of the process, we again see the “Download OK” window, already familiar from previous manipulations. You can reboot into a modified recovery environment.
It is worth noting that the considered method of installing recovery via SP FlashTool does not pretend to be an absolutely universal solution. In some cases, when loading a recovery environment image into the device, additional actions may be required, in particular, editing the scatter file and other manipulations.
As you can see, the process of flashing MTK devices on Android using the SP Flash Tool application is not a complicated procedure, but it requires proper preparation and balanced actions. We do everything calmly and think about every step - success is guaranteed!
We are glad that we were able to help you solve the problem. Add the Lumpics.ru website to your bookmarks and we will be useful to you. Thank the author and share the article on social networks.
Describe what didn't work for you. Our specialists will try to answer as quickly as possible.
Preparation
It is important to know that flashing your smartphone's firmware will cause it to return to its factory settings. In other words, all information stored on the device will be deleted and cannot be restored. To prevent this from becoming a problem for you, do the following:
- Save all contacts from your phone book. They can be transferred to your computer using special programs or synchronized with your Google account.
- Copy all important photos, documents and videos to your computer.
- Check if there is any important information left in the SMS (passwords from payment systems, bank codes, etc.). If there is one, then it is better to rewrite it.
- Check the calendar for significant dates.
- If you still have installation files of some rare programs, you can copy them to your computer before flashing them through FlashTool.
Don't neglect these simple tips, because they will help you save time and nerves. It is better to go through all the points several times, and only after that proceed with the firmware.
Actions after flashing
After flashing your phone is completed, you need to perform a few more simple steps:
- Don't forget to set the current time and date.
- Link your device to your Google account. This is especially useful if you have synced your phone book with it.
- It will be better if you format the memory card. There may be system files left on it from the previous firmware that do nothing useful, but only take up free space.
That's basically it. Now you can enjoy the new firmware, which will undoubtedly make your smartphone work in a new way.
Firmware for Chinese phones
How to flash a Chinese phone using FlashTool? This can also be done, but this procedure is somewhat different from the standard one; it will be discussed separately. Here it is important to know the following:
- Never click the Memory Test button in FlashTool. For some reason, Chinese phones do not respond adequately to this operation, and it may happen that the firmware is erased beyond recovery.
- Carefully study the information about the firmware on the site from which you download it. It is possible that there are bugs in it that can cause you serious problems.
- Do not try to install firmware from another device on your smartphone. So you risk ruining it, and it’s not a fact that you will be able to return the phone to working condition.
Also, if you are not confident in your abilities, it is better to contact your nearest service center. Chinese smartphones are very specific, so let the specialists deal with them.
Installing TWRP via Flashtool
This utility is widely popular, since it is mainly used to flash many Android devices based on MTK processors. Using it, you can also upload a new recovery, namely TWRP. To perform the operation, you will need the Flashtool program itself and the TWRP image downloaded from the official website of the developers. The program starts, in the settings the DA DL ALL Check Sum checkbox is checked. Now the scatter file available in the TWRP archive is selected. The list of components to be flashed should include recovery. Clicking the Download button initiates the firmware download.
Flaws
- no interface localization (this especially causes inconvenience for Lenovo owners);
- failures are observed during flashing of devices equipped with MT6577 and MT6575 processors;
- flashing driver firmware without first creating backup copies of data can lead to complications;
- to save user information, you must select a mode called Firmware Upgrade each time;
- By default, the program has Download installed, which formats the internal memory;
- there is no universal driver for the USB cable;
- there is no step-by-step wizard for flashing Android devices in Russian;
- There are firmwares that do not have a scatter-loading file - then all files must be specified manually.