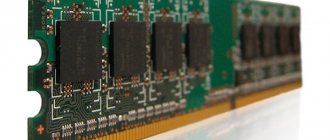
Why overclock your video card?
The purchased computer always operates according to standard specifications. However, each device also has a certain frequency reserve, and its size determines how much the user can overclock a personal computer.
It should be noted that this procedure is most often performed by experienced users, since they need high-quality operation of the entire computer.
Also, many users want to do this for the following reasons:
- The main reason is that thanks to this procedure, the personal computer begins to work much faster. This occurs by increasing the frequency with which the device operates. Thanks to this, the owner of the device will be able to use various programs and video games that require powerful hardware to function properly. Also, thanks to this, new computer interfaces become available to the owner of the device;
- By overclocking a purchased computer, the user can significantly save on purchasing more expensive computer equipment, since in this way one can also get a powerful device;
- If the video card installed in the system unit of a personal computer begins to perform worse, the entire system of the device begins to suffer. This reduces computer performance. Solving the problem can take a lot of time and money, so it’s worth overclocking the video card.
MSI Afterburner - practical part
How to take off with this, i.e. how to overclock a video card this way? Very simple.
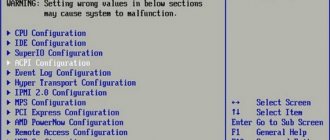
Initially (remember the reboot?) you have determined the operating parameters of the processor frequency and memory of your video card, which, accordingly, are indicated by the values for the Core Clock (MHz) and Memory Clock (MHz) sliders:
The simplest, basic overclocking is a gradual (this is important!) increase in these values to the limit when the card stops working stably (more on this below). That is, the sequence of overclocking a video card via MSI Afterburner is as follows.
How much can you improve the performance of a video card?
All released lines of video cards were designed in such a way that using the overclocking procedure, the user will still not be able to achieve too high a personal computer performance. That is, it is impossible to overclock the model of a low-end card to the performance level of the older ones.
Possible risks during overclocking
Despite the fact that the presented operation allows you to improve the performance of a personal computer several times, it has certain disadvantages and risks. Namely:
- After overclocking the device, it may begin to get very hot. This happens because the accelerated video card begins to heat up all the built-in chips. And this leads to certain breakdowns in the computer, due to which the user may need to purchase a new device. However, the user can avoid this problem by installing a special system in the computer that will cool it;
- After this procedure, the video card begins to consume a huge amount of electrical energy. If the device's power supply is not prepared for a higher level of settings, the entire equipment may completely fail. Also, the device may work with constant interruptions or stop functioning altogether;
- If the video card installed in a personal computer is already operating at maximum power, then after overclocking it the chips may burn out. It is recommended to carry out this procedure smoothly, constantly checking the operation of the video card;
- After overloading, the service life can be significantly reduced. Without a doubt, a personal computer will work many times better, but it will last less time than with standard operation. This occurs because the computer device is subjected to very high loads;
- Even if the computer overclocking procedure was carried out successfully, after a certain amount of time certain problems may arise in the functioning of the device. This often happens because synchronization is lost within the device. Also, details of the graphic storage may change independently, and programs to speed up the operation of a personal computer may produce incorrect indicators;
- In the process of overclocking the functionality of a personal computer, special programs are used. However, also in certain cases, this procedure may require resoldering of certain parts. Although this allows you to further increase your computer's performance, there is a huge risk of the device breaking. This often happens due to the inexperience of the person performing the procedure, lack of certain knowledge, as well as incorrect soldering.
Checking overclocking results
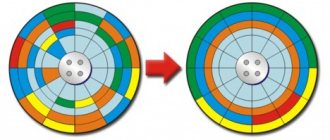
Let's compare the main indicators of an overclocked video card with those without overclocking.
Before overclocking
The experimental GeForce GTS 450 demonstrated the following productivity (see above):
• PixelFillrate — 6.3 GPixel/s;
• TextureFillrate — 25.1 GTexel/s;
• memory bandwidth (bandwidth) - 57.7 GB/s.
After overclocking
The following results were obtained (see screenshot):
• PixelFillrate — 7.2 GPixel/s (14.2% increase);
• TextureFillrate — 28.8 GTexel/s (14.7% increase)
• memory bandwidth (bandw >15.0% increase).
To check productivity gains in conditions close to real ones, the 3DMark11
. This is one of the most popular graphics adapter performance tests.
In 3DMark11 without overclocking, the GeForce GTS 450 showed a result of 2272 points, after overclocking - 2573 points.
That is, the increase in video card performance in practice was 13,2 %
(see screenshots).
Overclocking a video card using Nvidia utilities
Each user can try to overclock the video card in their computer on their own using Nvidia utilities. To do this, you will first need to download it to your personal computer and run it. After this you need to take the following steps:
- The value called “Shader Clock” must be made the same, for example, 1800 MHz. Since “GPU Clock” depends on this indicator, its indicator should also change independently;
- After this, you need to apply the new parameters by clicking on the button called “Apply Clocks & Voltage”.
Before moving on to the next step, it is recommended to check the functionality of the video card. This is done by launching a game or a specific program that requires a powerful video card to function properly. Also, the user can seek help in this situation from a special program that can independently test the graphics. In addition, it is necessary to monitor the temperature of the device. If its value exceeds 90 degrees, you will need to reduce the settings.
- Next, the user can begin the process of setting the indicator responsible for the supply voltage. To do this, you need to increase the indicator called “Voltage” to a value of 1.125;
- Now you will need to save the installed settings to a configuration file, which should be created on the desktop after downloading the program. To do this, the user must click on the “Create Clocks Shortcut” button.
Follow the link to watch a video that shows how to do this:
What is important to know and understand in the process
Next, to understand how to overclock a video card to the maximum, you need to know:
- By “a little” we often mean not even tens, but units of MHz, and the peak overclocking value is achieved precisely due to these units, and the frequencies are interrelated, both in a good and in a bad sense;
- Overclocking (or rather overheating, increasing voltages and other related nuances) can damage the video card (and not only it) and/or reduce its service life;
- No image distortions should appear anywhere and, ideally, never;
- Temperatures must be within normal limits, which is regulated by the appropriate slider and/or custom auto mode, which will automatically select the cooler rotation speed, depending on the temperature during overclocking and testing;
- It may turn out that the card is overclocked only by one of the parameters (i.e. only by memory or only by the processor), and when changing another parameter problems begin - this means that overclocking is possible only by this value, i.e. Core Clock (MHz) and Memory Clock (MHz), respectively;
- It is not recommended to touch other sliders at this stage (except, perhaps, “Power Limit”, and even then with caution), as this can significantly affect the life and operation of the video card.
Well, of course, it’s worth saying the following.
Automatic overclocking of the video card
Before you begin this procedure, it is recommended to check the characteristics, for example, in a test called 3D Mark. Using this, the user will be able to compare the current performance of his personal computer, as well as find out how much it has increased.
In the process of automatically overclocking a video card, not only the computer’s video memory increases, but also the frequency of the graphics system. The user should pay attention to the described parameters, since in certain models they can have different effects on the performance of the device.
To automatically overclock your video card, it is recommended to use a program called MSI Afterburner. The presented program has a very clear interface and controls. Once the Start button is enabled, the user will be able to load new settings during system startup.
Those users who own a GeForce graphics card from the Pascal generation (GeForce GTX 1000) or Turing (GeForce GTX 1600 and RTX 2000) also have an advantage as they have access to the scanner function. This feature uses special algorithms that help the system automatically detect potential overclocking. In order to use this option, the user simply needs to click on the magnifying glass, which is located in the upper left corner. All changes will be made to the curve.
At the very beginning of the automatic overclocking process, you must click on the “Test” button. This must be done so that the system checks the characteristics of the video card with standard settings.
After this, the user must click on the “Scan” button. This is done to check the overclocking potential, and after a certain time the application independently sets a safe value to speed up the kernel.
It should be noted that this algorithm cannot speed up the video memory in a computer. In this regard, the owner of the device must do this independently.
Downloading and installing the program
This article will talk about MSI Afterburner 2.3.1, how to use it and other aspects of its operation.
You can download the program on the official website, on the program page, by first going to the Downloads tab.
And then click on the button next to the first program presented on the page.
During the download process, you will need to select a language, installation folder, and components to install. It is recommended to install RivaTuner Statistics Server, a program that will expand the capabilities of monitoring the operation of your computer.
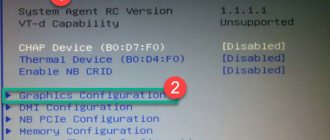
Setting up the video card driver
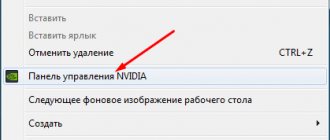
If the nVidia driver is installed on your personal computer, then to go to the settings menu you will need to right-click on the device’s desktop, and then go to the section called “nVidia Control Panel”.
After this, the user will need to open a tab called “3D Options”. A window will open in which the computer owner can change certain settings. These settings may vary for many video card models. However, they are basically the following:
- Anisotropic filtering must be turned off;
- Vertical synchronization (V-Sync) must be turned off;
- Scalable textures need to be disabled;
- Turn off the smoothing function;
- Texture filtering quality is essential;
- Texture filtering must be enabled (negative LOD deviation);
- Trilinear filtering must also be enabled;
- Anisotropic optimization will need to be enabled.
It should be noted that on certain devices, these settings may change the image quality, but the computer's performance will increase by approximately 20 percent.
MSI Afterburner Tips and Profiles
You can also find out in more detail about any element (as well as about those that we have not described) by simply holding the mouse on it for a long time and looking at the tooltip:
By the way, just below the circle with the temperature and to the right of the card name, as well as the driver version, there is a listing of the so-called Profiles, from 1 to 5, using which you can save various achieved values and quickly switch between them (for example set the overclocking state on one profile, and on the other, on the contrary, lower frequencies and power consumption).
To save the profile, you need to set all the sliders in the order you need, then click on the “Save” button and then on the parameter from one to five.
How to overclock a video card on a PC manually
It is recommended to use manual overclocking of a personal computer, since, as a rule, this procedure most often gives the opportunity to obtain a positive result.
If the user wants to overclock an AMD Radeon video card model, he will need to set a specific value for memory or core clocking, and in the case of Nvidia GeForce video cards, the user must select the values by which this clock should be increased.
It is recommended to start by increasing the clock speed of the graphics view by approximately 35-50 MHz. If the value is stable, the user can increase it by about 15-20 MHz. Thanks to this, he will be able to get the highest value that will remain stable.
The processor synchronization process may be limited by power limits, meaning overclocking the video card may improve the quality of its performance, but this may lead to more electrical energy consumption and also higher temperatures. As a result, the cooling system will be very noisy. The owner of the device should conduct experiments, for example, increasing the maximum power by 5 or 10%, and then checking what effect this has on the performance of the device and its temperature.
A more experienced user can increase the voltage level slightly if desired. This, just like increasing the amount of power, will make the operation of a personal computer more stable, however, because of this, a greater amount of electrical energy will increase, and the temperature of the device will increase. As a result, the cooling system will be noticeably noisier. In this regard, it is not recommended to increase the voltage too much; increasing it by about 10% will be sufficient.
It should be noted that it is better to entrust this work to a professional.
Program management, functionality
Now let's talk about what's here, in this very MSI Afterburner, why and why (the picture above is clickable):
- In the left circle you can see the current (at this particular point in time) values of the core and memory frequencies (top and bottom, respectively). These values can change depending on the load, so most likely you see underestimated values that “jump” (change), if, of course, the video card supports energy saving management by lowering/increasing frequencies;
- In the right corner you can observe the current (at this particular moment in time) voltage and temperature values (top and bottom, respectively);
- At the very bottom you can see the change in the temperature mentioned above over time, i.e. in the form of a graph;
- At the very core of the interface there are sliders that will allow us to overclock our video card and control various parameters of its frequencies, as well as power consumption and cooling.
Separately about the sliders and the values on them:
- Core Voltage (mV), - is responsible for the voltage of the core of the graphics processor of the video card and, as a rule, this value is rightly blocked initially (used mainly for advanced overclocking, because it can cause harm);
- Power Limit (%) - controls the power consumption limit of the video card, helps to achieve higher overclocking with higher power consumption and/or vice versa;
- Temp.Limit (*C), - controls the critical temperature limit for the video card, if it is supported by the video adapter (touching, as a rule, is not recommended and/or is used for advanced overclocking and cooling);
- Core Clock (MHz) is one of the main parameters we need for overclocking. Responsible for the frequency of the leading GPU (graphics processing unit) of the video card;
- Memory Clock (MHz) is the second of the main parameters we need for overclocking. Responsible, as you may have guessed, for the frequency of operation of the video card memory;
- Fan Speed (%), - allows you to set (in percentage) the rotation speed of the cooling system fans (if the software custom auto mode is set and enabled, the Auto value is lit).
This is the basic basis that is worth knowing about the interface parameters in order to understand how to overclock a video card and what characteristics play a role in this.