06/18/2014 D-Link | Firmware
This manual provides details on where to download the firmware for the DIR-320 and, in fact, how to flash this router.
The firmware itself is not a complicated procedure and problems do not often arise with it if everything is done correctly, and the firmware file itself is intended specifically for this device. In turn, after the update, some problems with the Internet connection and the operation of the Wi-Fi router may be corrected.
Setting up the D-Link DIR-320 router
Where to download firmware for DIR-320 NRU and AD1
Firmware should be downloaded from the official D-Link website ftp.dlink.ru, and not from anywhere else; for this purpose, there is a separate section where files for all manufactured router models are collected. The firmware file itself has the extension .bin:
- (latest - 1.4.3)
- (latest - 1.0.7)
The most important thing here is to download the firmware specifically for your hardware version of the device. Most users today have D-Link DIR-320 NRU Wi-Fi routers, but check the sticker on the back of the router, this information is there in the H/W ver.
Where to download DIR-320 firmware
Considering the fact that in this manual I will not talk about various kinds of alternative firmware for the D-Link DIR-320 Wi-Fi router, the source that allows you to download the latest firmware for this router is the official D-Link website. (Important note: we are talking about firmware DIR-320 NRU, not just DIR-320. If your router was purchased within the last two years, then this instruction is intended for it; if earlier, then perhaps not).
- Follow the link ftp://ftp.dlink.ru/pub/Router/DIR-320_NRU/Firmware/
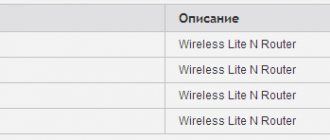
- You will see a folder structure and a .bin file located in the folder, containing the firmware version number in the name - this is what you need to download to your computer.
Latest official DIR-320 firmware on the D-Link website
That's all, the latest firmware version has been downloaded to the computer, you can proceed directly to updating it in the router.
Comments (4)
Gennady
01/14/2016 at 20:49
Good afternoon, dear specialists. Router D-Link DIR-320. Two months ago we connected Internet television (the Internet was already connected), after installing the latest firmware version (1.4.3), problems began, i.e. The Internet connection began to disappear spontaneously, chaotically, without any clear system. I turned the power off and on to the router and everything worked. But it may disappear again after 5 minutes or 2 hours. Many owners of this router have a similar problem. Is the problem in the firmware or hardware?Answer
admin
04/13/2016 at 11:33
Both options are possible. But it’s better to try by updating (or vice versa installing an old version) of the firmware.
Answer
Oleg
12/22/2016 at 14:20
Tell me, please: I downloaded the firmware from the site with the extension .bin, when I try to reflash, I get a message that the file is not a firmware file... Thank you
Answer
Glory
01/25/2017 at 22:35
Gennady 01/14/2016 at 20:49 Good afternoon, dear specialists. Router D-Link DIR-320.
For DIR-320 firmware version is 1.22. I myself stepped on a rake regarding 1.4.3.
Answer
How to download DIR-320 firmware
- LiveJournal
- Blogger
Download the driver for the router
If something becomes available on the Internet, it instantly spreads across all sites. Criminals who want to plant a virus or an unpleasant banner in your machine do not shun this either. There are alternative versions of firmware, but since we are talking about the right actions today, we also choose the right place to download the latest updates. The official firmware for DIR-320 can be easily found on the manufacturer's main website. We are talking about models that are not older than a couple of years; they are ideally equipped with the DIR-320 NUM firmware. Disappointing news for those who bought their device before; there is no way to reflash it now.
In order for the firmware for the D-Link DIR-320 router to be on your hard drive, you need to go to ftp://ftp.dlink.ru/pub/Router/DIR-320_NRU/Firmware/. Here you can easily find in the folder the only file with the .bin extension that you need to download. The name is the next firmware number. The more recent the update, the more bugs are fixed. Download the D-Link DIR-320 driver for your home.
This process is not particularly difficult even for people unfamiliar with computers. While the download is in progress, let's move on and see how to install it on your router with minimal errors.
How to restore D-Link DIR-320 after unsuccessful firmware
If the D-Link DIR-320 was previously installed with firmware from another device or of poor quality, then it will not be possible to reflash the router using the above scenario. To return to factory firmware you need to:
- Download the firmware from the manufacturer's website.
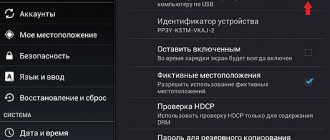
- Configure network card settings . IP address: 192.168.0.5, subnet mask 255.255.255.0, do not specify other parameters.
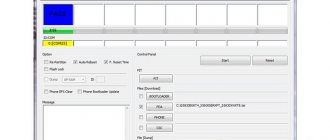
- Connect a computer or laptop to the D-Link DIR-320 via a switch so that Windows does not disconnect the switched off router from the network. If it is not possible to use a switch, then a similar result can be achieved by writing the line highlighted in the figure HKEY_ LOCAL_ MACHINESystemCurrentControlSetServicesTcpipParameters
- In the browser, specify 192.168.0.1
- Disconnect DIR-320 from the network.
- Press the Reset on the router and do not release.
- With the Reset button pressed, turn on the D- Link DIR-320 and continue holding the Reset button for at least 40 seconds.
- In the browser, go to the previously entered address 192.168.0.1.
- In the Software File Name , use the browse button to select the firmware file and click Update Software.
- Wait until the update process finishes. Ready.
How to reflash D-Link DIR-320
To flash the firmware you need to do a number of simple steps:
- Disconnect the Internet cable from the router;
- Connect the cable from your computer or laptop, which will be used to flash the firmware to the router, and disconnect all other devices from the router.
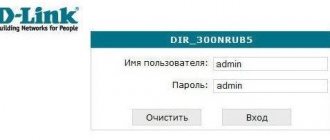
- Launch your browser and enter 192.168.0.1 in the address bar. In the new window, enter your login (admin) and password (admin). If the password has been changed previously and is lost, then reset the router settings by holding the hidden “reset” button on the back of the device for 30 seconds.
- We went to the web interface of the router settings. Select " Advanced settings " at the bottom of the page.
- Click on the right arrow in the “ System ” section and click on “ software update ”.
- Follow the further instructions in the window that opens. Select “ Browse ”, find the previously downloaded firmware file and click update. Upon completion, a message indicating a successful update is displayed.
How to set up Hamachi in different versions of Windows
d link dir 320 setting
First, let's prepare. Read two short articles: Setting up a network card, Determining provider settings, Connecting a router .
After we have configured our operating system and connected the router, we type 192.168.0.1 in the address bar of the browser. The login window will appear. Enter there Username – admin, Password – admin and click “LOGIN”.
The hateful message “The password is now set to default. For security reasons, you are advised to change your password." Click "OK", set a new password to access the web interface and click "Save".
After this, the login form will pop up again, enter: Username - admin, Password - the one you came up with. Next on the page, go to Network->Connections and click the “Add” button under the table.
Once on the settings page, select the connection type 3G
In the PPP Settings, enter the necessary data for connection. Leave the Miscellaneous field unchanged.
Click “Save”.
In the window that appears, check “Default Gateway” opposite the created connection and click “Save” in the upper right corner. Also click “Save with reboot” in the “System” pop-up window
If a PIN code is set on the SIM card, go to the “USB modem” >>> “PIN” menu, write it in the appropriate field, click “Change”, and then “Save” in the upper right corner. Setting up a connection to a 3g modem is complete.
Instructions for setting up the D-Link DIR-320 router
- Authorization
- Changing the factory password
- Setting up an Internet connection Setting up a PPPoE connection (Rostelecom, Dom.ru)
- Setting up an L2TP connection (Beeline)
- Configuring PPtP (VPN) while automatically obtaining a local IP address (DHCP)
- Setting up PPtP (VPN) with a static local IP address
- NAT when automatically obtaining an IP address (DHCP)
Alternative firmware for D-Link DIR-320
Router D-Link DIR-320 is analogous to a router Asus WL-500gP V2 with reduced flash memory from 8 MB to 4 MB without a 2-port USB hub. The router was built on a BCM5354 processor, the amount of RAM is 32 MB, flash is 4 megabytes, 1 USB port, 1 internal COM port.Attention! The firmware will most likely “remove” the manufacturer’s warranty obligations. So flash it at your own peril and risk. And so, the firmware procedure: First, you need to download the firmware from the site: https://oleg.wl500g.info/#latest 1. If we are flashing over the native one, then rename it to firmware.bin, if “Oleg’s firmware” is already installed, then we update as standard from Web interface. 2. Save the firmware file in the c:\bin folder 3. Create a flashing.cmd file in any text editor and save this file in the c:\bin folder Contents of the flashing.cmd file: @Echo Off :BEGIN ping -n 1 -w1 192.168.0.1 If errorlevel 1 Goto BEGIN If errorlevel 0 Goto FLASH Goto END :FLASH Echo *** Start Flashing **** tftp -i 192.168.0.1 put firmware.bin :END 4. Set the address of the computer’s network card 192.168.0.2, mask 255.255.255.0, gateway and DNS do not need to be registered. We connect a network cable to the computer’s network card, and insert the second end of the network cable into any LAN port of the router; do not turn on the router’s power. 5. Launch the command line START -> Run -> cmd, go to the cd c:\bin folder and run the command file flashing.cmd C:\bin>flashing.cmd 6. Press and hold the Reset button pressed, turn on the power of the router, and As soon as the Lan indicator flashes, release the Reset button. 7. Observe the firmware process: Exchange of packets from 192.168.0.1 to 32 bytes: The timeout interval for the request has been exceeded. Ping statistics for 192.168.0.1: Packets: sent = 1, received = 0, lost = 1 (100% loss), <<< SKIP >>> <<< SKIP >>> <<< SKIP >>> <<< SKIP >>> Exchange of packets from 192.168.0.1 to 32 bytes: Reply from 192.168.0.1: number of bytes=32 time=4ms TTL=100 Ping statistics for 192.168.0.1: Packets: sent = 1, received = 1, lost = 0 (0% loss), Approximate round-trip time in ms: Minimum = 4 ms, Maximum = 4 ms, Average = 4 ms *** Start Flashing **** Successful transfer: 3592480 bytes in 11 s, 281134 bytes/s C :\bin> 8. After the status indicator lights up (~1–2 minutes), reset the D-Link DIR-320 router settings to default. To do this, press and hold the Reset button pressed until the status indicator flashes. Let's release Reset. The router will reboot. After this, you need to change the IP address of the computer’s network card (via cable or WiFi) to receive an address automatically via DHCP. 9. For firmware, go to Telnet (C:\bin>telnet 192.168.1.1) on the router (login: admin and password: admin) and only for firmware enter the following commands: nvram unset vlan2ports nvram unset vlan2hwname nvram set vlan1hwname=et0 nvram set vlan1ports=”0 5″ nvram set wandevs=vlan1 nvram set wan_ifname=vlan1 nvram set wan_ifnames=vlan1 nvram set wan0_ifname=vlan1 nvram set wan0_ifnames=vlan1 nvram commit reboot or via the Web interface go to https://192.168.1.1 enter the login: admin and password: admin. System Setup -> System Command -> and enter the commands listed above there one by one.