How to view all windows drives in cmd
How to view all Windows disks in cmd, the task is very simple: open cmd and write
1. wmic logicaldisk get description,name
How to view all drives in cmd windows-01
2. Diskpart - and the list disk
When installing Windows or performing a system restore, you may need the command line. It is needed either to solve all sorts of problems, or without it because without it it is impossible to perform this or that operation. When we execute some commands on the command line, for example, DISKPART, then at some stage we need to know the drive letter or flash drive, but we don’t know. If you want to check system files, you need to know the system drive letter, although the default is C:.
There is a very simple way to determine the drive letter and now I will tell you about it.
Windows Disk Space feature
This feature first appeared in Windows 8 and has been improved in Windows 10. Storage Spaces is available in all versions of Windows 8 and 10, including Home.
To create Disk Space, at least two physical disks must be connected to the computer, including built-in or connected via USB.
Using the Storage Spaces feature, you can create a storage pool of two or more physical disks by grouping them together. After creating a storage pool of two or more physical disks, you can create spaces of three types of resiliency:
- Simple type
. Designed to create a disk with the maximum possible volume. This type of space does not protect data in any way in the event of a possible failure or failure of one of the disks. On such a disk, Windows will save all data in one copy. If one of the physical disks fails, all data stored on it will be lost. This type of disk is convenient when you need to temporarily store large amounts of data. - Mirror space
is designed to protect data in case of possible physical disk failure by storing multiple copies of files. If one of the physical disks of the space fails, the data stored on it will remain accessible from the other disk on which its copy was created. This type is useful for protecting important data in the event of possible hardware failures. - Even space
is a cross between simple and mirror types. Data is written in a striped manner across multiple physical disks, creating one or two copies of the parity information. However, due to the need to calculate checksums, space with parity control is noticeably slower to write, as a result of which they are recommended for storing data archives. For example, photos or videos.
How to determine the drive letter using the command line?
Sometimes the letters from the Windows OS are not the same as, for example, in the installer or recovery environment, but if you open the command line and type the command notepad , a notepad will open to our eyes, there we need to press File - Open , or simply press Ctrl + O. After that, Explorer will open, in which we click on the computer icon and see all the connected flash drives and so on.
Thus, we can not only find out the drive letter, but also carry out all kinds of operations: copying, transferring, deleting.
Now about something else. If you need to launch some kind of file manager, the same Total Commander, located on some disk or flash drive. To run it you need to enter the path on the command line:
| E:Soft otalcmd.exe |
It is much easier to work with a running file manager than from the command line.
If you need to switch to another drive from the command line, you can use the following command:
| cd /d E: |
How to restore your device to full capacity
Before proceeding with the actual analysis of the manuals, it is important to note that the reasons and methods for solving them are divided into two categories: system errors and hardware errors, which are expressed in the fact that the disk loses the ability to be displayed in Windows Explorer.
Each of them requires detailed study and we have tried to prepare comprehensive information for you.
Common systemic causes
Working to fix an error in this category involves making some system adjustments that will correct the problem.
Differences in standards
Every user must have noticed that the hard drive capacity declared by the manufacturer differs from the one that the system displays after connecting the device to the computer. This is due to differences in standards.
For example, HDDs are mainly sold with the following parameters: 500 GB, 1 TB, 2 TB, etc. And if, regarding hard drives, the memory value is rounded - 1 GB = 1000 MB, then in the case of the Windows operating system everything is somewhat different - 1 GB takes on the true value of 1024 MB. And this is the case with each individual value. That is why, if we take a 500 GB disk as an example, after installation its memory will be 466 GB.
Internal system protection activity
Internal System Protection is a tool built into Windows that regularly backs up information about your computer's system files and settings. This copying occurs before each new installation of applications or drivers.
Such precautions were designed specifically to combat unexpected damage to files vital to the OS, which could easily turn out to be malicious. However, it is the creation of such backup files that can easily clog the disk, which is why the number specified in the partition properties becomes invalid.
Fortunately, we can influence the internal protection, forcing it to reduce the amount of hard drive resources it consumes. You can do this as follows:
1. Open Control Panel .
2. Go to the System and Security .
3. Open the System .
4. Go to the System Protection .
5. In the window that opens, go to the System Protection , select the desired section and click on the Configure .
6. In the new window, you can enable or disable system protection at any time. When enabled, we recommend specifying the maximum allowable value for disk resource consumption.
Ready.
Our opinion
Is this feature necessary at all? On the one hand, we have stable protection of the system and its files, but on the other hand, we lose a fairly large amount of disk space “to nowhere.” Therefore, here everyone must make their choice, weighing the pros and cons. If you often update drivers from unknown sources or install a large number of different programs that somehow work with Windows OS, then we recommend turning on protection. Otherwise, it is not needed.
High resource costs for the page file and hibernation file
The paging file and the hibernation file are hidden services of the Windows operating system that one way or another consume a certain amount of computer resources.
When enabling hibernation, we must keep in mind that this service consumes a certain percentage of the device’s RAM, which nevertheless does not exceed 75% of the allowed maximum. If you are not interested in this service, you can disable hiberfil.sys using the command line. Let's look at how to do this using the example below.
1. Run Command Prompt as Administrator.
2. Type powercfg -h off and press Enter .
3. Close Command Prompt and restart your computer.
Now, upon completion of the operation, the hiberfil.sys will disappear from the root directory, and the space it occupied will be immediately freed.
For those who do not want to completely abandon hibernation mode, we recommend using the command powercfg -h -size 25% . This command will allow you to set a fixed amount of memory that sleep mode can consume. You can replace the number 25 with any number convenient for you.
Next we'll look at the page file, which is labeled pagefile.sys .
The page file is used as an addition to the computer's existing RAM. If a running application or background process exceeds the allowed RAM threshold, the missing memory is taken from the hard drive space. Thus, if you do not use the most powerful computer and nevertheless often use resource-intensive programs, your disk may become overloaded and lose capacity.
If you encounter something like this, the right solution would be to either reduce the size of the page file or abandon it completely. You can do this as follows:
1. Open Control Panel .
2. Go to the System and Security .
3. Open the System .
4. Go to the Advanced system settings .
5. In the Advanced , find the Performance and open its Settings .
6. In the window that opens, find the Advanced , the Virtual memory Change button .
7. Disable the Automatically select paging file size .
8. Specify a new paging file size or disable it altogether.
Ready.
When finished, restart your computer for all changes to take effect.
Presence of hidden hard disk partitions
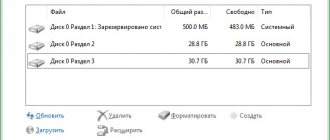
A common reason for the lack of disk space when the actual load is seemingly low is the presence of hidden hard disk partitions. They can be either system ones, that is, hidden from the moment the laptop was sold, or personal ones, which were created by users personally and then hidden. You can find such partitions using the Disk Management utility.
1. Open the Disk Management . This can be done by right-clicking on the Start menu and selecting the appropriate program.
2. Determine whether there are hidden sections.
In most cases, you should not touch the system partitions so as not to accidentally damage the Windows OS through careless actions.
Presence of an unallocated partition or disk
When connecting a new hard drive to a computer, there is no point in expecting it to work on its own without the user doing partitioning. Sometimes when dividing a disk into volumes, we may make a mistake and leave some amount of space unallocated. In this case, although we will have several logical partitions, part of the disk will be idle.
To create a new partition from unallocated space, you need to do the following:
- Just as in the previous method, open the Disk Management .
- Find the device with unallocated space, right-click on it and select the Create simple volume .
- Finish creating the new logical drive.
- Ready.
Resolving disk mapping error
In some cases, when you connect a disk to a personal computer, the operating system cannot detect it. The following reasons may cause this problem:
- Bad connection.
- Equipment malfunction.
- System errors.
To help restore the correct display of your hard drive, we have prepared several proven methods for you.
Check the drive connection
Before moving on to the intricacies, you need to understand the simplest thing - connection. A damaged connector or cable can be a serious stumbling block to the good functioning of the drive. Check visually for such damage and, if so, replace the device.
Update your device driver
The absence or presence of an outdated device driver can significantly affect the performance of the disk. If the device functions well on another computer, but refuses to work on yours, then it is quite possible that you are faced with exactly this situation.
To resolve this issue, use the following instructions:
1. Open Device Manager .
2. Expand the list of Disk devices .
3. Select the desired drive and open its Properties .
4. Open the Driver and click the Update driver .
5. Select Automatically search for updated drivers .
6. Complete the device driver update.
Ready.
Once the update is complete, the disk issue should be resolved.
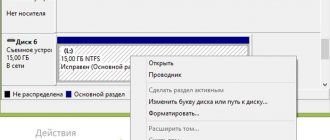
Change the drive letter
In some cases, the reason why the disk is no longer displayed may be the presence of an incorrect letter. This manifests itself primarily in a situation where two drives are connected to the computer and both of them have the same letters at the beginning of the path. You can fix the error as follows:
1. Open the Disk Management .
2. Right-click on the desired drive or partition and select the Change drive letter or drive path .
3. Using the suggested tool, change the drive letter.
4. Complete the operation.
The drive should now show up in Explorer.
Recovering a damaged disk
Before you start using third-party applications, we recommend trying the built-in Windows utility - CHKDSK. It is suitable for fixing most problems that may arise in the operating system.
1. Open Command Prompt as Administrator.
2. Enter the command chkdsk E: /f /r Instead of the letter E: set the letter corresponding to the drive you want to check.
3. You will see a detailed scan and recovery report.
Now the disk should restore its functionality.
Formatting the device
If none of the presented methods help resolve the issue, the only available remedy we have is formatting the hard drive. You can do it in the following way:
1. Open the Disk Management .
2. Right-click on the desired partition and select the Format .
3. We recommend leaving the default values. Click OK to start the process.
Ready.
Upon completion of the operation, the partition will be ready for further use.
Recovering a large loss of disk space
In rare cases, we may experience large-scale loss of disk space. This is due to the fact that there is a failure within the drive firmware in the HPA, LBA48 and DCO . Despite the catastrophic nature of what happened, you can always correct the error by using the Atola Technology HDD Restore Capacity Tool . It will allow you to restore the disk firmware and lost space.
Running and entering commands
The utility is launched from the command line in administrator mode (Win+X -> command line (administrator)), to do this you need to write its name and press Enter.
Launching Diskpart on the command line
When the following command line screen appears, the utility is ready to use. This means that all commands entered by the user will be considered diskpart instructions.
Diskpart utility running
Diskpart does not have a graphical interface, which means that all selection of an object is done by setting focus on it. Setting focus on an object means that all subsequent operations will be performed on that object. This will continue until the user moves focus to another object.
To set initial focus on an object, you need to display a list of these objects, and then select the one you need from the list (place it in focus).
There are three auxiliary commands for this:
- list disk - Displays a list of physical disks;
- list partitions — Displays a list of partitions of the selected disk;
- list volume — Displays a list of volumes.
The use of commands is shown in the screenshot below.
Please note that the disk in focus is marked in the list with a * symbol.
How to find out GPT or MBR disk partition in AOMEI Partition Assistant
The AOMEI Partition Assistant program (free version - AOMEI Partition Assistant Standard) is designed for working and managing disks. The program has the ability to convert (convert) GPT disks to MBR and MBR to GPT.
You may also be interested in:
- How to convert GPT to MBR using system tools
- How to convert MBR to GPT using system tools - 3 ways
After launching the program, the computer disks will be displayed in the main window of AOMEI Partition Assistant. At the bottom of the application window, under the name of each physical disk, the partition type is shown: GPT or MBR.
What's the best way to partition a hard drive?
Why do you need to partition your hard drive?
If you are a beginner, then for convenient and safe work with data, your hard drive needs to be partitioned.
For what? Firstly, it is very convenient when the operating system is installed on one partition of the hard drive, and all documents and media files are on another partition. Secondly, if files are infected with viruses on one partition of the hard drive, they will not be able to get to another partition, unless you copy the infected file to that other partition. How to properly distribute hard drive space
Before partitioning a hard drive, you need to think very carefully about how to distribute space on it. As for the Windows operating system, it is best to allocate at least 25-30 GB for the system drive “C”. If the capacity of your hard drive does not allow you to save space on your hard drive, then we recommend allocating 100 GB for drive “C”. For what? This way, you can install a large number of large programs without fear that there will not be enough space for them on the system disk. In addition, you will be able to install a large number of games, and at the same time, without fear that their saves will also not fit on the “C” drive. One more nuance: the freer the system partition, the better the operating speed of the OS. We recommend downloading files downloaded from the Internet to the system drive so as not to infect all your media files on drive “D” if there is a virus in the downloaded file. And to download files you also need to allocate space. As you can see, there are a lot of arguments for allocating a large volume to the system partition. But at the same time, there is no need to allocate too much space for the partition with the system; this is of no use. As mentioned above, you need to split the hard drive into at least 2 sections. If you have data that you want to separate into a separate partition, you can create a third partition with the required volume for these files. All partitions must be created in the NTFS file system.
Creating a section
After compressing the free memory on your hard drive, it's time to start creating a new partition. In Windows 10, control is carried out by right-clicking on the unallocated area and activating the “ Create simple volume”
».
The Create Simple Volume Wizard will be called.
", which will prompt the user to manage the volume size. By default, the disk set value will be equal to the size of the free space - it should be changed only if you plan to create more than one disk. You will also be asked to select a volume name and label, after which partition formatting options will open. It is recommended to use the default values set in Windows and click “Format”. Now you have a new volume at your disposal.
Since disk management in Windows 10 is similar to “seven,” we suggest you watch a video on how to partition disks in Windows 7.
When purchasing a new hard drive or reinstalling the system, quite often there is a need to partition the hard drive or repartition it. This is quite simple to do, and there are a large number of methods for this procedure. So, let's look at how to partition, create a new partition, and also how to merge hard drive partitions.
Why might you need a list of files from the command line?
If you ever need to get a list of all files, then you will find the most unpleasant news. The Windows Explorer interface doesn't allow you to do this in a simple and clear way. And the task seems to be incredibly simple, and all the necessary files seem to be in front of your eyes, but... However, this can be done very simply using the command line (cmd). Additionally, the command line will allow you to filter only the necessary files, for example only mp3s. In this case, we will use the special command “dir”. Most likely, experienced users are familiar with this command, so the article will not be interesting to them. But for most ordinary users it will be very useful.
Note: you can also use various catalogers and organizers, but they require the installation of additional applications.
If you think that this will never be useful to you in your life, then you are mistaken. Almost every user implicitly uses file lists every day. This includes searching for the required document among all your documents. It `s music. These are photographs. These are various file exports in your applications. Trite, same playlist. It’s just that you’ve never encountered such simple tasks as “send a list of files, for example, to technical support”, “collectively select the music you need from the entire list” (and this is usually done on paper, and there are a huge number of “fashionable devices”, but they will never replace such simple things as paper and pencil), “upload a list into a new application” (not all applications have high-quality import), “using the same console applications for technical needs” (for example, various batch processing of files; of course, the average user will never do this, but...) and much, much more.
Partitioning using Acronis Disk Director
This is a powerful utility often used by system administrators. Its functionality significantly exceeds standard Windows tools. To work with the program, you need to download and install it. This guide shows the sequence of actions for the Suite version:
- When you first start the program, you will be prompted to select an operating mode. Specify manual mode.
- In the menu at the top, select the “Masters” category, and in it the “Create section” item.
- Specify the hard drive you want to partition and click “Next”.
- Here you need to indicate from which existing parts the space for the new one will be borrowed. It is not recommended to touch the partition signed “Acronis Hidden” - this may damage your operating system. Click “Next” and wait while the system calculates the available space to borrow.
- Use the slider to configure the desired size of your future partition and click “Next”.
- Select "Logical" disk type and click "Next".
- Here you need to specify the file system. You need NTFS. Click Next.
- In this step you can select a letter for your partition. Select the one you like and click “Next”.
- Click "Finish" and wait for the process to complete.
Now your disk is divided into 2 partitions and you can use them as you wish.
Convenient distribution of disk space on a computer is one of the fundamental actions for comfortable operation and performance of the operating system. After purchasing a new PC or reinstalling the operating system, the question arises - how to properly partition a hard drive? The standard division into two volumes C and D will not be enough for a large hard drive. 100-150 GB are usually allocated for system files; the rest of the disk space will be correctly divided into several parts. This simple action will guarantee the performance of the OS by reducing the rate of fragmentation of the system volume. There are three simple ways to partition in the Windows operating system:
- Installation of separate software.
- Using internal Windows services.
- Separation when installing/reinstalling the operating system.
When using a separate program to partition a disk, you need to prepare, namely:
- make a backup copy of important personal files;
- free up additional space on your hard drive;
- check the hard drive for possible errors.
Protecting your personal files from loss during further work is the user’s primary task. Photos, contacts and other files should be copied to an external storage device (hard drive, flash drive) or use a file storage cloud on the Internet. After backing up your data, you should make sure you have free space to create a new partition. To do this, just go to “Control Panel” - “Add or Remove Programs”. View the list and remove unnecessary software, which will provide additional disk space.
Once you have enough space for the new partition, you need to check the hard drive for errors. Go to “My Computer”, select the desired drive and go to “Properties”. Then select the “Service” tab and click “Run check”, check both boxes and wait for completion. At the end of the check, the OS will ask you to restart the PC - confirm. The disk properties interface in Windows 7 and XP is identical, so there will be no difficulties.
How can you partition a hard drive when installing a system?
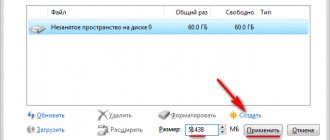
In order to partition the hard drive when installing the system, you need to go to the selection of the partition for installation.
Then click on “Disk Setup”. In the menu that appears, you will see all the necessary buttons for dividing and merging sections. To partition a new hard drive, select the existing partition and click the “Delete” button. Then select the free area and click on the “Create” button, where you will need to enter the desired partition size and click on the “Apply” button. To create other partitions, select the free space again and click the “Create” button. In order to distribute the remaining free space, if any, select one of the hard drive partitions and click on the “Expand” button, then you will need to specify the final size of the partition to be expanded. To combine partitions, we delete one partition and, using an extension, add the freed up space to it. Many users of personal computers and laptops are faced with the need for several parts. This can be useful for visually distributing the functions of individual parts: for example, one virtual disk will be occupied by the system and temporary files - cache, the second will host games and the necessary software, and the third will become a media content storage. This article provides a guide on how to divide your hard drive into parts using Windows 7 and third-party programs.
Allocating a separate virtual (or physical) hard drive for the operating system is very convenient. Firstly, you won't be able to accidentally fill up your system drive with files, which could slow down your computer. Secondly, if something happens to the Windows system and the partition has to be formatted during reinstallation, all your photos, movies, books, music and documents will not be affected, because they are not stored on the same disk with the system.
In addition, if you intend to store a large amount of information of different sizes, in order to optimize machine search, it is worth placing large and small files on different sections of your hard drive. This will significantly speed up the search for the file you need.