After the device manufacturer stops supporting it, you can only get an update by flashing it. If the pleasure is overshadowed by incessant glitches and slowdowns of the gadget, when some of its system files are lost, if viruses are not removed even by the best programs, you want to get rid of some of the annoying applications and “make life easier” for a weak processor - this procedure will help out. There are a lot of methods, but among them there are those that are used more often and are suitable for most devices: we’ll tell you how to flash Android through recovery.
What does Android firmware mean?
Firmware is the name given to replacing an operating system or even software. There are many options and tools for carrying out such an operation.
It is impossible to point out one universal and best device for all devices without exception. Compatibility with hardware plays a role.
Of course, it is possible to flash Android without recovery using:
- FOTA updates (“over the air” via Wi-Fi);
- computer with special software.
But one of the most effective and simplest options is using recovery.
Recovery concept
Recovery is a special mode, which means “recovery” in English, and is available on almost every mobile device running Android OS. The developers specifically provided for the possibility of restoring the functionality of gadgets with its help.
In this mode, the user himself has the opportunity to:
- reset the system to factory settings;
- reboot the device;
- make a system backup;
- clear the device memory from the cache;
- format individual partitions.
It is also possible to install firmware on Android via Recovery (in this case, “firmware” means the operating system)
How to restore stock recovery. How to install custom recovery
- Description
- Help
Recovery Reboot
- when your phone freezes it's just terrible. In this case, people usually restart the phone (or tablet, if it is faulty). But sometimes the problem cannot be solved by a simple restart, because the inconsistency itself is in the operating system itself. And then the Recovery Reboot application helps solve the problem.
The application is incredibly convenient without any errors. This is, in fact, the second operating system for a smartphone or tablet, which will help you understand the operation of the device’s operating system. Thus, you can create the necessary backup copies, upgrade the operating system and customize it for yourself in a way that is convenient for you. If violations are found in the system, using the Recovery Reboot application they can be corrected, returning the device’s operating system to work in standard mode.
The app's possibilities are almost limitless when it comes to controlling your device. The rest, regarding Recovery Reboot for Android, is best studied independently, through scientific examination and attempts to study all the capabilities of the application. It will be useful for those who decide to fully control their phone. However, you will need root access.
In general, the buyer of any Android device receives out of the box a device designed for the “average user.” Manufacturers understand that it will still not be possible to satisfy the needs of absolutely everyone. Of course, not every consumer is ready to put up with this state of affairs. This reality has led to the emergence of modified, custom firmware and simply various improved system components. To install such firmware and add-ons, as well as manipulate them, a special Android recovery environment is required - a modified recovery. One of the first solutions of this kind that became available to a wide range of users is ClockworkMod Recovery (CWM).
CWM Recovery is an Android recovery environment modified by third-party developers, designed to perform many non-standard operations from the point of view of device manufacturers. The CWM recovery is being developed by the ClockworkMod team, but their brainchild is a fairly adaptable solution, so many users bring their own changes and, in turn, adapt the recovery to their devices and their own tasks.
Interface and control
The CWM interface is nothing special - these are ordinary menu items, the name of each of which corresponds to the title of the list of commands. Very similar to the standard factory recovery of most Android devices, only there are more items and the expandable lists of applicable commands are wider.
Control is carried out using the physical buttons of the device – “ Volume+
", "
Volume-
", "
Power
".
Depending on the device model, there may be variations; in particular, the physical Home
or touch buttons under the screen may also be used.
In general, the volume keys are used to move through items. Pressing “ Volume+
” leads to moving one point up, “
Volume-
”, respectively, moving one point down.
Confirmation of entering a menu or executing a command is by pressing the “ Power
” key or the physical “
Home
” button on the device.
Installation *.zip
The main, and therefore most frequently used, function in CWM Recovery is the installation of firmware and various system patches. Most of these files are distributed in *.zip
, therefore the corresponding CWM recovery item for installation is called quite logically - “
install zip
”.
When you select this item, a list of possible paths for the location of the *.zip
. It is possible to install files from an SD card in various variations (1), as well as download firmware using adb sideload (2).
An important positive point that allows you to avoid writing incorrect files to the device is the ability to check the firmware signature before starting the file transfer procedure - the “ toogle signature verification”
».
Cleaning partitions
To eliminate errors when installing firmware, many romodels recommend cleaning the Data
and
Cache
before the procedure.
In addition, such an operation is often simply necessary - without it, in most cases, stable operation of the device is impossible when switching from one firmware to a solution of another type. In the main menu of CWM Recovery, the cleaning procedure has two items – “ wipe data/factory reset
” and “
wipe cache partition
”.
In the drop-down list after selecting one or the second section, there are only two items: “ No
” - for about to start the procedure.
Creating a backup
In order to save user data in case of problems during the firmware process, or to be on the safe side in case of an unsuccessful procedure, it is necessary to create a backup copy of the system. The developers of CWM Recovery have provided this feature in their recovery environment. The function in question is called by selecting the item “ backup and storage”
"
This is not to say that the possibilities are varied, but they are quite sufficient for most users. You can copy information from device partitions to a memory card – “ backup to storage/sdcard0
”.
Moreover, the procedure begins immediately after selecting this item; no additional settings are provided. But you can determine the file format of the future backup in advance by selecting “ choose default backup format
”.
The remaining menu items “ backup and storage
” are intended for recovery operations from a backup.
Mounting and formatting partitions
The developers of CWM Recovery have combined the operations of mounting and formatting various partitions into one menu, called “ mount and storage”
" The list of revealed capabilities is minimally sufficient for basic procedures with device memory sections. All functions are performed in accordance with the names of the list items that call them.
Additional features
The last item in the main menu of CWM Recovery is “ advanced”
"
This, according to the developer, is access to functions for advanced users. It is not clear what the “advancement” of the functions available in the menu is, but nevertheless they are present in the recovery and may be needed in many situations. Through the “ advanced
” menu, you can reboot the recovery itself, reboot into bootloader mode, clear the “
Dalvik Cache
” partition, view the log file and turn off the device when all manipulations in the recovery are completed.
Advantages
- A small number of menu items that provide access to basic operations when working with device memory sections;
- There is a function for checking firmware signatures;
- For many outdated device models, this is the only way to easily make a backup and restore the device from a backup copy.
Flaws
- Lack of Russian interface language;
- Some non-obviousness of the actions proposed in the menu;
- Lack of control over procedures;
- No additional settings;
- Incorrect user actions in recovery can damage the device.
Despite the fact that the recovery from ClockworkMod is one of the first solutions that ensured widespread Android customization, today its relevance is gradually decreasing, especially on new devices. This is caused by the emergence of more advanced tools with more functionality. At the same time, CWM Recovery should not be completely written off as an environment that provides firmware flashing, backup creation and restoration of Android devices. For owners of somewhat outdated but fully functional devices, CWM Recovery is sometimes the only way to maintain a smartphone or tablet in a state that complies with modern trends in the Android world.
Recovery is software that is present in every phone. With it, you can flash your phone, make a backup, change the font, or do a full reset.
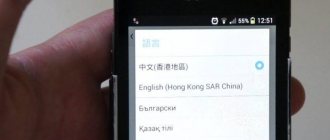
If you are a very curious user, then over time the thought of flashing your phone will come to your mind. And the first thing you will learn is that there are official and custom firmware. And with the help of what recovery these firmwares are installed and how to install custom recovery, we will now find out.
Types of recovery
Types of custom recovery
In turn, custom recoveries are divided into two types: CWM and TWRP.
CWM recovery looks like this:
It may differ slightly from the one in the screenshot, but in most cases it looks exactly like this.
You can control CWM recovery using the volume rocker and power key. The volume rocker moves the blue bar up and down, and the power button selects an item.
TWRP recovery has a slightly different look:
It has touch controls, so it's a little easier to navigate.
Craftsmen often release TWRP recovery in Russian to make it even easier to use.
Menu items
Let's take a little look at the translation and meanings of menu items. Since the menu is generally similar, let’s look only at the main items that may be needed when flashing the firmware:
- Install – installation. This item opens a flash drive to select an archive with firmware or font.
- Wipe - wipes. They are responsible for completely cleaning the system and resetting the system to factory settings.
- Backup and Restore - backup and restoration. Creating backup copies and restoring them (helps in case of unsuccessful phone firmware).
It’s better not to touch the remaining points, because you can mess things up and the firmware will fall off.
How to install custom recovery
In fact, there are many ways to install a custom recovery. You can use a computer and programs such as , Flashtool, ADB. But there are also programs for the phone: Flashtool, RAM manager.
First, download the recovery for your device.
Now we will install custom recovery without a computer, but for this we need .
Let's look at the RAM Installer program. We install it on the smartphone, then open it and provide root.
Click on the three dots at the top and click Flash Image. Next, select the path where the recovery was downloaded. It is advisable to unpack it to the root of the map so that you don’t have to search for a long time in the future. Then press the “Flash” button. We wait for the operation to complete until the green SUCCESS message appears.
On some devices, you need to install Busy Box before using this program.
This is only one way to install a custom recovery, so you shouldn’t try it on your device right away. Each device has its own installation instructions.
Problems with installing custom recovery
Installation problems can be very different, mostly due to crooked hands. But besides everything, you can download a recovery that is not for your device, make a mistake during installation, etc. Therefore, I would like to give some advice:
- Download recovery only for your device;
- Install strictly according to the instructions;
- Programs and recovery should be downloaded only from trusted sources.
One of the most popular forums is 4PDA, where you can find anything for your smartphone.
Conclusion
In conclusion, I would like to say that installing a custom recovery does not take much time, but it requires care. It is very important to choose the right program and find recovery for YOUR smartphone.
But then, many new opportunities will open up before you, such as custom firmware, various patches and fonts. Your phone may run faster and drain the battery more slowly. Also, there are much fewer bugs in custom firmware than in official ones (although it depends on the manufacturer).
But remember that you carry out all actions at your own peril and risk, and no one is responsible for your experiments except yourself.
Login to recovery
A special feature of this mode is entry and navigation, which are carried out using mechanical control buttons on the previously turned on device. Two or three keys are pressed simultaneously and held until the mode is entered.
Which keys exactly depend on the manufacturer, and sometimes the model, which can be found in the instructions supplied with it. Typically, the following variations are used:
- volume button (to decrease, increase or both at once);
- power button;
- Home button.
The device responds with vibration, and the “green man” characteristic of Android appears on the screen. You can navigate through the menu using the volume keys and confirm your selection with the power button. The list of mode capabilities depends on its type.
Other custom firmware
Other firmwares based on pure Android or CyanogenMod are also available for certain devices. The most famous builds: Chroma, Resurrection Remix, MoKee, etc. More FlymeOS or MIUI builds based on CyanogenMod.
The listed firmwares include various additions and reworked existing functions. And the choice of one or another assembly is more influenced by the issue of stability and convenience implemented by the authors.
Custom Recovery – CWM and TWRP
The “native” mode, or, as it is also called, stock mode, does not have a large list of features provided. Some Chinese gadgets are not equipped with it. Therefore, enthusiasts created versions with an increased set of functionality: first CWM, and then TWRP.
What is custom recovery
They were called custom by analogy with the English word custom, which in one of the translations means “convenient”. That is, at the software level adapted to the needs of the user.
While both do their jobs equally well, TWRP has a few more features, including navigating menus using the touch screen, choosing a location to save a copy of the system, batch installing patches, a built-in file manager, keyboard and terminal emulator, allowing you to work without having to force a reboot.
The sixth version of CWM also received a touch option, but is still inferior in ease of use due to the interface being too simple.
Why use custom recovery
Stock mode allows you to install only stock firmware into the device, that is, provided by the gadget manufacturer. Custom makes it possible to install any “homemade” firmware with different capabilities, which can vary greatly, and of which a huge number have been created. Flashing the kernel on Android via Recovery or getting root access is not very difficult.
Installation
Both types of custom Recovery are installed into internal memory instead of factory memory using:
- a special utility on the device itself;
- connected computer and special software.
Typically, different types show better compatibility with different utilities.
Installing CWM using ROM Manager
The easiest way to install CWM is using the ROM Manager utility, available for free in the official Google Play store. The program for flashing recovery on Android requires root. It is also recommended to visit the official page of the program developer and make sure that the mobile device is in the list of supported ones.
If everything is in order, you need to download the program to the gadget, open it, find the Recovery Setup item in the menu, then Install or Update Recovery and select ClockworkMod Recovery.
The program will detect the device, after which all that remains is to confirm the installation, and after completion, provide ROM Manager with root rights, if necessary.
Installing TWRP using GooManager
The GooManager utility is well suited for TWRP. It is also available for free on Google Play, and also requires root access to operate.
After installing the program, you need to open it and select Install OpenRecovery Script from the menu. After installation, you can switch the gadget to mode directly from the menu of this program.
Flashing custom recovery using Fastboot
The methods described above are simple, but do not always cope with the task due to possible incompatibility. In this case, there is nothing left to do but flash the recovery on Android via a computer.
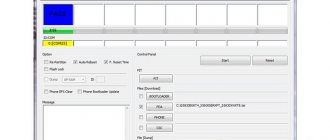
A computer with the Fastboot program allows you to get rid of them and install any Custom Recovery on your gadget. Fastboot is part of the Android SDK used for OS development.
The work requires some extensive computer knowledge, a computer with Windows OS, a distribution kit and drivers for a mobile device, and a USB cable.
Fastboot can be installed separately or download the entire SDK from the official website of the developer. A suitable recovery can be obtained from the project website or specialized forums.
Before you start, you need to enable USB debugging mode on your gadget. The device must be well charged. Drivers should be found on the manufacturer's official website. It is also recommended to make a backup.
Step by step instructions
When everything is ready, you need to do the following:
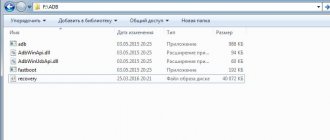
- Rename the downloaded file from Recovery to update.img (can be anything else, but without Cyrillic and spaces and always with the same extension), move it to the platform-tool folder in the Android SDK directory.
- Connect the gadget to the computer via a USB cable.
- Open the computer command line: select the Win+R key combination, enter the cmd command in the field and confirm with the Enter key.
- Specify the path to the recovery folder.
- When the computer detects the device, enter adb devices into the command line, and then adb reboot devices.
- Wait until Android reboots and enters bootloader mode. When the robot appears on the screen, enter the fastboot devices command to check if there is a connection.
- If everything goes well, enter fastboot flash recovery update.img.
If everything is done correctly, the message “finished. total time..."
You can flash other memory sections in the same way.
Installing custom recovery on Android
Soon there will be separate articles on Trashbox on how to install two popular custom recoveries on Android - TWRP and CWM.
However, it is worth noting that such operations require an unlocked bootloader. Such instructions will also appear on our website - stay tuned. Every novice user of an Android tablet or phone, traveling through thematic sites and forums, sooner or later comes across a mention of the mysterious, which is especially often mentioned in instructions for firmware, replacing the system kernel and other “hacker” things.
So what is it, what is it intended for, and how to handle it correctly? I will try to answer these questions in this article, which contains complete instructions for working with ClockworkMod Recovery.
In a nutshell, or ClockworkMod
or simply
CWM
is an alternative recovery for Android devices. Instructions for working with ClockworkMod Recovery contain the following sections:
What is recovery?
Every Android tablet or phone has a factory recovery that can be loaded when you turn on the device by pressing a specific key combination. Factory recovery usually knows how to install system updates from the update.zip file and clean the system.
Introduction to alternative recovery ClockworkMod
- this is a much more powerful system recovery utility (menu) compared to the factory one, which allows you to make full backups of the entire system of the device, install software, firmware, kernels and much more on it, which is usually not possible with factory recovery. ClockworkMod is installed in a special system partition of the internal memory of a tablet or phone, in place of the factory recovery menu.
ClockworkMod Recovery can help you out in some seemingly hopeless situations. Even if your tablet or phone cannot boot, in many cases, using CWM you can restore the system with all its settings and applications.
Here is a rough list of what you can do with ClockworkMod Recovery:
Install custom firmware and unofficial kernels
Install factory system updates, add-ons and patches
Connect to a computer via USB in removable storage mode
Connect to a computer via USB to work with the ADB program
Create a complete backup copy of the current firmware and its individual parts (system, settings, applications)
Restore a device from a previously created backup
Reset to factory settings (Wipe – data/factory reset), clear cache (wipe cache), clear Dalvik-cache (wipe Dalvik-cache), clear battery statistics (wipe battery stats)
Create partitions on a memory card and format them
Created by developer Koushik Dutta (also known as Koush), there are versions of CWM for most Android phones and tablets.
Installing ClockworkMod Recovery
For many smartphones and some tablets, installing ClockworkMod Recovery is a very simple procedure; you just need to install the ROM Manager
and the first item in its menu will be the ClockworkMod installation item.
For other devices, there may be separate utilities similar to the Acer Recovery Installer
for the Acer Iconia Tab tablet, or ClockworkMod Recovery can be installed on them using the
adb
.
Launching ClockworkMod Recovery
There are several ways to boot your tablet or phone into ClockworkMod Recovery.
1.
Using the ROM Manager program, selecting “Load Recovery Mode” from its menu.
2.
By pressing a specific key combination when turning on the device. This combination depends on the device model. On many devices, you can get into recovery by pressing the volume down and power buttons at the same time when turning them on.
Firmware via standard recovery
Standard or “factory” recovery allows you to install only stock firmware, but you can do this without additional software and a computer.
To flash Android via System Recovery 3e, you will have to download the official firmware or copy it to an external memory card, and after entering the mode, erase the old one and specify the path to the new one. This operation is not fraught with any pitfalls, since all the tools used are official.
How to download firmware
The firmware must be downloaded from the official website of the gadget manufacturer. There is no need to unpack it, but it is worth changing the name to update.zip. For devices based on the MTK processor, there is a convenient program called MobileuncleTools, with which you can easily and simply install the distribution kit on a memory card and update the operating system from it. Only to work with it you will need root.
Installation of MobileuncleTools
You can download the utility on the developer’s official website or specialized resources. The program is distributed free of charge and has a Russian-language interface. Installation is performed in the usual way - downloading and unpacking the ARK file.
Launching the utility and flashing the firmware
The program is launched in the same way as any other - by tapping on the icon. After logging in, you need to find the “Firmware Update” button in the menu, after activating which the utility itself will detect and install the firmware.
Firmware installation
Now that the smartphone is equipped with a custom recovery console, it is ready to accept any firmware available for this model and swallow it without choking. Of course, we will not search for firmware on our own. We automate this process using the GooManager application. For those who are not in the know: from the very beginning of the distribution of custom firmware on the Internet, a website appeared. Initially, it hosted proprietary Google software (such as Gmail or the market), which authors of custom firmware could not use due to licensing restrictions, but then it turned into an open repository of all kinds of firmware, and after some time the GooManager application appeared, which allows you to automatically install firmware and Google applications.
This application is great because it gives you a choice of available firmware based on your smartphone model. As a result, we will not have to look for firmware on our own, nor be afraid that some of them may not work properly. In general, the algorithm for working with the application looks like this: “Launch -> Browse Compatible ROMs -> select firmware by name (for example, aokp or cm) -> select version -> Begin Download -> Order & flash selected -> Flash.” And that's all, the firmware will be downloaded and then installed automatically. The smartphone will reboot.
Installation, or, to be precise, additional installation of Google applications is even easier: Download gapps packages -> Yes -> Order & flash selected. Although it is better, of course, to download Gapps in advance, and only then proceed to download and install the firmware. In this case, at the last step of installing the firmware (Order & flash selected), you will be able to select the gapps package, and it will be installed along with the firmware. Installing several packages at once is only possible if you have TWRP Recovery; in ClockworkMod this function is blocked and only works in combination with the paid version of the ROM Manager utility.
I will also note that by default GooManager does not wipe before installing the firmware, but it can do it. Therefore, every time when you radically change the firmware, that is, replacing one with another, and not updating, in the last window (which appears after clicking “Order & flash selected”) you should check the box next to the “Wipe data (factory reset)” option. This way you will avoid possible problems with downloading and operating the new firmware.
GooManager himself
Android firmware via CWM Recovery and TWRP
These operations have approximately the same algorithm. A PC can be used, or you can do without it. In the first case, you can flash the phone through the recovery menu from a flash drive to which the distribution package has been previously copied in .zip format.
In the second, the archive is transferred to an external memory card and installed directly from it. It is recommended to search for the archive with the firmware on trusted sites.
Detailed instructions
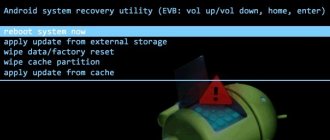
Procedure:
- Put your mobile device into Recovery mode.
- Clear the internal memory and cache - do a so-called wipe. To do this, in the mode menu you need to select the Wipe data/Factory reset and Wipe cache partition items.
- Select the Install section and specify the path to the file.
- After flashing the firmware, reboot your mobile device by clicking on Reboot system now.
How to make an Android backup
Before flashing the firmware, it is recommended to create a backup copy of the system. If the result is not satisfactory, you can always quickly roll back. There are a huge number of tools for this. You can use special software on a connected computer, or you can get by with the same custom recovery. This requires root.
If you choose the latter option, you must:
- Enter the mode.
- In the Backup and Restore section, check the boxes for the data to be backed up.
- Confirm the archiving task, and then reboot the gadget by selecting the appropriate item (reboot).
It is recommended to store the created archive on removable media or another device or in the cloud.
The same can be done using third-party programs that are freely available. For example, Nandroid Backup, available on Google Play, allows you to make a backup in a couple of clicks. Titanium and many others work the same way. You need root everywhere.
How to restore factory firmware
To reset the firmware to Android via Recovery, you need a full reset, which is done as follows:
- You need to get into mode.
- Select and confirm “Wwipe data/Factory reset” (full reset to factory settings) and “Wwipe cache partition” (erase cache partition).
- Restore a previously saved copy of the OS by selecting Sinstall zip from sdcard and specifying the path to the archive on the memory card.
To return to factory settings, you need to:
- Enter "Settings".
- Go to the "Restore and reset" section.
- Select "Reset settings" and follow the instructions.
As a rule, this is enough.