Good afternoon friends. Most users are well aware of what a BIOS is, especially if they follow my articles, since I have already written articles about BIOS several times. But, for the other part of the readers, I will repeat. It is the BIOS that provides organized communication between the various parts of the computer. BIOS (UEFI) is installed on the motherboard.
We'll talk about the Gigabyte motherboard. Its manufacturers are constantly creating updates for chipsets to improve its performance and remove errors. So, today we will look at updating the Gigabyte BIOS and how they can be done more correctly and safely for the motherboard.
What does BIOS mean?
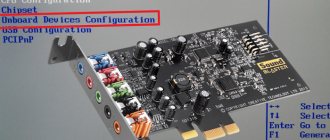
This abbreviation can be translated as “Basic input-output system.” This system is responsible for processing messages coming from various computer devices. When you carefully examine the motherboard, you will notice this chip. The memory of this chip carries the corresponding program, which we are going to update.
Of course, this is a thorough and painstaking work that must be done with extreme caution, otherwise we will disrupt the proper functioning of the computer (or even damage the motherboard).
Important: - if your PC is still under warranty, then such a procedure will remove all warranties from the computer. Accordingly, in this case, you need to contact its service center. I advise you to think about this.
Setting boot parameters, that is, starting the computer
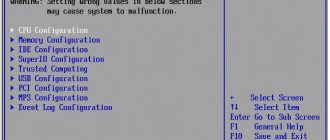
Booting, that is, the main startup of the computer (even before loading the operating system), is controlled by the functions on the Advanced BIOS Features tab (Fig. 4). If your computer has two or more hard drives, then using the Hard Disk Boot Priority option you specify which of them to load the operating system on.
The Quick Boot option disables detailed hardware tests when the computer starts. If you don't have any problems with your computer, this option should be enabled.
Three more functions - First Boot Device, Second Boot Device and Third Boot Device - allow you to determine which type of drive will first attempt to boot the operating system. If the system is installed on a hard disk, set the first one to Hard Disk (Fig. 5). If you need to boot from an optical drive (for example, to install Windows from a disk), select the CDROM option. The F12 key has the same function, but pressing it when turning it on causes only a one-time boot from the optical drive, while this boot method set in the BIOS will be permanent (until changed).
READ How to reset BIOS settings
Other important settings options on this tab:
- HDD SMART Capability - enables testing of the hard drive (if there are no problems, set it to Disabled).
- Limit CPUID Max. to 3 - allows you to identify the processor through the system. This option should be disabled on operating systems newer than Windows 2000, on almost all new computers.
- No-Execute Memory Protect - protects against attempts to overflow the memory buffer.
- Delay for HDD (Secs) - draws the BIOS’s attention to timely detection of an old, slow-running hard drive. For all new drives, you should set it to 0.
- Backup BIOS Image to HDD - creates a copy of the BIOS on the hard drive, which you can use if the motherboard BIOS fails.
- Full Screen LOGO Show - enable the appearance of the motherboard manufacturer's color splash screen logo when the computer boots (if you are not happy, set it to Disabled).
- Init Display First - the function specifies where exactly the computer should first look for a video card (external or integrated). The correct settings are another way to speed up your computer's boot time.
Preparing to update the BIOS
In fact, updating the BIOS is simple. Of course, one cannot do without nuances here. For example, during the update the light may simply blink. In this case, the update process is already broken. The situation is very unpleasant. You may lose your system board. If this happens, immediately take it to the service center. Therefore, let's look at the recommendations that it is advisable to follow:
- You should not use BIOS versions that are still being tested. They are quite raw and you don't know what to expect from them;
- The firmware itself can only be downloaded from the official website of the motherboard. Various third-party developers may mislead you with their builds, which supposedly open up various possibilities. Make no mistake about the update;
- The firmware must strictly match the chipset model. If there are even small differences, the program may not install correctly, which will cause errors;
- The hard drive must be checked for the presence of bet blocks. Also, it is advisable to remove everything unnecessary from the hard drive and thereby increase its volume;
- Be sure to purchase an uninterruptible power supply device before installing the firmware. Without it, don’t even think about starting the firmware;
- If you are flashing the firmware under a functioning Windows OS, it is advisable to turn off all programs that are not currently needed. Also, it is better to turn off the Internet so that the computer devotes all its attention to the update process.
BIOS Setup - Overlocker's Shrine
Gigabyte stores all the functions of the advanced menu for setting the operating parameters of the main components or motherboard, processor and memory load on the MB Intelligent Tweaker (MIT) tab.
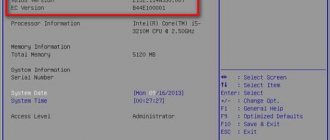
Here you will find additional tabs with very important information: values of the base frequency of the processor, memory, amount of installed memory, operating temperature of the processor and chipset, as well as the current supply voltage of the processor and memory (Fig. 13). The MIT Current Status tab provides more detailed information about the operating parameters of the entire processor and memory. You cannot make any changes here. Advanced Frequency Settings - (Fig. 15) this tab contains the most interesting functions used during overclocking. The most important is the BCLK Frequency (MHz) (Fig. 16) - the base values used to create all the operating frequencies of the components through the corresponding coefficients. For new Intel processors, the nominal value is 133 MHz. At the top you can see the CPU Clock Ratio option; it sets the processor multiplier. This figure is multiplied by the base value and sets the operating frequency of the system. In the example from the figure, the multiplier is x22, which with BCLK 133 MHz (actual value 133.3 MHz) gives a frequency of 2933 MHz.
The QPI Clock Ratio option sets the frequency multiplier of the QPI bus (components used when internal communication between two systems is located in the same processor case).
System Memory Multiplier (SPD) is another memory multiplier - setting it to x10 gives a memory operating frequency of 1333 MHz - nominal for Intel Core i7 800 chips.
In most processors, all multipliers are set to maximum values. This means that overclocking beyond the factory-set ceiling is not possible. The limitation can be overcome by increasing the base frequency.
There are also options for changing the PCI Express bus clock speed (PCI Express Frequency (MHz)). The default value in this case is 100 MHz.
READ What is BIOS (BIOS)
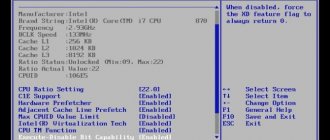
The additional Advanced CPU Core Features tab (Fig. 17) provides access to additional processor parameters - allows you to enable or disable various energy saving methods or turbo mode. Also here you can specify the number of active cores (Fig. 18). The photo shows the optimal parameters for proper operation of the system with one exception - the turbo mode must be turned on (Enabled). RAM memory operating parameters are set on the Advanced Memory Settings tab (Fig. 19). At the top you will see the System Memory Multiplier option - this is a multiplier of the operating memory frequency (Fig. 20). Performance Enhance - determines the way memory works, from moderate to aggressive. DRAM Timing Selectable - allows you to set the access timing selection method - from automatic to manual (Auto, Quick, Expert).
Selecting this function gives access to manual adjustment of all timings (Channel A/B Timing Settings tab) (Fig. 21), requires more experience and knowledge of the real capabilities of the RAM memory modules used. You will set the component voltage on the Advanced Voltage Settings tab (Fig. 22). If you do not have much experience in this area, it is better to leave all the settings at the default, that is, Auto or Normal - too high a voltage can damage the entire computer. However, during overclocking, increasing these values is necessary to obtain good results and stable system operation.
The principle “the more the better” does not apply here; this requires long tests of the computer’s operation with the specified voltage and combination of these values. In a word, this is an activity for the most experienced users who are well versed in the operation of a computer, have extensive experience and devote a lot of time to experiments. Manufacturers offer different ways to change the voltage: to a selected value (for example, from 1.2 to 1.35 V), or from a selected value (for example: 1.2 + 0.15 V).
How to find out the BIOS version?
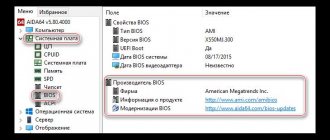
To download the necessary update, it is advisable to find out which BIOS version is installed on your motherboard. This can be done with programs like Everest AIDA or Speccy. Information is in the "Motherboard" section.
In it you will see your BIOS version. It may very well be that your version is current and there is no need to flash it. Write down the received data on a piece of paper. Check all letters and numbers carefully.
How to search for updates?
- Once you have all the necessary information, all you have to do is log in to the Gigabyte website;
- Then, you need to enter your chipset version into the search bar on the site;
- We check your version with the one proposed on the site. Is there a newer firmware version on the website? Then you need to download it;
- Information from the site is in an archived file. Let's unzip it. There are 3 files, select the file “H110MS2H.F21” (you will have a different one). Copy the file to the flash card.
Important: - Before the procedure, format the flash card in FAT 32 format. The flash card after formatting must be empty, without unnecessary programs!
BIOS firmware Gigabyte
Knowing the model of the motherboard and the version of our BSVV, we proceed to the next preparatory stage of the software upgrade. On the manufacturer's website, download the available update for your board. This is usually a file up to 3 MB in size, so you won't have to wait long. Next, you need to make a bootable USB flash drive, which will contain the new firmware for your BIOS. Only after all of the above will you be able to carry out the process of “uploading” more advanced software code onto the BSVV microchip, through which the hardware of your computer is controlled.
We update the BIOS
It is best to flash using DOS mode with the Q-Flash (flahback) utility. So let's begin:
- We start the computer and quickly press one of the top keys. I don't know what system you're logging in from, but most often it's one of the F keys. For example, F2, F8, Del. In general, try all the top buttons (relevant for Windows 7). In Windows 10, based on its update, the login may be different. But, also try these buttons. If that doesn’t work, you can enter the BIOS (UEFI) through “Control Panel”, “Settings”, “Command Line” or using the CMOS jumper (I’m going to write more about this in an upcoming article);
- Select the optimal settings item “Load Optimized Default”;
- Click “Ok” and restart the computer;
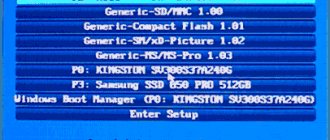
- We re-enter the BIOS. At the bottom of the screen you will see the Q-Flash command. You need to select it and confirm the launch;
- When the utility loads, you need to make a backup of the input/output system by clicking “Save Bios”. A backup copy is necessary if errors appear during the firmware. Click “Update”;
- We will select the flash card on which the firmware file is located as the source. Then, you need to select the desired element and again confirm the firmness of your decision. After pressing “Enter”, flashing the BIOS will begin. It will most likely take about two minutes. I don’t recommend pressing anything during the process;
- After this, the computer will begin to reboot (several times). There is no need to be afraid of this, this is how it should be;
- If the firmware completed successfully, you can look into the BIOS (UEFI) and enjoy the excellent design and added functionality;
- BIOS will now be called UEFI. There should be a language selection button at the top. It says “English” by default. Select “Russian” and enjoy the Russian-language BIOS!
First, it is better to monitor the functioning of the OS. If errors or failures occur, it is advisable to roll back the BIOS using the created backup copy. I understand perfectly well that many of you, despite detailed explanations, still don’t understand much, and it’s scary to go and start updating the BIOS. Therefore, especially for you, I have prepared a video that shows the whole process in more detail.
Preparation and general recommendations
Some useful tips:
- Download the update only from the manufacturer's official website. Under no circumstances should you trust third-party “craftsmen” who offer to download their BIOS build, promising wider functionality and/or stable operation.
- The update version must be suitable for your motherboard. The manufacturer's website always indicates which equipment a particular update version is compatible with. You can find out the model and serial number of your motherboard by reading the manual that came with the device upon purchase or by disassembling the computer/laptop case.
- Before downloading and installing, read reviews from other users about the update. Sometimes, on the contrary, it worsens the performance of the system.
- When installing updates, make sure that it will not be interrupted by a sudden power outage or system reboot/freeze.
- If you are updating via Windows, then turn off the Internet and antivirus, because... They can interrupt the installation or open background processes that will negatively affect the completion of such an important procedure.
Follow these steps to find out the model of your mother card:
- Open a CMD terminal using the Run window (opened by the Win+R key combination). To open a terminal, enter “cmd” in the line.
- In the terminal that opens, enter the command:
wmic baseboard get productand press Enter.
- The motherboard model will be displayed below.
Next, follow these steps to download the latest version of updates:
- To begin, use the Win+R keyboard shortcut and enter the command “msinfo32”.
- A window will open containing all the information about the system. Find the “BIOS Version” item among them. This line contains all the relevant information regarding the BIOS.
- Now go to the official Gigabyte website and select “Support” in the top menu.
- On the page that opens, find the “Download” field, enter the serial number of your motherboard there and start searching.
- You will be prompted to download the latest firmware version. It is recommended to check the offer with the current BIOS version.
There are two ways to update:
- Directly through the OS. To do this, you will also need to download the free @BIOS utility from the developer’s website. The whole process will require a few clicks and a little time.
- Via BIOS. Suitable for advanced users only. This method is safer because It is possible to create backups and rollback if the update is unsuccessful.
Method 1: Update via OS
After you have downloaded the utility and the current BIOS version from the official website, do the following:
- Launch @BIOS. On the left side of the window there will be data regarding the current BIOS version. To start updating, click on “Update BIOS from Gigabyte server” or “Update BIOS from file”.
- In the first case, you will need an Internet connection. The utility itself will download the necessary files and begin the installation. It is recommended to use the second button, because... The utility downloads only the latest firmware version, which may still be “raw”. Also, when updating, it is not recommended to leave the PC connected to the Internet.
- If you are updating using a file that has already been downloaded, the utility will ask you to select the desired file, which should have the .ici extension. After selecting the file, the BIOS will begin updating.
- During the procedure, the computer may restart several times. Upon completion, you will receive a notification from the system.
Method 2: update via DOS
To do this, you will need to transfer the previously downloaded BIOS version to the USB flash drive. Connect the flash drive to your computer and follow the instructions:
- Reboot the OS and enter the BIOS using the Del or F2-F12 key (the latter depends on the configuration of your PC).
- Reset the BIOS status to default settings. To do this, find the “Load optimized default” item in the interface. To exit the BIOS and reboot, click on “Save and Exit”.
- Enter BIOS again. If everything worked out, then when you press the F8 key you should see confirmation of entering the QFlash program interface. To enter, press Y on your keyboard.
- Make a backup copy of the BIOS using the “Save BIOS” item.
- Now go to “Update BIOS”. The program will ask where to install the update from. Select a USB flash drive connected to your computer and a file with the desired extension on it.
- Next, you will need to confirm the update by pressing the Y key.
- The procedure will take no more than 5 minutes. If everything went well, then when you try to enter the BIOS you will see the updated interface and functionality.
An ordinary PC user can easily update the BIOS on a motherboard from Gigabyte. The most important thing is to follow the recommendations and steps in the instructions.
Gigabyte BIOS update video
Conclusion: — Updating the Gigabyte BIOS, as it turned out, is not as scary as it might seem, but rather easy. If you are confident in yourself, then you can proceed with this operation. But, if in doubt, it will be better if you invite a knowledgeable person and carefully watch his actions. After this, you can update UEFI yourself! Good luck!
Sincerely, Andrey Zimin 09/24/2019