Gradually, over time, our computers begin to become a little outdated and need updating. This is especially true for the bios system utility, which is responsible for almost the entire performance of the computer. This is where the question arises: how to update the system utility. Setting up the bios is the basis for building a system for the operation of the entire computer, so you should regularly, at least once a month, be interested in the release of updates for your system utility. Updating a system utility is not that difficult, the main thing is to have patience and know where to get the updates.
It is necessary to update the BIOS, as this will increase the security and performance of your computer, can open up new opportunities and improve the quality of the BIOS settings itself. But you shouldn’t rush too much, since this procedure is quite complex and any error can have a detrimental effect on the entire performance of the computer. But how to update the BIOS? To do this, you should carefully study the steps for updating the bios so that you don’t have any questions and you know exactly what needs to be done.
Video text
Wondering about all the features of MSI's Click BIOS 5? Wonder no more with this complete overview of ALL the features (including overclocking!).
BE AWESOME! Support The Work I Do Today! https://www.patreon.com/caffcast
Motherboard Features: - Supports 6th Gen Intel® Core™ / Pentium® / Celeron® processors for LGA 1151 socket - Supports DDR4-3600+(OC) Memory - DDR4 Boost: Give your DDR4 memory a performance boost - USB 3.1 Gen2 2X FASTER: USB 3.1 Gen2 offers performance - twice as fast as a regular USB 3.0 connection - Twin Turbo M.2 64Gb/s + Turbo U.2 ready + USB 3.1 Gen2 Type-C + Type-A combo + SATA 6Gb/s - GAMING LAN with LAN Protect, powered by Killer™: The best online gaming experience with lowest latency — Audio Boost 3: Reward your ears with studio grade sound quality — Nahimic Audio Enhancer: Immersive sound quality that pushes the limits of reality — Game Boost: This one goes up to eleven; 11 levels of easy overclocking — GAMING Hotkey: Assign macros, launch your favorite games or do real-time overclocking using a single button — Designed for overclocking: with OC Essentials and OC Engine 2 — XSplit Gamecaster v2: 1 year free premium license to show off your skills and achievements to the world — SteelSeries Certified: Optimized for SteelSeries gaming gear — Military Class 5: The latest evolution in high quality components featuring the brand new Titanium Chokes — MULTI-GPU with Steel Armor: Steel Armor PCI-E slots. Supports NVIDIA SLI™ & AMD Crossfire™ – Click BIOS 5: Award-winning brand new Click BIOS 5 with high resolution scalable font – GAMING CERTIFIED: 24-hour on- and offline game testing by eSports players for the best gaming experience
Personal computers have been around for decades, but upon startup we are invariably greeted by the familiar blue and white color scheme of the Base Input/Output System (BIOS). Beginner users are invariably intimidated by numerous incomprehensible settings, however, even an experienced system administrator will not always be able to clearly explain the purpose of a particular parameter. Therefore, it is quite obvious that many people have thought about simplifying and facilitating the initial setup of a computer many times. The “locomotive,” as has happened more than once, was Intel Corporation. In addition, the 64-bit Itanium processors being developed at that time had to abandon compatibility with previous families of 32-bit CPUs, so why not at the same time replace the outdated BIOS with something newer, more convenient and modern? This is how EFI (Extensible Firmware Interface) appeared, which in Russian roughly means “extended interface for working with microcode”.
Development began back in the 90s of the last century; in the early 2000s, the innovation was actively discussed; prototypes of computer systems running EFI were demonstrated at the Intel Developer Forum. And then somehow everything became quiet. In fact, there are many examples of how various kinds of useful innovations do not find support and are gradually forgotten, even if the initiative comes from such an influential representative as Intel Corporation. So it’s unlikely that we would have thought about EFI on our own if it weren’t for MSI, which announced that three of its new motherboards based on the Intel P45 Express chipset will receive support for MSI Click BIOS, which is based on UEFI specifications. It turned out that Intel's development is currently being continued by the Unified EFI Forum (UEFI), which led to the name change.
We had already tested the MSI P45 Platinum motherboard, but at that time Click BIOS support was not yet ready for it. Now we decided to return the board to the test bench to talk about new features.
It is quite possible that I forgot something very important, you can add it in the comments. Now let's see what a UEFI BIOS looks like in the form of an MSI Click BIOS.
Actually, getting started with MSI Click BIOS was not so easy. If you go to the MSI website page talking about the MSI P45 Platinum motherboard or another motherboard that supports Click BIOS, you will not find any mention of it. There is nothing on the page with different BIOS versions for the board. It turned out that you need to go to the main page of the English-language Taiwanese MSI website and only there there is a small banner of 150 * 60 pixels leading to a separate section of the site telling about Click BIOS. Only here you can get information about the UEFI BIOS, download the corresponding firmware and a CD image with additional MSI Extras Disc software.
How to change boot from a flash drive in BIOS
2.Select only the BOOT tab. This is the boot order of the devices after pressing the START button. So, let’s get to the main thing, how to make a bios msi boot from a flash drive . To start the bootable flash drive, make a similar boot order on your computer.
Let's take a closer look:
- 1. CDROM First of all, boot from a CD.
- 2. USB FDD Secondly, loading from flash drives.
- 3. USB HDD Thirdly, boot from a hard drive connected to USB.
- 4. HDD Fourthly, boot from the computer’s hard drive.
- 5. USB CDROM Fifth, boot from a CD connected to USB.
3. On the same BOOT page there should be an indication of which keyboard keys to swap the lines of the boot order. In this BIOS these are the F5 and F6 keys.
When you don't need to go into BIOS
4. This is an example of BIOS, when you do not need to go into BIOS and configure the boot order. The flash drive must be inserted into USB. After holding down the F12 key during startup, a small window appears: “Boot Menu”. Using the Up and Down arrows on the keyboard, select the desired boot line. You can see in the photo that USB Verbatium is selected - this is a flash drive. And press Enter. The download from the flash drive begins.
Severe cases
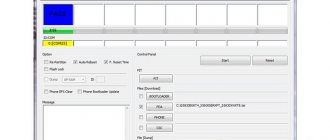
There are difficult cases. Mostly with new laptops or netbooks. In new computers, the BIOS may prohibit loading everything except the system hard drive, CDROM, and the operating system supplied by the manufacturer. Then bootable flash drives may not boot at all. Or they load, but the bootloader is not registered when installing the new operating system that you want. What can help? In this case, all that remains is to reflash the BIOS. The BIOS file is downloaded only from the computer manufacturer’s website using the number on the computer. If you have never done this, then I advise you NOT TO DO IT!!! If errors occur during the flashing process, the computer will stop booting altogether, and it will be impossible to flash it again at home! This requires special equipment. And it will be very expensive to fix this. It is better to do this immediately at a Service Center with a good reputation. Then it will be cheap and cheerful!
That's it! I wish you success in this matter and move forward to installing the system you like! For example Debian 9.
[kkstarratings]
5,598 total views, 19 views today
Click to rate this post!
[Total: 1 Average: 5]
Does my motherboard need an update?
The first thing you should find out before getting started is the revision of your motherboard and the current BIOS version. It's not difficult to do this.
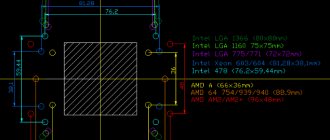
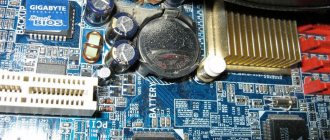
In order to find out the revision, you can look at the motherboard itself, there you will find the inscription rev. 1.0, rev. 2.0 or similar. Another option: if you still have the box or documentation for the motherboard, there may also be information about the revision.
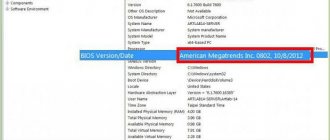
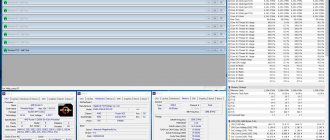
In order to find out the current BIOS version, you can press the Windows + R keys and enter msinfo32 in the Run window, and then see the version in the corresponding item. Three more ways to find out the BIOS version.
Armed with this knowledge, you should go to the official website of the motherboard manufacturer, find the board of your revision and see if there are BIOS updates for it. You can usually see this in the “Downloads” or “Support” section, which opens when you select a specific product: as a rule, everything is quite easy to find.
Note : if you bought an already assembled computer from any major brand, for example, Dell, HP, Acer, Lenovo and the like, then you should go to the website of the computer manufacturer, not the motherboard, select your PC model there, and then in the section downloads or support to see if BIOS updates are available.
How to enter BIOS.
So, in front of you there should be a switched off computer or laptop. Turn on your device and as soon as the first letters appear, press the F2 or the Del . If the first key does not work, the second will work 100%.
On the best keyboard for a programmer, I circled the two keys that need to be pressed to enter the BIOS.
How does the computer tell you what to press to get into the BIOS?
When you start your computer or laptop, you will see the message: Press Del to enter Setup
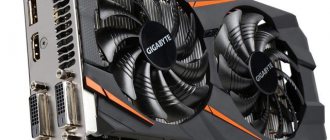
On my Gigabyte X470 Aorus Ultra Gaming motherboard, to enter the BIOS you need to press the Del key, but the F2 key also works!
This means that you need to press Del to enter the BIOS. It may say Press F2 to enter Setup or in some cases Press Esc to enter Setup
Bah, familiar AMI BIOS!
Typically, laptops like CX and gaming series G and P have the familiar interface from American Megatrends Incorporated (AMI). Here, if you understand the general principle, it’s quite easy to navigate:
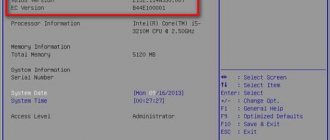
- A tab with the main menu (Main) immediately opens, where technical data about the system and PC is presented;
- Next, you can explore additional settings in Advansed;
- Check the security settings in Security or power settings in Power (depending on the version);
- The most popular section is the “Boot” section, where boot devices are registered (if you are reinstalling the system, then this is the place for you);
I will not dwell on a detailed description of all functions. But let me remind you that after each time you make changes to the BIOS, do not forget to save them.