Preparatory activities
If the user uses standard methods for updating the BIOS, it is recommended to take the following measures:
- open any program to view computer hardware (for example, AIDA 64), in which find the line “ Motherboard ”;
- then go to BIOS ;
- a window will open indicating manufacturer and version;
- in the same window you can find links to update files , but it is better to find them yourself on the official website;
- do the same for the motherboard .
Download the necessary files from the official MSI website:
- enter the name of the motherboard in the search bar
- after searching, there will be a download link ;
- select BIOS option ;
- the most current version of the updates presented will be the one at the top of the list ;
- additionally recommended to download your current version for possible reinstallation.
Is this utility necessary and how can I remove it if necessary?
Here's a brief summary of everything about the ASUS Live Update utility. What kind of program this is is clear in general terms. Is it needed on a computer? The issue is quite controversial. By and large, if necessary, drivers can be installed manually; as a last resort, you can use automated programs like Driver Booster, which do not load the system so much. Updates for primary systems, if really necessary, can be downloaded on the manufacturer’s official website, but most ordinary users never install new firmware. And system updates, if the service of the corresponding center in Windows is enabled, will be installed without using this software product.
You can uninstall the program through the standard section in the Control Panel. But to automatically clean up residual components, it is better to use highly targeted applications, like Revo Uninstaller or iObit Uninstaller.
Firmware
ATTENTION! Failure to follow the correct sequence or turning off the computer or laptop during the firmware process can lead to complete failure of the motherboard.
The method of updating the BIOS on an MSI motherboard involves using a standard utility that is built into the BIOS; it is convenient and does not require additional preparation measures. All downloaded files must be unzipped and transferred to a flash drive previously formatted in FAT32. To update the BIOS from a flash drive, you need to do the following:
- Initially ensure booting from the drive. Restart the computer and enter the BIOS using the F2, F12, or Delete keys.
- In the menu , set the boot priority so that the flash drive starts first.
- Save all changes and reboot your computer. In this case, it is recommended to use the Save & Exit .
- The computer will reboot and automatically read the information from the flash drive.
- The system will offer several options to choose from. You need to run “ BIOS update from drive ”. The name may differ depending on the board version.
- The final point will be to select the firmware version .
What affects the speed of a computer?
How to update the BIOS of an MSI motherboard
BIOS is the most important component of a computer that checks the functionality of the equipment, allows you to make settings to the computer, and is also responsible for starting the operating system. BIOS updates may also be released over time, causing users to want to install them.
Please note that it is not recommended to update the BIOS unless absolutely necessary. If something goes wrong during the update process, you may completely lose the functionality of your computer.
Flashing via UEFI BIOS
To flash the MSI BIOS, follow the instructions:
- restart your computer, enter BIOS ;
- in the main menu, select the “ Advanced ” option;
- confirm entering the required Advanced Mod e ;
- in the service section , select the first line;
- To carry out the operation, it is recommended to agree to the terms and conditions ;
- activate update process .
It is forbidden to turn off the computer or press any keys at all times.
Setting up BIOS on MSI
MSI devices (laptops and motherboards) are known primarily as solutions for advanced users, which is reflected in the firmware features of such devices. Today we would like to introduce you to the BIOS settings of MSI products.
BIOS Settings in MSI
First of all, we consider it necessary to note that the vast majority of modern products from the company in question use a UEFI graphical interface. The text BIOS familiar to experienced users remains only in the most budget or outdated solutions. Therefore, we will give the firmware settings using the example of a graphical menu, which most often looks like this:
In general, the interface is similar to solutions from other manufacturers, especially with two display modes: the simplified “EZ Mode” and the advanced “Advanced”. First, let's look at the settings that the simplified mode offers.
EZ Mode Options
This mode offers basic settings designed for novice users. However, for complete beginners, even such an interface may seem complicated and incomprehensible. Let's look at the most commonly used settings.
- In the upper left part of the screen on advanced solutions from MSI there are switches for the “Game Boost” and “A-XMP” modes.
The first allows you to bring the performance of the board and components to optimal performance in video games, while the second essentially involves overclocking the RAM. Please note that this parameter is designed to interact with AMD Ryzen processors.
- On the left side of the interface there is an information menu, the items of which provide information about the status of the main computer systems. This information is displayed in the central part of the window.
- At the top in the center and on the right there is another information section: on the left side the current frequency and temperature of the processor and RAM modules are indicated, and on the right there is brief information about the computer components.
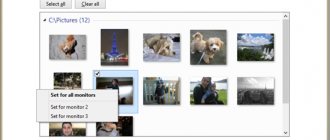
- Below the information block there is a list of boot devices. From here you can change their priority - for example, if you need to select a flash drive as the first boot device, simply find the corresponding position in the list and drag it with the mouse to the beginning of the list.
- At the bottom left is a menu for accessing service utilities: a proprietary BIOS flasher from MSI called M-Flash, a utility for switching working profiles (the “Favorites” item), and a tool for monitoring the operation of the board and components.
- Finally, at the bottom center and right there is access to quick settings for some important parameters: enabling or disabling AHCI mode or the built-in sound card, displaying an error if there are problems with the main cooler, etc. You can also open the BIOS log from here.
- The first item is system status, which displays extended information about the configuration of your computer or laptop.
- The settings of the “Advanced” block depend on the board or laptop model. The main ones are:
- “Integrated Peripherals” – you can configure the behavior of components integrated into the board (video core, network adapter and sound controller).
- “USB Configuration” – responsible for working with USB. This enables Legacy mode support for installing OSes other than Windows 8 and higher.
As you can see, this mode is really designed for a novice user.
Advanced mode settings
The EZ Mode option is not very suitable for advanced users who are used to fine-tuning the operation of the motherboard to suit their needs. Fortunately, the manufacturer took this into account, and Advanced mode is available for experienced users. You can enable it by pressing the F7 key or through the button at the top of the menu.
Now let's take a closer look at the advanced mode settings. When you switch to Advanced Mode, sections with configurable parameters appear on the right and left sides of the interface.
“Settings” This section contains the main settings of the motherboard, which can also be found in any other BIOS.
Update from Windows
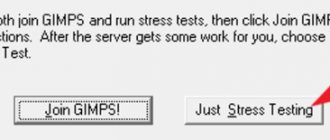
For a novice user, this method is optimal. The instructions must be followed:
- run the MSI Live Update utility and go to the Live Update , often it does not open by default, but it is easy to find at the top;
- the Manual Scan and MSI BIOS buttons
- at the bottom of the window, click on the Scan , the download will start;
- after scanning, the install and download , activate it;
- then, upon completion of preparation, a window will appear specifying the necessary parameters. Check the In Windows Mode , then click on Next and Start;
- The duration of the entire procedure is no more than 15 minutes . Don't worry if the system reboots several times. Upon completion of the firmware, the utility will notify the user.
What is Live Update?
I will immediately disappoint those readers who, when answering the question “what is Live Update,” believe that this is a Windows OS system process responsible for updating the operating system. The svchost.exe process, launched by the corresponding system service, is responsible for updating the OS, and the process I am considering is not a system process, but its functionality is used by some programs, usually installed externally.
In particular, the following software products may be the initiators of the appearance of a file and the corresponding live Update process on your computer:
- Product Updater;
- Asus Live Update;
- Openwares' LiveUpdate;
- TODO;
- Samsung PC Studio;
- Driver Genuus (IObit);
- AceGain and a number of others.
Using DOS Mode
To use this method, it is necessary to create a special flash drive for loading and further work in the DOS interface. This method is not recommended for novice users.
To create a flash drive with update data, you must have the MSI Live Update utility. In this case, the program will independently select and download the latest files from the official MSI website. Follow the instructions:
- insert the flash card into the computer and click on the Live Update if it has not activated itself;
- Next, it is recommended to check the boxes for MB BIOS , as well as Manual Scan , then click on Scan .
- As a result, the program will detect the presence of new update files. Download and install command will appear , you need to click on it;
- a window will appear, check the box for In DOS mode (USB) , then click Next ;
- In the field at the top , enter the name of the installed flash drive and click Next ;
- Once the download is complete, a notification will appear informing you that the process is complete.
Determining the frequency of RAM
Further work will be carried out in the DOS interface. Follow these steps:
- Restart your computer and open BIOS . Set to run from a flash card.
- Save the settings by clicking Save&Exit, then the DOS interface will appear.
- You must enter the command C:\>AFUD4310 firmware_version.H00 .
- After installation, restart your computer.
The BIOS update process is not complicated, but it is recommended that you carefully follow the step-by-step instructions.
How to remove Live Update
First, you need to decide which application is the initiator of the appearance of the process I am considering on your computer.
- Launch Task Manager.
- Go to the processes tab and enable the display of processes for all users.
- Right-click on the Live Update process and select the “Open file storage location” option from the menu that appears.
Look at the file location
Usually, by the name (and path) of the directory where the file is stored, you can understand which program is the source of the appearance of this process and, if desired, uninstall it.
If this program is simply located in the directory of the same name in the system folder Program Files, or the source program for the appearance of the process in question cannot be determined for some reason, then you need to do the following:
- Remove the culprit program using a standard program removal tool (if identified). Go to “Uninstall Programs”, find the required program, the name of which mentions “Live Update”, and delete it;
- Disable the Live Update service. Click on the “Start” button, enter services.msc there and press enter. Then we find LiveUpdate in the list of services, right-click on it and select “Properties”. In the startup type, set “Disabled” and click on “Ok” to confirm the changes;
Live updater, what is this program and is it needed?
Step 1: Repair Registry Entries Associated with Fix-It Utilities 9 Professional
Sometimes LiveUpdate.exe and other EXE system errors can be related to problems in the Windows registry. Several programs can use the LiveUpdate.exe file, but when those programs are uninstalled or modified, sometimes "orphaned" (incorrect) EXE registry entries are left behind. Basically, this means that while the actual path of the file may have changed, its incorrect former location is still recorded in the Windows Registry. When Windows tries to look up these incorrect file references (file locations on your PC), LiveUpdate.exe errors can occur. Additionally, a malware infection may have corrupted the registry entries associated with Fix-It Utilities 9 Professional. Thus, these corrupt EXE registry entries need to be fixed to fix the problem at the root. Manually editing the Windows registry to remove invalid LiveUpdate.exe keys is not recommended unless you are PC service professional. Mistakes made when editing the registry can render your PC inoperable and cause irreparable damage to your operating system. In fact, even one comma placed in the wrong place can prevent your computer from booting! Because of this risk, we highly recommend using a trusted registry cleaner such as %%product%% (Developed by Microsoft Gold Certified Partner) to scan and repair any LiveUpdate.exe-related registry problems. Using a registry cleaner, you can automate the process of finding corrupted registry entries, missing file references (like the one causing the LiveUpdate.exe error), and broken links within the registry. Before each scan, a backup copy is automatically created, allowing you to undo any changes with one click and protecting you from possible damage to your computer. The best part is that eliminating registry errors can dramatically improve system speed and performance. Warning: Unless you are an experienced PC user, we do NOT recommend manually editing the Windows Registry. Using Registry Editor incorrectly may cause serious problems that may require you to reinstall Windows. We do not guarantee that problems resulting from incorrect use of Registry Editor can be corrected. You use Registry Editor at your own risk. Before you manually repair the Windows registry, you must create a backup by exporting a portion of the registry associated with LiveUpdate.exe (for example, Fix-It Utilities 9 Professional): Click on the Start . Type “ command ” in the search bar...DO NOT PRESS ENTER YET ! CTRL-Shift keys on your keyboard, press ENTER . A dialog box for access will be displayed. Click Yes . The black box opens with a blinking cursor. Type “ regedit ” and press ENTER . In the Registry Editor, select the LiveUpdate.exe-related key (eg. Fix-It Utilities 9 Professional) you want to back up. From the File , select Export . Save in list , select the folder where you want to save the backup copy of the Fix-It Utilities 9 Professional key. In the File name , enter a name for the backup file, for example, “Fix-It Utilities 9 Professional backup.” Make sure that the Export Range is set Selected Branch . Click Save . The file will be saved with the extension .reg . You now have a backup of your LiveUpdate.exe-related registry entry. The following steps for manually editing the registry will not be described in this article, as they are likely to damage your system. If you would like more information about editing the registry manually, please check out the links below. We do not accept any responsibility for the results of the actions performed according to the instructions below - you perform these tasks at your own peril and risk. Windows XP https://www.theeldergeek.com/windows_xp_registry.htm Windows 7 https://www.theeldergeek.com/windows_7/registry_edits_for_win7.htm Windows Vista https://support.microsoft.com/kb/2688326 – LetMeFixItMyselfAlways
Step 2: Conduct a full scan of your computer for malware
There is a chance that your LiveUpdate.exe error could be related to a malware infection on your PC. These malicious intruders can damage or even delete EXE-related files. It's also possible that the LiveUpdate.exe error you are experiencing is related to a component of the malware itself. Tip: If you don't already have anti-malware installed, we highly recommend using Emsisoft Anti-Malware (download). Unlike other security programs, this program offers a malware removal guarantee.
Step 3: Clean your system of junk (temporary files and folders) using Disk Cleanup (cleanmgr)
Over time, your computer accumulates unnecessary files due to normal Internet surfing and daily computer use. If these junk files are not occasionally removed, they can cause Fix-It Utilities 9 Professional to respond slowly or provide an LiveUpdate.exe error, possibly due to file conflicts or an overloaded hard drive. Removing such temporary files using the Disk Cleanup utility can not only eliminate the LiveUpdate.exe error, but also significantly improve the performance of your computer. Tip: Although Disk Cleanup is a great built-in tool, it does not remove all temporary files from your computer. Other programs that you frequently use such Microsoft Office, Firefox, Chrome, Live Messenger, and hundreds of other programs are not cleaned up with Disk Cleanup (including some Avanquest North America Inc. programs). Due to the shortcomings of the Windows Disk Cleanup (cleanmgr) utility, we highly recommend using specialized hard drive cleaning/privacy protection software such as WinSweeper (developed by Microsoft Gold Partner) to clean your entire computer. Running WinSweeper once per day (using automatic scanning) will ensure that your computer is always clean, running fast, and free of LiveUpdate.exe errors related to temporary files. How to run Disk Cleanup (cleanmgr) (Windows XP, Vista, 7, 8 and 10 ): Click on the Start . Type “ command ” in the search bar...DO NOT PRESS ENTER YET ! CTRL-Shift keys on your keyboard, press ENTER . A dialog box for access will be displayed. Click Yes . The black box opens with a blinking cursor. Type “ cleanmgr ” and press ENTER . Disk Cleanup will begin counting the used disk space that you can free up. The Disk Cleanup dialog box will open, containing checkboxes that you can select. In most cases, the “Temporary Files” takes up most of the disk space. Check the boxes next to the categories you want to use for disk cleanup and click OK .
Step 4: Update device drivers on your computer
LiveUpdate.exe errors can be caused by corrupt or outdated device drivers. Drivers can easily work today and stop working tomorrow for a variety of reasons. The good news is that most often you can update your device drivers to fix the EXE problem. Due to the time commitment and overall complexity of updating drivers, we highly recommend using a driver update utility such as DriverDoc (developed by Microsoft Gold Partner) to automate this process. Please Note: Your LiveUpdate.exe may not be related to hardware driver problems, but it's always a good idea to ensure all of your PC device drivers are up-to-date to maximize PC performance.
Step 5: Use Windows System Restore to “Undo” recent changes to the system
Windows System Restore allows you to “go back in time” with your PC to help fix your LiveUpdate.exe problems. System Restore can return system files and programs on your computer to a time when everything worked fine. This can potentially help you avoid the headache of troubleshooting EXE related errors. Please note: Using System Restore will not affect your documents, pictures or other data. To use System Restore (Windows XP, Vista, 7, 8 and 10) : Click on the Start . In the search bar, type “System Restore” and press ENTER . In the results window, click System Restore . Enter your administrator password (if prompted). Follow the Wizard's to select a restore point. Restore your computer.
Step 6: Uninstall and Reinstall the Fix-It Utilities 9 Professional Program Associated with LiveUpdate.exe
Instructions for Windows 7 and Windows Vista: Open Programs and Features by clicking the Start . Click Control Panel in the menu on the right. Click Programs . Click Programs and Features . Find Fix-It Utilities 9 Professional in the Name . Click on the Fix-It Utilities 9 Professional . Click on the Delete in the top menu ribbon. Follow the on-screen instructions to complete the removal of Fix-It Utilities 9 Professional . Instructions for Windows XP: Open Programs and Features by clicking the Start . Click Control Panel . Click Add or Remove Programs . Find Fix-It Utilities 9 Professional in the list of Installed programs . Click on the Fix-It Utilities 9 Professional . Click the Delete on the right. Follow the on-screen instructions to complete the removal of Fix-It Utilities 9 Professional . Instructions for Windows 8: Position your mouse pointer at the bottom left of the screen to display the Start menu . Right-click to bring up the Start Context Menu . Click Programs and Features . Find Fix-It Utilities 9 Professional in the Name . Click on the Fix-It Utilities 9 Professional . Click Delete/Edit in the top menu ribbon. Follow the on-screen instructions to complete the removal of Fix-It Utilities 9 Professional . After you have successfully uninstalled your LiveUpdate.exe-associated program (eg. Fix-It Utilities 9 Professional), reinstall the program according to the Avanquest North America Inc. instructions. Tip: If you are positive that your EXE error is related to specific Avanquest North America Inc. program, uninstalling and reinstalling your LiveUpdate.exe-associated program will likely solve your problem.
Step 7: Run Windows System File Check (“sfc /scannow”)
System File Checker is a handy tool included with Windows that allows you to scan for and repair corrupt Windows system files (including those related to LiveUpdate.exe). If System File Checker finds a problem with the EXE or other critical system file, it will attempt to replace the problematic files automatically. To run System File Checker ( Windows XP, Vista, 7, 8 and 10 ): Click on the Start . Type “ command ” in the search bar...DO NOT PRESS ENTER YET ! CTRL-Shift keys on your keyboard, press ENTER . A dialog box for access will be displayed. Click Yes . The black box opens with a blinking cursor. Type “ sfc /scannow ” and press ENTER . System File Checker will begin scanning for LiveUpdate.exe and other system file problems (be patient - the system scan may take a while). Follow the commands on the screen.
Step 8: Install all available Windows updates
Microsoft is constantly updating and improving Windows system files that are associated with LiveUpdate.exe. Sometimes, to solve an EXE problem, you simply need to update Windows with the latest service pack or other patch that Microsoft releases on an ongoing basis. To check for Windows updates (Windows XP, Vista, 7, 8 and 10 ): Click on the Start . Type “ update ” in the search bar and press ENTER . The Windows Update dialog box will open . If there are updates available, click the Install updates .
Step 9: Perform a clean installation of Windows
Caution: We must emphasize that reinstalling Windows will be a very time-consuming and advanced task to resolve LiveUpdate.exe problems. To avoid data loss, you must be sure that you have backed up all important documents, images, software installers and other personal data before starting the process. If you are not currently backing up your data, you should do so immediately (download a recommended backup solution) to protect yourself from permanent data loss. Please Note: If LiveUpdate.exe problems still persist after a clean install of Windows, your EXE problem MUST be hardware related. If this is the case, you will likely need to replace the associated hardware causing the LiveUpdate.exe error.