Sudden muting or any problems associated with it have never been a rare occurrence. This is a very relevant and discussed topic that almost every user has encountered. Most often, the reason lies in the BIOS itself, namely in turning off the sound in its settings. This indicator can be quickly corrected; just follow a simple algorithm. It is worth considering enabling a sound card using the example of AMI, Award and UEFI.
How to enable a sound card in BIOS
Go to BIOS
All actions will need to be performed in the BIOS itself, but not every user knows how to go there. This knowledge is useful, since you will need to log in not only when connecting a sound card, but also when reinstalling the OS and performing other operations.
Note! PCs contain different motherboards, and entering the BIOS depends on them. Most often, the user just needs to press F2 and Delete when turning on the computer. Moreover, this must be done sequentially, and not simultaneously.
If this method does not work, then you can try holding down the F12, F10 or F11 keys. Often the user himself can familiarize himself with the method of entering the settings. When you turn on the PC, this information is displayed on the monitor.
After turning on the computer, press F2 and Delete
About ASUS
ASUS is one of the leading manufacturers of motherboards and other equipment, including video cards, optical drives, monitors, computers, laptops, netbooks, servers, multimedia devices, wireless solutions, network equipment and mobile phones.
The BIOS must be updated before installing Broadwell processors. All modern ASUS motherboards have two methods for updating the BIOS. You can use the BIOS Updater utility or the USB BIOS Flashback feature, which is supported on many ASUS motherboards. Unfortunately, the usual firmware procedure via EZ Flash or the ASUS utility for Windows does not work in this case. Using the ASUS Maximus VII Hero motherboard as an example, we will show both methods.
Updating BIOS via USB BIOS Flashback
One way to update the BIOS is to use the proprietary USB BIOS Flashback function, which is present on most modern ASUS motherboards. This function means a button on the I/O panel and a special USB port, which ASUS has equipped with the USB BIOS Flashback function. You will also need a USB flash drive formatted in FAT32.
First, you should download the BIOS firmware with the CAP extension from the ASUS website, then rename the file.
In the case of the Maximus VII Hero motherboard, the file should be renamed “M7H.CAP”. This file then needs to be copied to the root folder on the USB drive (or make sure that the file exists there if you copied it earlier). For other ASUS motherboards that support the USB BIOS Flashback feature, check the user manual to see what name the file should have.
Then the prepared USB flash drive should be installed in a USB port that supports the USB BIOS Flashback function - on the Maximus VII Hero motherboard it is located to the right of the button. Of the two USB 3.0 ports, use the lower one. For all other motherboards, check your documentation to select the correct USB port. You need to turn off the computer and then press the USB BIOS Flashback button for three seconds.
The system will start, after which the process of updating the motherboard BIOS will begin. Once the update is complete, the button LED will turn off. Then you can start the system, it will start with the new BIOS version. For ROG motherboards, the firmware of the ROG chip is also optionally updated.
The big advantage of this feature is that updating the BIOS does not require installing the processor and memory. So if you buy an ASUS motherboard with USB BIOS Flashback and a Core i5-5675C or Core i7-5775C processor, you can update the BIOS to the latest version before installing the CPU, so you don’t have to rearrange processors for firmware.
The following video shows the update process by Chris Huang from ASUS
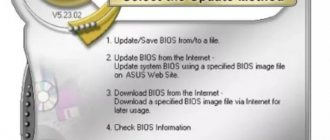
Updating the BIOS using the BIOS Updater utility
But not all ASUS motherboards have the USB BIOS Flashback function. For this reason, ASUS offers a BIOS Updater feature that allows you to prepare ASUS motherboards based on Z97 and H97 chipsets for dual Broadwell processors. But ASUS specifically states that the BIOS Updater utility will only work with the 4th generation processor. So the BIOS needs to be updated before upgrading. The utility can be downloaded from the ASUS website using the following link: BIOS Updater for 5th generation Intel Core processors.
To start the update, you need to run the “Update.exe” file.
In this window, you should select the BIOS CAP file, which must first be downloaded. To select, click the corresponding button on the right.
Now select the folder where the CAP file is stored, then double-click with the mouse.
Update via ASUS BIOS Updater utility.
The BIOS Updater utility can now flash the BIOS CAP file. To start the update process, just confirm the request.
Update via ASUS BIOS Updater utility.
You should then wait until the update process is completed. Of course, you should not reboot your system during the update process.
Update via ASUS BIOS Updater utility.
When the update process is complete, a message will appear. Then you should confirm the request, the system will restart with the new BIOS. Again, in the case of ROG motherboards, the ROG chip firmware may also be updated.
Conclusion
After updating the BIOS to support Broadwell processors, you can begin installing the Core i5-5675C or Core i7-5775C processors themselves. For other motherboard manufacturers, the process will be similar; before installing a new processor on Z97 or H97 motherboards, you should update the BIOS. We will prepare a separate news article in which we will list motherboards that support Broadwell processors. But today it is already clear that almost all motherboards on the Z97 or H97 chipsets will support new processors; it is enough to install a new BIOS version that contains microcode for the new CPU processors.
Can't access settings
This is also a common practice, which is associated with the fact that the user has “Fast Boot”, which translates as fast boot mode. He can press the correct key combinations, but the window either quickly disappears or does not appear at all.
In this case, when you turn on the PC, you need to quickly press the F2, Delete, F12, F10, F11 keys 3-4 times. These actions must be carried out sequentially, pressing the buttons one by one.
Key combinations to enter BIOS
Now the user can go to the settings and proceed to the next step.
How to use fast boot mode correctly
Next we will look at the exit method, but it won’t hurt to learn the intricacies of operation. What if it comes in handy?
- First you need to connect your PC and smartphone using a USB cable;
- Fastboot Mode is activated on the mobile gadget. This option can be “hidden” in the screen settings or in the “Accessibility” section:
- Now you need to download and install the FastbootTool utility on your laptop (select the latest version from the list on the official website);
- Open the software and if the previous steps are completed correctly, your tablet model will be indicated in the main software window;
- Now you can perform various actions with the device that are not available in normal mode. But I recommend that you carefully read the topic on the 4PDA forum, specifically for your phone model (ASUS, Lenovo, Huawei, ZTE, etc.).
Enabling in AMI BIOS
You need to take these simple steps:
- By pressing the key combination we go to the BIOS settings. The user will see the main menu, which contains all the necessary information. It looks like this.
BIOS main menu
- It contains 7 large sections, in this case you will need the “Advanced” tab. On the left side there is a list, there you need to select “Onboard Devices Configuration”.
Select “Onboard Devices Configuration”
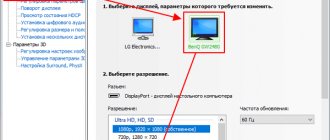
- A window will open where you can turn the sound on and off. In this case, you need to pay attention to the “Onboard Audio” item. On some PCs it may be called "Onboard HD Audio". There should be an “Enabled” indicator next to it. This means that the sound is fine. Sometimes “Auto” is displayed, which also indicates that there are no problems. If the user needs to turn off the sound, then you can press the key on “Enabled”, and this indicator will change to “Disabled”.
To enable sound, select “Enabled”
Once all the necessary settings have been entered, you need to press the “F10” key to exit the Bios and proceed to your usual work on the PC.
Main sections and settings
How to enter BIOS
I believe that the first place to start this article is with the question of entering the BIOS (otherwise there will be nothing to configure ✌).
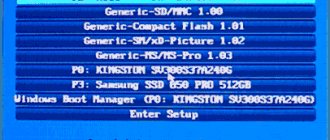
In most PC/laptop models, to enter the BIOS you need to press the F2 or Del (sometimes F1 or Esc) immediately after turning on the device.
Some laptops (for example, Lenovo) have a special Recovery button (which is pressed instead of the power button). After this, usually a sign appears (as in the photo below) - to configure the BIOS you need to select BIOS Setup.
I also recommend that you read the articles on my blog about logging into the BIOS (links below).
Control buttons
In the BIOS, all settings have to be set using the keyboard (which is somewhat scary for novice users who are used to doing everything in Windows with the mouse).
Note: more modern versions of BIOS (i.e. UEFI) support mouse control.
It is also worth noting that all settings are set in English (however, most settings are easy enough to understand what they mean, even for those who have not studied English).
So, now about the buttons.
I draw your attention to the fact that in almost every BIOS version, all the most basic control buttons with which it is configured are written at the bottom of the screen (or on the right).
Control buttons on the bottom of the window / Dell Inspiron laptop
Generally speaking, the buttons are as follows:
- arrows →↓↑← - used to move the cursor (change parameters);
- Enter - the main key for entering sections (as well as for selecting certain parameters and switching items);
- Esc - exit the BIOS without saving settings (or exit a specific partition);
- +/PgUp or -/PgDn — increase/decrease the numerical value of a certain parameter, or switch it;
- F1 - quick help (only for settings pages);
- F2 — hint for the highlighted item (not in all BIOS versions);
- F5/F6 - change the parameters of the selected item (in some BIOS versions they can also be used to restore changed settings);
- F9 - system information (loading secure settings);
- F10 - save all changes to the BIOS and exit.