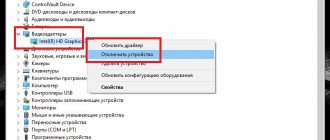
Using Boot Menu to boot from a flash drive
In most cases, booting from a flash drive into the BIOS is required for some one-time task: installing Windows, scanning the computer for viruses using LiveCD, resetting the Windows password.
In all these cases, it is not necessary to change the BIOS or UEFI settings; it is enough to call the Boot Menu when you turn on the computer and select the USB flash drive as a boot device once.
For example, when installing Windows, you press the desired key, select the connected USB drive with the system distribution, start the installation - setting up, copying files, etc., and after the first reboot occurs, the computer will boot from the hard drive itself and continue the installation process as usual mode.
I wrote in great detail about entering this menu on laptops and computers of various brands in the article How to enter the Boot Menu (there is also a video instruction there).
How to set boot from disk?
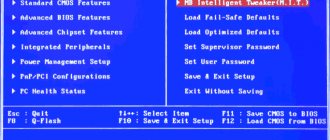
The third BIOS version is Phoenix. It is less common compared to other options (mainly on old laptops). Looks like that:
How to set boot from disk in this case? To do this, do the following:
- Go to the "Advanced" tab.
- To configure the BIOS to boot from disk, put the CDROM first (First Boot Device), and the hard drive (HDD-0 or Hard Disk) second. By the way, the control buttons are different here, and they are usually listed at the bottom.
- Open the "Exit" tab, select "Save and Exit", write Y and click Enter.
The laptop or computer will automatically reboot. To start loading the installation disc (or recovery disc), click any button.
Good to know: Why doesn’t the BIOS recognize the bootable USB flash drive?
How to get into the BIOS to select boot options
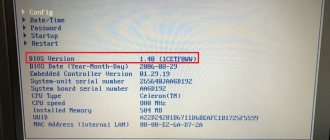
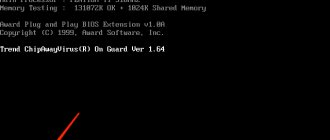
In different cases, in order to get into the BIOS setup utility, you need to perform essentially the same actions: immediately after turning on the computer, when the first black screen appears with information about the installed memory or the logo of the computer or motherboard manufacturer, click the desired button on the keyboard - the most common options are Delete and F2.
Press the Del key to enter the BIOS
Typically, this information is available at the bottom of the initial screen: “Press Del to enter Setup”, “Press F2 for Settings” and similar. By pressing the right button at the right moment (the sooner the better - this must be done before the operating system starts loading) you will be taken to the settings menu - BIOS Setup Utility. The appearance of this menu may vary; let’s look at a few of the most common options.
Changing the boot order in UEFI BIOS
On modern motherboards, the BIOS interface, or more precisely, the UEFI software, is usually graphical and, perhaps, more understandable when it comes to changing the order of boot devices.
In most options, for example on Gigabyte (not all) or Asus motherboards, you can change the boot order simply by dragging the disk images accordingly with the mouse.
If this is not possible, look in the BIOS Features section, in the Boot Options item (the last item may be located in a different place, but the boot order is set there).
Setting up booting from a flash drive in AMI BIOS
Please note that in order to perform all the described steps, the flash drive must be connected to the computer in advance, before entering the BIOS. To set boot from a flash drive in AMI BIOS:
- In the menu at the top, press the “right” key and select “Boot”.
- After that, select the “Hard Disk Drives” item and in the menu that appears, press Enter on “1st Drive”
- In the list, select the name of the flash drive - in the second picture, for example, it is Kingmax USB 2.0 Flash Disk. Press Enter, then Esc.
Next step:
- Select “Boot device priority”
- Select “First boot device”, press Enter,
- Again, specify the flash drive.
If you need to boot from a CD, then specify the DVD ROM drive. Press Esc, in the menu at the top from the Boot item, move to the Exit item and select “Save changes and exit” or “Exit saving changes” - when asked if you are sure If you want to save the changes you have made, you will need to select Yes or type “Y” from the keyboard, then press Enter. After this, the computer will reboot and begin using the flash drive, disk, or other device you selected to boot.
How to load programs from a flash drive into UEFI BIOS
When you enter a modern version of the BIOS, a program with good graphics will open. It is controlled by both cursors and the mouse. The first thing you do is set the Russian language, and a lot will become clear even for those who have little knowledge of computers.
UEFI also has several versions, and they may also differ in menu layout, but in general everything is clear and understandable. Before you set priority boot from a flash drive or DVD, you need to go either to the “ Boot ” tab in some versions, or to “ Device boot priority ” in others. In some versions, you can simply drag the icon of a flash drive or disk with the mouse to specify it as a priority boot device.
In general, everything is done in the same way as was described using the AWARD example. First, we check whether the DVD drive or flash drive is turned on, then we set priority boot, save the settings, and after that the computer reboots. In UEFI BIOS, after the computer has booted from a flash drive or disk, you will also need to return the settings to default.
Booting from a flash drive into BIOS AWARD or Phoenix
In order to select a device to boot into Award BIOS, in the main settings menu, select “Advanced BIOS Features”, then with First Boot Device selected, press Enter.
A list of devices from which you can boot will appear - HDD-0, HDD-1, etc., CD-ROM, USB-HDD and others. To boot from a flash drive, you must install a USB-HDD or USB-Flash. To boot from a DVD or CD - CD-ROM. After that, go up one level by pressing Esc, and select the menu item “Save & Exit Setup”.
Setting up the BIOS to boot from a USB drive
As already mentioned, setting up the BIOS to boot from a flash drive is almost no different from setting up to boot from a CD or DVD. The only difference is the choice of option in the corresponding section. Let's look at boot settings using the example of the two most common types of BIOS - AMI and Award.
AMI BIOS
By connecting a USB flash drive to your computer and entering the AMI BIOS, you will find yourself in the “ Main ” section. Right arrow key, select the “ Boot ” section in the main menu and press enter to enter it. Here, first of all, you need to select the “ Hard Disk Drives ” subsection and press enter. You will see a list of devices with the names 1st Drive, 2nd Drive , etc. The number 1 in the first name just means that this is the first device from which the boot is performed.
The hard drive will be indicated to the left of it, but you need to replace it with a flash drive. To do this, highlight 1st Drive , press Enter and select the connected flash drive in the menu that opens. Press Enter and Esc to return to the previous menu. Now go to the “ Boot Device Priority ” subsection. There will be a similar list of items ( 1st Boot , 2nd Boot ), give preference to the first one, press Enter and also indicate the flash drive in the menu that opens. Save the settings by pressing F10 to start booting from the flash drive.
Award BIOS
In Award type BIOS, the setup procedure is very similar. Once you get into the BIOS, go to the “ Advanced BIOS Features ” section and select the “ Hard Boot Disk Priority ” subsection. Having entered it, select a pre-connected flash drive from the available devices and move it to the top of the list by pressing the “ + ” sign. Then go back to the previous menu and this time select the “ First Boot Device ” option. USB-CDROM or USB-HDD from the menu list that opens . Everything is ready, you can save the settings by pressing F10 and reboot.
Setting up boot from external media in H2O BIOS
To boot from a flash drive into the InsydeH20 BIOS, which is found on many laptops, in the main menu, using the “right” key, you need to go to the “Boot” item. Set External Device Boot to Enabled. Below, in the Boot Priority section, use the F5 and F6 keys to set External Device to the first position. If you need to boot from DVD or CD, select Internal Optic Disc Drive.
After that, go to Exit in the menu at the top and select “Save and Exit Setup”. The computer will reboot from the desired media.
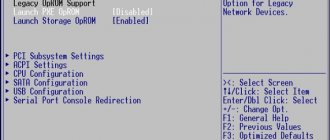
The AMI BIOS version is usually found on laptops
The AMI BIOS version is usually found on laptops. It looks like this:
- Open the Boot tab and select “Boot Device Priority”.
- Here you will see familiar lines - 1st, 2nd and 3rd Boot Device. It is with their help that you can set the boot priority from disk. To do this, install the CDROM first, and the hard drive (HDD or Hard Disk) second. Switching can be done differently on different laptops, so look at the control buttons (usually they are indicated on the right).
- Go to the “Exit” tab, click on the “Exit and Save” line, and then click on “Ok”.
Saving settings and exiting BIOS
The laptop will reboot and you will see the same black screen with one line. To start booting the laptop from the disk, press any button.
These instructions are suitable for laptops of any brand - Lenovo, Asus, Acer, HP Pavilion, MSI, Samsung, etc. If you have a different BIOS version, then 2 more options are discussed below. Perhaps one of them is your case.
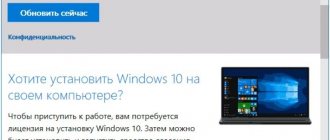
Boot from USB without entering BIOS (Windows 8, 8.1 and Windows 10 with UEFI only)
If your computer has one of the latest versions of Windows installed, and the motherboard has UEFI software, then you can boot from a flash drive without even entering the BIOS settings.
To do this: go to settings - change computer settings (via the panel on the right in Windows 8 and 8.1), then open "Update and Recovery" - "Recovery" and click the "Restart" button in the "Special boot options" item.
On the “Select Action” screen that appears, select “Use device.” USB device, network connection, or DVD."
On the next screen you will see a list of devices from which you can boot, which should include your flash drive. If suddenly it’s not there, click “View other devices.” After selection, the computer will reboot from the USB drive you specified.