Purpose of the IDE
Using the Arduino IDE, you can, based only on knowledge of C++, solve a variety of creative problems related to programming and modeling.
Today, with the help of Arduino, all kinds of interactive, educational, experimental, entertainment models and devices are designed.
The interface is relatively easy to learn; it is based on the C++ language, so even novice programmers can master the tools.
Where to download Arduino IDE
You can download the required version in the table above. Select the desired operating system and file for installation.
The program itself is open source. All basic tools are distributed free of charge - just select the version that matches your operating system. Descriptions (in English) can be found on the official website page https://www.arduino.cc/en/main/software, and the links to the required version can be found in the table above.
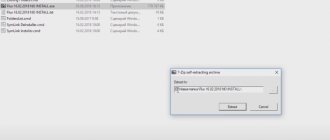
After selecting the desired operating system and the desired installation file, you will be taken to the download page (see below) where you simply need to click “Just Download” to begin the download.
Arduino IDE
The very first, and often the only program for beginners to work with the Arduino controller is Arduino IDE - an integrated development environment from the creators of the platform.
You can download the main versions of this program for free on our website, just below are the download links. For your convenience, we have selected the most recent and popular versions of programs. In other materials on ArduinoMaster.ru you can learn more about installing and configuring the Arduino IDE. Let's first briefly find out what an IDE is and get answers to the most frequently asked questions. If you are an experienced developer, then you can safely fly to the next section of the article with download links.
What is Arduino IDE
The abbreviation IDE stands for Integrated Development Environment, which means integrated development environment. Using this program, programmers write programs, and do it much faster and more conveniently than using conventional text editors.
Within the Arduino platform, the Arduino IDE program does the same thing - it helps programmers write programs. With its help, a sketch written in the Arduino language is checked, turned into C++, compiled, and loaded into Arduino. Theoretically, you can do without this program, but in reality there are practically no other options for a beginner to start working with Arduino. Therefore, the first thing you must do is find and install this programming environment for yourself. It's not difficult at all and absolutely free.
How to download and install Arduino IDE
The download and installation procedure is absolutely traditional. You download the file, start the installation. Versions with an installer (exe) and regular zip archives are available on the official website. You can find versions of the Arduino IDE for all major operating systems.
The installation procedure is quite simple; you will need to answer a few questions. An important step in this process is installing the COM port driver. For most "Chinese" Arduino boards you will need to install additional drivers.
After installation, you will need to slightly configure the environment - we will talk about this in a separate article about installing and configuring the Arduino IDE.
Which version of Arduino IDE should I choose?
The first version of the Arduino development environment officially appeared in August 2005. Much water has passed under the bridge since then, and the program has undergone revolutionary changes several times. Until 2011, version numbers consisted of one digit (the last one was 0023 - version dated 11/09/2011). Then came the more familiar entry with “minor” and “major” updates. So, Arduino 1.0.0 appeared on November 30, 2011, and version 1.0.1 – in May 2012.
The key ones in terms of the number of updates and associated compatibility problems were the transitions from versions 1.0.7 and 1.5. Many libraries written for “old versions” of the program could not be compiled in new ones due to changes in system libraries and other internal project assembly mechanisms. This became especially noticeable during the transition to version 1.6. If your project has ancient libraries that do not work correctly with modern versions of the IDE, you will have to change them yourself, wait for the authors to do it, or submit to circumstances and install the version with which the library will work.
The latest stable version of the Arduino IDE at the time of writing is 1.8.7 (August 2018).
Arduino in Russian
Another important issue is the Russification of the development environment. Let's immediately figure out how to translate the Arduino IDE into Russian. In fact, you don’t need to search for or download special versions for this. You download and install the regular version, just select your language from the list of available languages in the corresponding settings item.
Arduino IDE in Russian
Initially, the toolkit is supplied in English. And although the menu commands are quite simple, the program can be easily translated into the desired language.
The full list of released localizations is presented on this page: https://playground.arduino.cc/Main/LanguagesIDE. Russian language is included in the list.
Russian is included in the list of Arduino IDE languages.
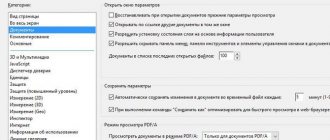
To enable the Russian-language interface, you need to use the command:
File → Preferences → Language _
and select Russian from the list.
Arduino IDE Web Editor online
On the official website today it is possible to use the capabilities of the Arduino IDE without installing the program using the online service Arduino Web Editor, which is available at //create.arduino.cc/editor/. In addition to all the standard Arduino IDE features, you can share a link to the sketch with friends or on social networks. A brief overview of the available functions of the Web Editor is in the following video.
Instructions for using this service are only in English and are available at the link here. One of the minuses should also be noted that a sketch written in the Arduino Web Editor can only be loaded into the original Arduino board. Access to the service is available only to registered users (registration is free). In the comments you can leave questions on the topic: Arduino IDE download in Russian.
Setting up the environment
Installing the Arduino software environment is a fairly simple process. After you have selected and downloaded the desired version, you need to start the installation through the arduino.exe .
As always, you must first agree to the License Agreement, despite the fact that the environment itself is distributed free of charge.
The next step is to select the actions that the installer must take. You can check all the boxes.
Next, select the installation folder.
If the installer prompts you to install a USB-to-serial driver, click Install .
H FLProg - school for Arduino. First lessons in communication and quick counting in drafts
A new version of the FLProg program has been released. Previous posts about the program can be read here and here. In the last post I promised that the next version would have a built-in simulator, and I honestly started working on it. But reality changes our plans. I am developing the project in accordance with the wishes of the program’s users, and as it turns out, few people are interested in the simulator yet. In the voting ranking on the site, he was at the very bottom. Therefore, I stepped on the throat of my own song and took up more popular functionality. So, what's new. First of all, a huge amount of work was done to rework the drawing of the diagram. Indeed, with a circuit size of 10 -15 boards, rendering was slow even on powerful computers. I had to completely rewrite the drawing in accordance with the new principles.
Principle 1 – cache EVERYTHING. Minimum calculations at the time of drawing. This entailed the creation of variables for the cache, raising the message tree along the chain of objects, and, accordingly, the change system with determining the need to reset certain caches. Principle 2 – we draw only what we see. In general, this is a trivial task. But in the Smalltalk language it took a lot of digging to determine the visible rectangle in ScroolBox. I may have reinvented the wheel, but it worked. Testing on a netbook with Atom showed that the drawing speed does not depend in any way on the size of the diagram.
I taught Arduino to communicate with each other via the Com port. The program has new blocks for receiving and transmitting data via the Com port. I tried to make this as simple and transparent as possible. The required number of variable transmission blocks are placed on the transmitting board diagram, and the corresponding variable receiving blocks are installed on the receiving side. You can watch the video below for more details.
Added speed counter block. This is a standard block in almost all industrial controllers. But until now I did not dare to approach it, because I did not really understand the hardware interrupts of the controller. But the users wanted it, and they had to dig. It seems to have worked out. The block counts pulses on the digital input of the controller associated with it for a given period of time. Counting occurs by interruption, and therefore does not depend on the rest of the program. A description of how to operate the counter and an example of application can be seen in the video below.
Also, in accordance with the wishes, a number of new functional blocks have been added. Algebra blocks: Sin, Cos, Tan, Abs, Min, Max, Sq, Sqrt. Random number generator, leading edge identification. A general overview of the innovations can be seen in the video.
Program website flprog.ru
PS. Please do not start, as in previous posts, a holivar about the harmfulness of the FBD and LAD languages. If you consider them to be universal evil, just close this page. There are people who don't think so. Leave this post to them.
IDE setup
A USB port is used to connect the board to a computer. Programming does not require special equipment; the board itself is compact and lightweight.
Step 1
We connect the Arduino board to the computer.
Step 2
Let's go to:
Start → Control Panel → Device Manager
We find “COM and LPT ports” and see our board on COM2.
It's likely that you won't see anything. In most cases, the problem is that you bought a board based on the CH340G chip. In this case, you need to use the solution from our article.
Step 3
Launch the Arduino IDE and go to:
Tools → Port
Select port COM2 (or the one you got in the step above).
Step 4
Choose a board.
This completes the setup. Now you have the Arduino IDE set up and you can start developing your projects.
ARDUINO MANUAL. INSTALLING ARDUINO IDE
Selecting an Arduino Driver Program - Guide
Let's take the widely used Windows 7 operating system as an example - we select the distribution kit (program) for Windows accordingly - Windows Installer is suitable for those who do not want to deal with the computer structure and file system. The installer will do everything for you, he will find where to install it, and the only thing you need to remember is the installation directory, this may be needed to search for drivers.
If you downloaded Windows (ZIP file), you will have to think about everything yourself - where to unpack it, where to put it, the program, give the appropriate rights, and much more.
After installing the program, you may need to restart your computer, but that’s not a fact.
2. You need to connect the Arduino UNO board (you may have a completely different board) and the computer with a USB cable.
If after connecting, within 10-20 seconds, the new equipment is not detected, and nothing happens at all, try plugging the USB cable into another socket on the computer.
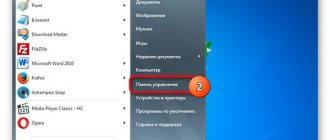
If the equipment is still not identified! Click the START button on the Windows panel, and enter devmgmt.msc .
Select the undefined Unknown Device with the right mouse button, select Update drivers , Search for drivers on this computer , Look for drivers in a specified location , Browse , then specify the directory c:Program Files (x86)Arduinodrivers, or c:Program Files (x86) ArduinodriversFTDI USB Drivers, or remember the directory in which you installed the Arduino IDE in the first step, there is a drivers , and in it FTDI USB Drivers , specify these folders, and install the necessary drivers
After the drivers are installed, you will have new hardware in the Ports (COM and LPT) - Arduino Uno (COM3) .
After installing the program, you should have an icon on your Windows desktop to launch the Arduino program. After launching it, the Environment for writing programs for Arduino will open in front of you - figure at the beginning of the article.
Sketches are programs for Arduino that must be uploaded to Arduino using the Upload button in the program menu (after installation, you have many example sketches at your disposal, they are located in c: Program Files (x86) Arduinoexamples .
You write your program in a text editor, select, copy, paste into the Arduino IDE, or open a ready-made one with two mouse clicks, then click the download button (arrow in the green circle), if the port is specified correctly, the port must match the port specified in the computer hardware , and there are no errors in the program, then in a few seconds it will be loaded into the Arduino, and the microcontroller will begin to execute it.