Why configure your gamepad?
As mentioned above, before starting the game, you first need to configure the gamepad. There are a lot of games using a joystick, so this article will be useful to a wide range of gamers. But it should be explained why it is necessary to carry out configuration, while the device must be prepared initially.
It’s worth making a reservation here: if you purchase a gamepad from XBox, then most likely it will function perfectly, but a device from another company is unlikely. This is the case because games designed for the joystick are cross-platform. This means that the developer makes them not only for PC, but also for PlayStation and XBox. And the game, accordingly, supports the device of these two flagships of the console industry.
In simple terms, if you have a third-party device, then you must know how to configure the gamepad, because otherwise it will not function correctly or will not start working at all.
Connecting a joystick on MacOS
Since Mac OS is quite different from Windows, connecting a joystick is different: most of these systems do not see them at all , which requires installing special drivers or programs. One of these is Joystick Mapper ($4.99 or 349 rubles in the Mac App Store). Once connected, the gamepad allows you to immediately configure it and works with all controllers in all applications - it works by simulating keyboard keys. There is also a free analogue of the mapper – Enjoyable, which works on a similar principle.
But there are also those that Mac will see without additional settings : on Windows, these support Dinput (or it and Xinput at the same time), for example? Logitech joysticks can be noted.
Settings via control panel
So, let's start talking about how to set up a gamepad for comfortable gaming. First of all, the simplest method will be discussed, which does not involve downloading additional applications. Configuration should be carried out using standard Windows utilities.
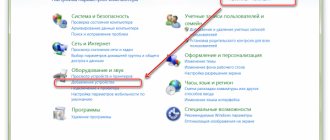
First you need to log into the control panel. To do this, select the section of the same name in the Start menu. Once you have done this, a window will appear with a large number of icons, but we are only interested in one - “Devices and Printers”.
Now you will see images of all devices connected to your personal computer. Among everything, find images of your gamepad. Now you need to right-click on the icon and select “Game Control Device Settings” from the menu. Next in the window you need to open the properties of this device.
Let's move on to the final stage. In the window you see a number of fields that need to be filled out. Each field requires entering a key on the keyboard, which will be activated when you press the corresponding button on the gamepad. Fill in all fields and then click “Save”.
Now, when you enter the game, all assigned buttons should function properly. But if this is not the case, do not despair, now another way will be discussed on how to set up a gamepad for games.
How to connect a joystick
First you need to figure out which gamepad you need to connect. We are not talking about the manufacturer, but about the types of joysticks. There are two - one-dimensional and multidimensional. The first ones allow you to perform manipulations up and down, left and right. The latter allow you to control an object in several planes.
There are differences in the type of connection to other devices, wired, wireless.
The best compatibility with the WIndows operating system are gamepads from Microsoft, not directly, but from slave consoles such as Xbox. They have a very simple connection scheme with devices. To connect to a computer, you need to turn on the device, select “Devices” in the “Options” window, then “Add a device” and select the lowest item.
Please note Bluetooth is required for connection.
After detection, automatic binding to the computer will occur, the gamepad will launch every time a connection is established. It is also worth remembering that the adapter function may not be available in some parts of our country, and indeed the planet. Before attempting to establish a connection, you should check for updates to your device.
There is no need to think that connection is only possible with a device from the company of the same name. Absolutely not, you can use any other controller. A simple way is to connect via USB, if you have all the necessary updates and drivers, respectively. If everything is in order, the connected device will begin to fully function without any settings in the system. Direct control settings will need to be made in the game itself.
If the drivers required for the connected device are not installed, this is an easily solvable problem. After connecting, you need to go to the device manager, select the device there, click on it. A window will open in which you need to select the “update configuration” item, that’s it. The system will independently find the necessary drivers on the Internet and install them.
To connect wirelessly, you must have Bluetooth on your PC. Click on the “Share” button, then go to the Notification Center. Select “All settings”, then “Devices”. Launch Bluetooth, device detection function. After a few seconds, the gamepad will be detected by the system. Click on the name you want, then click “Create a pair.” The connection is complete. You don’t need to make any settings, just directly in the game itself.
Setup using x360ce
If the above instructions did not help you, you need to move on to other methods. This time you will need the help of third-party software, namely x360ce. This is an XBox 360 gamepad emulator. It makes any game feel like a PC device connected to an XBox joystick.
After downloading, you need to configure the program. This is not a difficult task, so everyone can easily cope with setting up this application:
- After downloading the archive, place the files from it in any folder on your computer.
- Now open the x360ce.exe file from this folder.
- If the controller is connected correctly, you will hear a characteristic signal upon startup.
- Click on the drop-down list below. All templates will open in front of you.
- From the list, select Thrustmaster Dual Tigger 3 in 1 Rumble Mods.
- Click the Load button.
Now, when you press the gamepad buttons and interact with the sticks, you will see that the corresponding buttons on the controller image will light up. If this is not the case, then change the preset or assign the desired buttons manually. After everything is done, click the Save button and close the window.
All that remains to be done is to copy the files from the folder, namely: x360ce.exe, x360ce.ini, xinput1_3.dll - to the root folder of the game. The root folder is the one in which the launcher is located. To find it, you can right-click on the game shortcut and select “File location”. A folder will open in which you need to place all the above files.
Gamepad does not work in PC games: why
We'll tell you what to do if the game doesn't see the gamepad on your PC...
If the gamepad does not work in PC games, you need to diagnose the system.
In order for the gamepad to be correctly recognized in the system, you must perform the following steps step by step:
- Connect and install the gamepad driver;
- Check whether the controller is recognized in the system;
- Calibrate the gamepad.
More details about this below.
Connecting and installing the controller
In cases where the gamepad does not work in games on the PC, you need to understand that on Windows 8 and higher, drivers for the USB gamepad are installed automatically - just connect the controller and wait a few seconds.
If the gamepad is wireless, before connecting, check the presence of batteries (batteries)
When connecting a Bluetooth controller that does not require a separate USB adapter to operate, you must click on the Bluetooth icon in the tray and select “Add a new device.” The Bluetooth gamepad will pair automatically.
After installing the driver, regardless of the model of the gamepad controller, you need to open the Windows Control Panel, select the “Hardware and Sound” section and check the “Devices and Printers” item.
If installation and connection of the controller were successful, the gamepad will be displayed on connected devices
Especially for you: GTA 5 does not start after the update: what to do
The gamepad does not appear in the system
Sometimes the gamepad simply does not appear in the system. This problem can be solved using JoyToKey - this utility has a keystroke emulator. Guidelines for installing and using this utility can be found on Google. Also, the problem of the gamepad not working in games on a PC can arise in cases of incompatibility between the equipment and the computer.
Why doesn't my PC see my gamepad?
There are several main reasons why a gamepad does not work in games on a PC - they may have radically different solutions. So often they occur due to user carelessness.
Among the most common are the following:
- The controller is not compatible with the computer - a gamepad that is not a Windows-compatible device is connected. Most console gamepad controllers are not directly compatible with Windows; special software or special adapters are used to pair them;
- The PC version of the game does not support a game controller - desktop versions of games are quite finicky about gamepads. Some releases only support Xbox-compatible gamepads, others support PlayStation controllers.
If the device is compatible with Windows, the answer to why the gamepad does not work in games on a PC must be looked for in the game itself. Sometimes, in order for the gamepad to be detected in the system, it is enough to update the controller drivers and set the necessary parameters in the game settings.
Especially for you: How to transfer data from Samsung to iPhone: complete manual
Often the gamepad does not work on a PC in cases where the device cable is defective or the connector is damaged. You can check this version by connecting another gamepad to your computer
Gamepads and other controllers are often limited by antivirus software. Before connecting the PC gamepad, you must disable your antivirus and firewall. Most likely the problem of the gamepad not working in games on PC will be resolved after this.
Setting up a gamepad that doesn't work in PC games
In order for the gamepad to work correctly in the game, you need to configure and calibrate it. You can accomplish these steps in a few steps:
- Download the current version of the x360ce emulator from the developer’s website; it is recommended to download the 64-bit version. Once the download is complete, unpack the emulator. Upon startup, a message will appear stating that the xinput1_3.dll file is missing - this is how it should be. Next, select Create. In the window that appears next, confirm the action. Upon completion of the setup process, select Finish.
- The program will offer to check all the controller buttons - if all the gamepad buttons work correctly, you need to click Save and close the emulator. The issue of the gamepad not working in PC games has almost certainly been resolved. All that remains is to find the xinput1_3.dll file in the emulator folder and rename it to xinput9_1_0.dll. All three files that we manipulated earlier must be transferred to the game folder. For example: "D:\steam\steamapps\common\ShadowOfMordor\x64".
Especially for you: Tamagotchi when it appeared in Russia: already history
Calibrating a gamepad or other controller on Windows
Open the “Task Manager” and check whether the device is displayed correctly in the system. If the result is positive, go to the gamepad parameters, find the “Joystick Properties” item and start calibrating the device.
The wizard will require the user to perform certain manipulations with the joystick - after this, the calibration of the gamepad will be completed
In many cases, calibration can resolve problems with device latency and response. Thus, the answer to why the gamepad does not work in PC games can be found in any case...
Setting up a gamepad using XPadder
So, now let's look at how to configure a gamepad using the XPadder program. We can say that now we are moving to the heavy artillery, since this program no longer emulates the controller, but the keyboard of your PC, that is, you will assign keyboard keys to the gamepad. This is a universal method, because with it you can play games from the device, even if they do not support joystick control at all.
So, let's set up the program:
- In the program window, click on the joystick icon, which is located at the top left of the window.
- Click New.
- From all the buttons, select "Open".
- In the window that appears, open the controllerimages folder. It contains pictures of different gamepads. Select yours and click “Open” (if you didn’t find yours, select any).
- In the left panel, select “Sticks”.
- In the box, check the box next to “Enabled”. Following the instructions, press left, then right.
- A circle will appear on the joystick image, move it to the left stick.
- In the stick settings window, check the box next to “Enabled”, only now on the right, and repeat all the steps, but move the circle to the right stick.
- In the left panel, select “D-pad”.
- Check the “Enabled” box and follow the instructions to press the appropriate buttons on the gamepad.
- Drag the cross in the picture to the desired location.
- In the left panel, select “Buttons”.
- Press all the gamepad buttons one by one. Squares will appear on the pictures: drag them to the corresponding buttons.
- In the left panel, select “Triggers”.
- Press the left and then the right trigger.
- Click "Accept".
Now you just have to click on the white squares to assign the corresponding keys on the keyboard.
Now you know how to set up a gamepad using Xpadder.
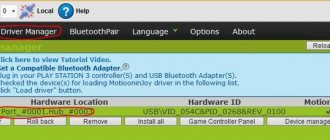
Installing the DS4Windows utility
If the usual installation does not lead to results, the instructions below will help you. Before you connect the Bluetooth gamepad to your PC, you need to download the driver and utility to correctly recognize the joystick. I use the “DS4Windows” solution, which can be downloaded from the site of the same name.
- Download to your computer and unpack the archive with the program.
- Run the “DS4Windows” file, which is needed to install drivers.
- Select the top tab with settings (Settings). Links will be located on the right side. Click on “Controller/DriverSetup” and confirm to launch the program. A window with a picture of a joystick will open.
- In the window that opens, click on button number one. The second press is required only if an XBOX 360 gamepad was previously connected to the PC and now there are problems with driver compatibility. After completing this action, click the third button (Complete).
- The Controllers tab now displays your controller. To connect it, you need to click the Start button in the lower right corner of the window. To turn it off, you can press the Stop button.
- The installation process is completely completed - you can enjoy the game.
In some games, an error may occur when the controller does not work properly or the Dualshock 4 does not connect to the PC via Bluetooth. To fix it, enable the “Hide DS4 Controller” setting in the Settings tab.
If you cannot enable the setting, go to Device Manager (Win + R and enter devmgmt.msc), find the Dualshock 4 gamepad - it is marked as Wireless Controller - and remove it.
Now check Hide DS4 Controller and reconnect the device according to the instructions above. Everything should work.
What to do if the gamepad is not configurable?
Of course, there is a possibility that all of the above methods will not help you. Unfortunately, this only means one thing - the gamepad is faulty. All that remains is to take it to the store and demand the money back or exchange the device for another.
It is recommended to purchase a gamepad from XBox. Although it is expensive, it is easy to set up: the gamer only needs to connect it to the PC, launch the game and enjoy the process.
So you have learned how to set up a gamepad. PC games, of course, are controlled using a keyboard and mouse, but it is much more convenient to lie down on the couch and, picking up a joystick, enjoy your favorite activity.
Why doesn't the joystick connect to the computer?
There are situations when controllers are not recognized and do not connect. This happens quite rarely, in which case it is necessary to know exactly the cause in order to eliminate it in a timely manner. Most often the problem is the following:
- Lack of drivers on the equipment or outdated software version.
- Damage to the controller or the wire used for connection. Damage to the USB connector.
- In the case of wireless communication, the reason may be incorrect synchronization.
- Software infection by virus programs.
Slow operation of the equipment is also possible. If you did everything correctly and the gamepad becomes visible to the computer, but all actions are performed with a delay, most likely there are problems of the following nature:
- System overload with a large number of running programs and applications.
- Outdated software and drivers.
- The presence of a malicious program that slows down the operation of the entire system.
- The gamepad is not designed to work on a PC.
Connect your equipment correctly and enjoy the gaming experience of computer games with convenient controls used in consoles.
Subscribe to our Social networks