As part of this review, an algorithm will be described on how to connect the drive to the motherboard. In addition to this, a list of necessary tools for its implementation will be indicated. A list of communication interfaces that can be used to implement this operation will also be provided. This material is of greatest interest to novice computer specialists who want to install, connect and configure a CD-ROM reader on their own.
Types of interfaces
Before connecting the drive to the motherboard, let's look at the ports that can be used for these purposes.
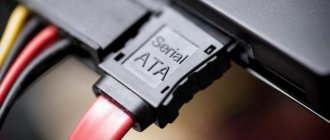
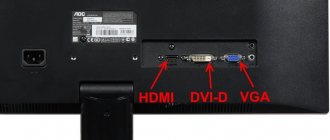
On older computers, the IDE port is used. It has 80 pins. This interface is used to connect between the motherboard and the drive. The second possible option, which is already found on modern PCs, is the SATA connector. It also connects the motherboard and the CD reader or writer.
Also, in all cases, you need to connect the connector from the power supply. Without it, such a device will not be able to function.
Connecting the installed drive to the motherboard
Let's first consider the option with IDE
- Unpack the supplied cable from the drive. If you already have one, use it, and if you don’t have your own or a complete one, then buy a new one along with the drive.
- Make sure your power supply has IDE (MOLEX) power connectors. If there are no free connectors, ask the store for a splitter or adapter with SATA connectors (however, this is rarely found in nature). Power adapter with SATA
- Connect the drive to the motherboard using a cable. Observe the connector keys during installation. We connect the drive to the motherboard using a cable
Note! The standard IDE cable is divided into three sections. The central one is offset from the center. The outermost connector, from which the distance to the middle one is greater, is inserted into the motherboard, and the other into the disk drive. If there are two drives, both connectors, the distance between which is the smallest, are used in the drives in series.
- Connect power to the drive. Connect power to the drive
- Turn on the computer, then check for the disk drive in the BIOS. You can find the information you need either on the main tab (“Main” or “General”), where all connected devices are described, or on the “Boot” tab. We find information about the drive on the main tab “Main” or “General”, or in the “Boot” tab
Note! Here we consider the option of connecting to a more or less modern motherboard. But this can also cause problems.
IDE is an old format with its own configuration rules. The loop involves the installation of two devices, so it turns out that one device is always the master (“Master”), and the other is always the slave (“Slave”). This may be the problem if the connected drive is not detected. To eliminate it, check the position of the jumper on the back of the drive. Pay attention to the screenshot.
Checking the position of the jumper on the back of the drive
Universal case: if you have only one disk drive on the cable and it is connected with the outermost connector, then put the jumper in the left position (“Cable Select”, or auto-detection of the connection type). If there are two disk drives or devices in general on the cable, then the jumper should take a position based on the position of the device: if the outermost connector is “Master,” that is, the right position, if the middle one is “Slave,” that is, the middle position. However, IDE motherboards have been around for a very long time, so they can easily not meet the standards. In this case, there is only one piece of advice - refer to the instructions.
- The cheapest way to connect an IDE device to the motherboard
Now an option with SATA
- In addition to the supplied cable, you most likely need a MOLEX - SATA adapter (power supply for SATA devices has the same name for versatility). Check the availability of such power in your system unit and, if necessary, purchase the required adapter. MOLEX to SATA adapter
- Connect the motherboard to the drive in the same way and connect the power. There are no subtleties here: the SATA cable has only two connectors. Connect the motherboard to the drive, connect the power
- Turn on your computer. Check again for the presence of the disk drive in the BIOS, as described in the previous paragraph. Ready!
All that remains is to close the side covers, tighten their mounting screws and start using the computer. Ready!
Video - Connecting (installing, replacing) a PC drive
As part of this review, an algorithm will be described on how to connect the drive to the motherboard. In addition to this, a list of necessary tools for its implementation will be indicated. A list of communication interfaces that can be used to implement this operation will also be provided. This material is of greatest interest to novice computer specialists who want to install, connect and configure a CD-ROM reader on their own.
What do you need?
The first step in this operation is to find out what motherboard is on the computer. There are three ways to clarify this information. One of them is studying the documentation for the computer. If for some reason it has not been preserved, then you can disassemble the case and look at the markings on the board. Then download the documentation from the World Wide Web. Another method is based on the use of diagnostic programs. The most important information in this case is the type of ports for connecting to drives and drives. As previously noted, either SATA ports or IDE connectors are used for these purposes. It is based on the type of interface used that you need to choose such a device. And therefore, the answer to a question like “what motherboard do I have installed in my PC” is really important to know.
When disassembling the PC and installing the drive, you will need a set of screwdrivers. You will also need an interface cord at this stage. Moreover, in the case of an old PC, an IDE cable is needed. If you plan to install the drive in a new system unit, then you will already need a SATA cable.
In addition, you need to pay attention to the power supply. It must have a free connector. Moreover, one that would be suitable for connecting a disk drive.
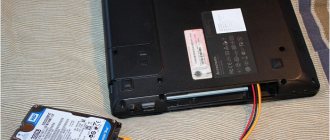
Transferring a PC drive to a laptop and vice versa
There are situations when you need to use a disk drive, but your PC doesn’t have one (or it’s on your desktop computer, but not on your laptop). There are two ways to do this. The first is the most difficult, requiring a complete understanding of what is planned to be done, mastery of a soldering iron and radio engineering knowledge. The procedure itself involves remelting the contacts and many other nuances. We will not consider this method because of its complexity and, often, inexpediency in terms of “force expended / final result.” The second method is to buy an adapter. In the relevant stores there is a large number of adapters for every taste: The procedure for connecting disk drives is absolutely identical to that described earlier. SATA plugs are inserted into specially designated places on the motherboard. They are indicated by text on the board - USB plug to USB port, etc. Drives from a laptop are much smaller than standard ones for a PC, so inside the system unit they need to be placed lower, in narrower spaces (in the same place where the hard drive is, for example). But if you can’t fix the drive or the cable from the adapter is too short, then the device must be placed next to the computer case. As an example, let’s look at the diagram for connecting an IDE drive from a laptop to a computer via a SATA adapter: From this moment on, the drive from a laptop is fully functional when connected to the computer . If you use a SATA/USB adapter, you do not need to connect power. The current in the USB connector is completely enough to operate the device. To find out, check the documentation for the drive (if available). The exact same method works when connecting a computer drive to a laptop (this is where a USB adapter is often used). This rule also applies to external drives. Connecting a drive is not at all difficult, although it may seem a little confusing at first. All connectors are labeled, and it is unlikely that you can connect the device incorrectly without breaking something in the process. Follow safety precautions when turning off the power, and otherwise there will be no difficulties.
The disk drive, until recently a mandatory element in any computer, is today losing ground to flash drives and retiring. Manufacturers have caught on to this trend and are now happy to follow it, refusing to install a drive in computers and laptops. But what if you need a disk drive? This is discussed in our article.
How to connect a disk drive to a computer
Disassembling the PC case. First stage
Before connecting the drive to the motherboard, it is necessary to disassemble the system unit case in the off state. To do this, disconnect the power cord. Next, unscrew the screws on the back of the case that secure the side walls. Then the latter are pulled back and dismantled. And on both sides.
After this, it is recommended to dry clean the PC case. No matter how long it is in use, dust still collects inside it. Therefore, its removal from the internal parts of the PC is a prerequisite for its long-term and reliable operation.
Connecting the data cable
For different brands - Gigabyte, Msi, Asus and less popular ones, as well as for different form factors, the number and location of CATA ports for connecting components may differ. As a rule, they are located in the lower right corner of the motherboard, but this is not at all an axiom.
The main difficulty when installing the drive is to position it so that the power cable from the power supply reaches it, and the date cable, in turn, reaches the motherboard.
This is especially true when assembling a PC in a BigTower case - the distance between the compartments there is significantly greater than that of “medium towers”, and accordingly the length of the cable may not be enough. I recommend buying trains of increased length.
As I wrote earlier, a hard drive is always connected to SATA port number 0 (and if it is not there, then 1). The drive can be connected to the next free one.
To increase the aesthetics of the inside of the computer, especially if you are assembling it in a case with a transparent side cover, the date cables from the hard drive and floppy drive can be wound in a spiral before connecting to the motherboard - this way they take up less space and look unusual.
The final touch is before installing the operating system, check in the BIOS settings whether the drive is designated as the main boot device. If this is the case, you should change the settings: the main one should be a hard drive with the OS installed on it.
As you can see, this assembly stage also did not cause us any difficulties and we can move on. I also advise you to read how to connect a cooler to the motherboard if there are no free connectors and how to connect a sound card to the motherboard. You can learn more about installing a video card on your computer here.
That's all for today. Don't forget to subscribe to the newsletter and share my posts on social networks. Till tomorrow!
Mounting the drive
Before connecting the drive to the motherboard, you need to install it in the system unit case. For this purpose, there is a slot inside the system unit in the 5.25” form factor into which installation will be carried out. Again, there are two things to consider in this case. The first of them comes down to ensuring that after installation the drive does not restrict access to other elements of the computer system, for example, a video card or RAM. The second condition is the possibility of output to the front panel of the case.
Once the required slot for installation has been selected, carefully remove its front plug. Then, through the front panel, we install a disc reader or writer. Next, we fix the device using screws. It is recommended to use four of these fastening elements. This will eliminate the possible occurrence of vibration while using the drive.
Installing a new drive in the system unit
In addition to a screwdriver, you may need pliers.
On a note! If you replaced the drive and followed the previous step to remove the old one, then you have already prepared everything for installation.
Now we will look at what to do if you want to install a disk drive in a new computer that has never had one, or want to install a second disk drive in addition to the old one.
- Using the instructions from the previous paragraph, open the system unit and remove the front panel.
- Carefully remove one of the plugs for five-inch devices from the front panel. Be careful not to break the grooves, as it may come in handy in the future if you want to get rid of the drive. Carefully remove one of the plugs for five-inch devices from the front panel
- Using pliers, break out the metal plate opposite the selected plug on the front panel. The plate will definitely not be useful anymore, so just break it out. Can be bent. Using pliers, break out the metal plate opposite the selected plug on the front panel
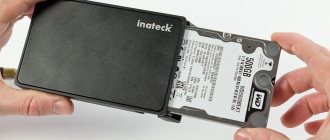
- Remove the new drive from its antistatic packaging. Remove all shipping stickers. Carefully insert the drive into its place in the system unit. Insert the drive into its place in the system unit
Note! It would be nice to find complete bolts from the system unit, but there are none; buy four or eight bolts together with the drive to secure it.
- Secure the drive with screws. Watch its position: it is important that it fits neatly with the front panel. One way or another, its position can be adjusted later. We fasten the drive with screws to the system unit
- Reinstall the front panel. If the drive does not align with it, loosen the screws and slide it into position. Tighten the screws.
Drive commutation
The next important step is connecting an optical disc reader or writer.
In this case, it is necessary to take into account one feature of the organization of outdated disk systems based on the IDE interface. One loop can have up to two drives. One of them works in Master mode, and the second - Slave. If there are two such devices on one cable, then we clarify the settings of the previously connected drive. Typically, it functions as a Master. Then use jumpers to switch the second one to Slave mode or vice versa.
Next, using a SATA cable (in new computers) or an IDE cable (in older PC versions), we connect the motherboard and the optical drive. Again, the type of connection, as previously noted, is determined using documentation from the Internet. That is, we use the appropriate cable to connect the drive to the motherboard.
Then we also connect the connector from the power supply to the connected drive.
There is no need to use force when switching. That is, all connectors should be easily installed in the connection sockets. Therefore, we pay attention to the shape of both the first and second. Each of them has a special “key”. When switching, their location must coincide. This protects equipment from incorrect switching. Due to this, the connector of the power cable or interface cord should easily fit into the optical drive socket. So, under no circumstances do we use significant force that could damage one of the components of the personal computer.
Connection diagram of the drive to the PC
Before directly connecting the drive, you should turn off the computer's power. You can unplug the plug from the socket, but it is more correct to turn off the power supply to the system unit itself. This is done here:
It is not necessary to deprive your computer of power, but it is recommended to avoid electric shock. Usually this does not happen, but if the drive has a manufacturing defect, or under other conditions, the consequences can be very dangerous. It would be useful to protect yourself from force majeure circumstances. There is a plug on the back wall of the system unit (in the upper left corner). You need to pull it out and the power will disappear. It is impossible to mix up the plugs: they go directly to the power supply. After turning off the computer, you can start connecting the drive:
- Remove the two side covers from the system unit case. This must be done because the drive is secured on both sides. To do this, you need to unscrew the bolts on the back of the housing:
Then, carefully, pressing lightly, the lid is pushed back and removed from the fastenings. After this, access to the drive is open, and the process of connecting it begins. - If there is no drive at all (old), skip this step. If one is present, it must be disconnected, pulled out and replaced with a new one. All cables that connect the device to the motherboard must be disconnected. It is quite enough to disconnect them on one side, from the drive, and then remove the drive itself from the mounts:
- Finally, when there is free space, you should start connecting the new drive. You need to start with its location and securing it in the case. Place the drive outside the system unit, on the front side of the case, and carefully push it inside until it stops:
Next, according to the previous photo, tighten the holders. These can be either ordinary bolts or more sophisticated methods of fixing the device. Their essence, however, is the same - to firmly hold the drive in the system unit case. These can be screw-on valves, a latch, etc. After fixing the device, connect the wires correctly:
The thin and red cable is SATA and controls the device. The wider one is the power cable. You won’t be able to insert them the wrong way, so just carefully connect the plugs, and if it doesn’t come out, try turning them 180°. Often, there are no problems with this, the main thing is not to use too much force. Do everything smoothly to avoid damage. The SATA cable is connected to the required connector on the motherboard (it is labeled SATA):
Well, the drive’s power cable does not need to be connected anywhere, since it initially comes directly from the power supply:
Ultimately, the system unit case is closed with covers; they are secured with bolts at the back. After all these steps, the drive installation process is considered complete. The external drive is connected to the computer in the same way, but remains outside the case. In fact, that’s why it’s called an external drive. - The floppy drive (for floppy disks) is connected in an absolutely identical way. Of course, it is not held in high esteem, but some manufacturers have left support for this type of device. It is worth considering specific details during the connection process. For example, you need to connect such a drive with the following plug (Molex connector) from the power supply:
And the device is connected to the motherboard (the connector is designated IDE) exclusively with an FDD cable:
It will not be possible to connect any other one, because the device will not work.
You can also use special adapters, but the cost of purchasing it very rarely pays for itself. This video shows how to connect the drive. This does not take into account the connection of wires, but this does not require special knowledge. The main problem arises during the physical installation of the device.
Housing assembly
Next, we check again that the optical drive is installed and connected correctly. After this, install the side covers of the system unit case. It is impossible to confuse them in places. One of them has holes and is installed on the side of the processor fan, and the second does not, and is mounted on the side of the motherboard. These metal covers are then secured with screws. The PC case is installed at the place of permanent use and the appropriate cable is connected to its power connector.
Enabling and setting
At the final stage, it is recommended to check the functionality of the optical drive. To do this, turn on the personal computer. After this, you must wait for it to finish loading. A message will appear indicating that new equipment has been found, and it will be automatically configured. That is, the necessary drivers will be installed. At the end of this stage, it is recommended to insert a disk into the drive and make sure that information is read from it, for example, some kind of multimedia file will be played.
Connecting a drive via BIOS
If you are sure that you connected the drive completely correctly, but the system did not recognize it automatically, the problem may be in the BIOS. In order to get into it, you need to press certain keys while loading the operating system. Often this is the DEL key on the keyboard, but depending on the BIOS version, computer configuration, etc. it may vary. When you boot your computer, the message “Press X to enter setup” may appear in the lower corners. It is the button that will be indicated instead of “X” that must be pressed to get into the BIOS system. Next, you need to find the appropriate section, using the arrows to navigate and confirming the selection with Enter: Inside this section you should find the name of your drive. If Disabled is written next to it, you need to change the value to Enabled. After this, the device will be recognized by the system and will work. If no changes are made, then either the device itself is faulty (manufacturer’s defect or damage due to operation), or you connected it incorrectly.