What is this?
While studying models of personal computers, you have repeatedly encountered this interface. Not everyone knows why it is needed and why it is important. Even abstruse definitions on the Internet do not always provide an accurate understanding of the term. After all, hardly everyone understands what a serial interface is, and not everyone even understands information storage devices.
To make it easier, it’s worth saying right away that SATA “grew” from another format - ATA, and owes its name to it. This interface, or, more simply put, a connector, has a serial information transmission system. This means that data is transmitted 1 bit per certain period of time. In this case, blocks of information go one after another along one channel.
The SATA cable works in tandem with the storage device. Usually this means a hard drive. You bought a hard drive and want to install it on the system. To do this, you need to get a cable of this format and connect the drive to the motherboard.
Connecting the hard drive inside the case to SAS connectors
These connectors are backward compatible, that is, SATA can be connected to SAS, but SAS cannot be connected to SATA.
Step 1. Install the hard drive into a special structure (sled) of the appropriate size.
On a note! The designs are designed for certain form factors, that is, inserting a 2.5-inch drive into the controller cage of 3.5-inch hard drives will not work.
We install the hard drive in a special structure (sled) of the appropriate size
Step 2. Insert the slide into the controller basket and push until the slide handle locks in the desired position.
Insert the slide into the controller basket and push it until the handle locks.
Important! Don't forget to check the connection of the RAID cable to the motherboard and change the settings of your controller.
Check the connection of the RAID cable to the motherboard and change the settings of your controller
Predecessor
Before we further understand our interface, we will find out what was special about its previous version. ATA performed the same function as SATA, but in a different way. Unlike the previous interface, it worked with parallel information transfer. As a result, data transmission and reception were carried out simultaneously.
But it still functioned in tandem with storage devices, including a hard drive or optical drive. After SATA grew from ATA, they decided to rename the first interface to PATA (Parallel ATA).
Consequences of switching to AHCI mode for Windows operation
So, you can change the IDE mode to AHCI at any time in the BIOS settings. But for Windows, such a move will not result in a slight delay at startup due to the automatic installation of the necessary drivers, as when replacing some computer components. In this case, even getting rid of the connection to computer components using the standard Windows Sysprep utility, as is the case with replacing the motherboard or processor, will not help. Changing the IDE mode to AHCI leads to serious consequences - Windows simply will not start again. As a result, we will get either a blue screen of death or a cyclic reboot of Windows with a notification that the system has not started correctly.
The fact is that IDE and AHCI modes when installing Windows are registered at the registry level. To operate hard drives in AHCI mode, a special driver is required, which is automatically installed with versions of Windows starting with Vista. Since the AHCI mode appeared later than Windows XP, the AHCI driver must first be integrated into the distribution of this version of the system, taken from the motherboard driver disk or downloaded from the Internet.
Ideally, switching to AHCI mode should be done before installing or reinstalling Windows. But there are ways to activate AHCI without having to reinstall Windows - by starting safe mode or editing the system registry. Below we will consider these methods for versions of Windows 7, 8.1 and 10.
Peculiarities
The SATA cable for a hard drive has its own characteristics. It is represented by a 7-pin connector. Unlike the previous one, it has become several times smaller. ATA used as many as 40 holes. The advantage of the new product was its small area. When connected, it takes up little space, and therefore does not block the air flow for cooling other components. Wiring has become simplified.
The shape of the new interface allows multiple cable connections. The power cord has also become stronger. Power flows through three channels: +3.3 V, +5 V and +12 V. Among modern devices that support this format, there are those that work directly with the SATA connector, and there are also those that support Molex.
Another difference from the previous format was easier connection. Now one device can be connected to one loop, and not two, as before. Now several devices can work simultaneously without delays or interruptions. The problem with a large number of cables and wires has also disappeared.
Contacts
The SATA cable for devices must have both a 7-pin connection and a 15-pin connection for power. There is an option to use a 4-pin connector from Molex instead of the 15-pin one. But it is worth remembering that if you connect both cables to power, the hard drive will most likely burn out. The interface operates on two-channel transmission. Low-voltage differential signaling technology allows data to be transmitted at high frequencies but using low-cost connections.
There is also a 13-pin connector. It is used in servers or small devices that use thin storage devices. It is combined and consists of two parts: a seven-pin one for the data bus and a six-pin one for power supply.
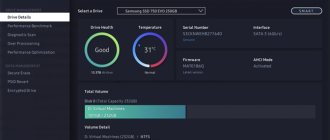
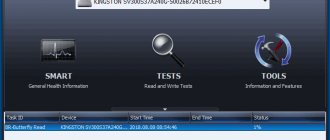
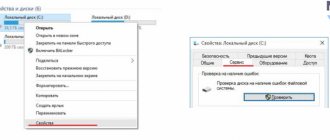
How to find out which mode - IDE or AHCI - is currently installed
You can find out which mode - IDE or AHCI - is currently active on your computer in Windows Device Manager. Expanding the thread:
- “IDE ATA/ATAPI controllers” in Windows versions 8.1 and 10;
- "IDE ATA/ATAPI controllers" in Windows 7.
If your computer's hard drives are connected via AHCI mode, the list of devices will include a SATA AHCI controller.
If IDE mode is active on the computer, the list of branches will contain an entry, respectively, about the IDE controller.
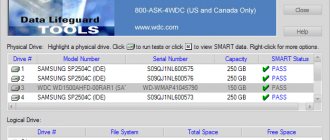
An alternative way is to use the AS SSD Benchmark utility to test the speed of hard drives. If hard drives can operate in AHCI mode, but the BIOS is set to IDE, the utility will notify you of this with the red value “pciide BAD”.
If the computer is running in AHCI mode, in the utility window we will see the green value “storahci - Ok”.
These two methods will make it possible to understand which mode is currently installed. But to determine whether support for AHCI mode is implemented in the BIOS, you need to enter it and find the option to enable AHCI. The selection of SATA operating modes in different BIOS versions may be located in the “Advanced” or “Main” sections. For example, in the BIOS UEFI of the Asus motherboard, this is the “Advanced” section, in it you need to enter the “SATA Configuration” subsection and expand the options for the “SATA Mode” parameter.
Another example is the BIOS AMI (V17.9) of the MSI motherboard, here everything is more complicated, and not everyone will be able to immediately figure out where the AHCI setting is. In the “Integrated Peripherals” section, you must select the “On-Chip ATA Devices” subsection, and in it – “Raid Mode”, which provides a choice of hard drive connection modes.
First
Since the introduction of SATA cables, many varieties and variations have appeared. The first revision appeared in 2003. It operated at a frequency of 1.5 GHz and a throughput of 1.2 Gbit/s. The new product was almost no different from the previous ATA interface in terms of throughput parameters. Although serial exchange is somewhat slower than parallel exchange, due to the increase in high frequencies the parameters are comparable. And due to noise immunity and the need to synchronize channels, SATA wins.
Third
The third revision became the most complete and diverse. The SATA 3 cable was introduced in 2008. Throughput has doubled again. 6 Gbit/s were supplemented with improved power management. The developers have maintained compatibility with previous revisions not only regarding connecting connectors and cables, but also when working with exchange protocols.
After the main version there were more updates. So, a little later SATA Revision 3.1 appeared. It marked the introduction of cables for compact devices. mSATA for 2.5-inch SSDs has become known. Among the innovations were special technologies that were responsible for energy consumption, performance and other capabilities.
The SATA 3 cable of the second version was separately called Express. It was compatible with its “father” at the software level, but PCI Express became the carrier interface. The design has also changed in this revision. Now these are two SATA ports placed side by side in length. The speed has increased to 8 Gbit/s if you use only the first part of the connector, if you use both, then 16 Gbit/s.
Connecting a hard drive with a SATA interface
The SATA hard drive is connected using a narrow data cable shown in the figure.
We connect one end of this cable to the connector on the disk, and the other to the motherboard.
After connecting the data cable, connect the power cable (from the power supply) to the corresponding connector of the SATA drive
If your power supply does not have connectors for SATA devices, use an IDE/SATA power adapter. If the hard drive has two types of power connectors, SATA and MOLEX, connecting one of them is enough.
All. We have a hard drive with a SATA interface connected.
How to connect a hard drive via SATA video:
Connecting an IDE hard drive
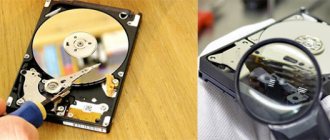
When connecting an IDE disk, first of all you need to set its operating mode: MASTER (master) or SLAVE (slave). Since we are installing one hard drive, we need to set the MASTER mode. The mode is determined by the position of the jumper on the back of the disk.
The figure on top of the hard drive shows which position to install the jumper to make it work as MASTER.
This is what the IDE connectors on the motherboard look like for connecting IDE drives and other IDE devices.
Devices are connected using an IDE cable (cable).
We take the end of a longer segment of the cable and connect it to the connector on the motherboard. Since we have one hard drive, the cable should be connected to the first IDE channel (on the motherboard there is usually a designation - IDE 0 Primary and IDE 1 Secondary).
Now we connect the cable to the hard drive. The connector located at the end of a short section of the cable is always connected to MASTER.
That's all. We took a step-by-step look at how to correctly connect a new hard drive via SATA, as well as a hard drive with an old IDE connector. By following these instructions, you can also additionally connect a second hard drive to your computer. If the hard drive is new or transferred from another computer, then the following all necessary procedures for setting it up will be performed during.
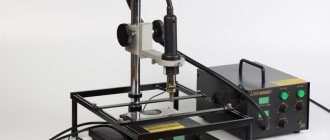
Before moving on to more professional hard drive diagnostic tools, I want to talk about some technical points, namely about connecting a hard drive to a computer, or more precisely, about connection options.
There is such a thing as a hard drive connection interface. In a simplified way, we can say that this is a way of connecting the hard drive and the motherboard, although in a broader sense it is also a way of interaction between the hard drive and the motherboard, because the concept of “interface” initially implies some method or way of interaction between someone (or something) then) with something.
If we go into a little more detail, it is worth saying that when transferring data in the computer world, protocols are used, that is, some rules for data transfer. Protocols are also an integral part of the interface.
Well, we, as ordinary users, have no need to know all these rules and subtleties of data transfer. Therefore, we will be interested only in the physical component of the interface - the cable connecting the hard drive to the computer. You can often hear another term instead of the word “cable”, they say - a cable connecting the hard drive to the motherboard.
Since there are currently several interfaces, the loops are somewhat different.
Let's look at the currently most popular interfaces.
And I'll start with the already outdated IDE
. I hesitated whether it was worth telling about it or not and decided that it was worth it, since it can still be found in fairly old computers.
IDE interface
(
Integrated Drive Electronics
- “electronics built into the drive”) appeared back in the 86th year of the last century and in the 90s it was the main standard for connecting hard drives and optical drives to a computer. Currently, new hard drives are no longer equipped with it.
The IDE cable looks like this:
As you can see from the photo, it has three connectors (although there may be two) and it allows you to simultaneously connect up to two devices to one connector on the motherboard.
Since two devices of the same type are connected to the computer via one cable, there must be a mechanism to determine which of the devices will exchange information with the computer at one time or another.
Master appeared
and
Slave
, which in this case can be translated as “Leader” and “Slave”. The connectors on an IDE cable usually have different colors, so it’s not difficult to understand what to connect to what:
If you have only one hard drive in your computer, as well as an optical drive (CD, DVD), then you can connect them like this - the hard drive as Master
, and the disk drive as
a Slave
on the same cable. Then the cable is connected to the motherboard to a special connector, of which there are usually two:
On the motherboard, the connectors are designated IDE1 and IDE2. That is, four devices can be connected to such connectors - two for each.
To ensure that the cable is always connected correctly, a groove is made in the connector on the motherboard, and on the cable connector, accordingly, there is a casting, which is called a cable key.
That is why you cannot confuse anything when connecting the hard drive to the computer.
IDE interface
also called
ATA
(
Advanced Technology Attachment
- advanced connection technology) and this interface had several variations, including design ones - the cable was 40 and 80 wires, and the data transfer rate varied among different standards and was 100 for the most recent ones -133 megabytes per second, although this was the maximum data transfer speed, in fact it was significantly less. In addition, when two devices are connected to one loop, the speed is divided between the devices.
In addition to the rather low data transfer speed of the IDE
there is another disadvantage - bulky cables, which are difficult to manipulate in a small case. Also, the length of the cable is limited to 46 cm, so it is not always convenient to use one cable to connect two devices, and the use of a second cable only aggravates the ventilation situation in a case already stuffed with wires.
To connect a hard drive or optical drive with an IDE interface, follow these steps: You need to decide whether the device connected to the computer will be Master or Slave, then select the appropriate connector on the cable and connect it to the device. In this case, you must ensure that the cable key is correctly aligned with the groove in the device connector, otherwise you may damage (bend) the pins (contacts) on the device or motherboard. After the connector is inserted, you should “push” it with a little force over the entire area to make sure that the connector is installed evenly and completely. Then the power cable is connected.
You can also control the priority of devices connected to the same cable using the devices themselves. The fact is that all devices connected via the IDE connector have another block of connectors.
Using special jumpers (jumpers), you can make the device either a master or a slave.
The jumper connection diagram is usually present on the hard drive case (on a sticker) and it may differ for different models.
The latest models of IDE hard drives did not come with jumpers, and this mode (without jumpers) was called Cable Select
, that is, priority is determined automatically, depending on which connector on the cable the device is connected to. But you can always use the jumper to set the priority on the device itself.
On this one with the IDE
I’m finishing up, and in the next video I’ll talk about the
SATA
.
Computer equipment has long ceased to be a curiosity; almost everyone has it in stock. The only difference is the nature of use: some users actively use the equipment, downloading movies, games and music onto it, while others use an electronic computer when they want to view the latest news on the World Wide Web or do some homework.
At certain times it is necessary to replace outdated components
In this regard, the load level of the hard drive also differs. If there is very little free space left, then you should not expect normal performance from your PC at all. Given these circumstances, many owners decide to purchase a second “screw”, thereby increasing disk space. However, it is very important to first find out how to connect the hard drive to the computer.
Finding information on the Internet on how to connect a hard drive to a computer is not difficult. It is only important to carefully read all the recommendations, and then no problems will arise if the user independently installs an additional hard drive, while leaving the old one in the same place.
An old hard drive must be removed only if it has become completely unusable and cannot be restored. By installing a second hard drive along with the old one, the user receives expanded space, thanks to which all actions will be performed faster.
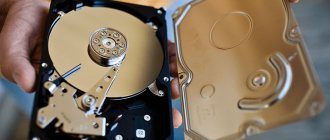
Installation in a PC case
Connecting a hard drive to a computer begins with the step where the user must initially place it in the case and securely fasten it.
To ensure that the “screw” is inserted correctly, you should first remove the cover from the system unit case. In the front part you can easily find special compartments designed for drives and hard drives. The drives are located at the top, and the second hard drive should be located at the bottom of such bays.
The hard drive is inserted into any free compartment, but preferably at a short distance from the existing one. This is very important, since during operation they both heat up, which will adversely affect the performance of the PC.
Then the second hard drive is inserted strictly along the guides so that the connectors are directed towards the inside of the system unit to ensure its comfortable connection in the future. When the new hard drive has taken its correct position, it should be securely fastened by tightening the screws on both sides, ensuring a tight connection with the compartment.
After fastening, you should check the strength by trying to loosen it. If the hard drive does not wobble, it means that all actions were performed correctly.
Connection using cables
Once you have successfully connected the second hard drive to your computer, you can move on to the second part of these important steps. At this stage, you should connect the second hard drive directly to the motherboard, and also ensure that power is supplied to it.
To do this, you will need to purchase additional cables. By the way, it is advisable to note that the connectors through which the hard drive is directly connected may differ, depending on the year of manufacture of the PC.
The old computer is equipped with IDE connectors, while the new one already has SATA connectors, which are characterized by amazing performance. Previously, users were instructed to pay attention to the connectors when making a purchase and to purchase only a hard drive with the desired type. Currently, finding a hard drive with an IDE connector on sale is problematic, but this does not mean that there is no hope of installing a second drive. It’s just that in this case the user is required to additionally purchase special adapters.
By connecting the second hard drive using SATA connectors and adapters, the owner of a smart machine not only ensures system performance, but also facilitates the installation process.
When installing an old hard drive with an IDE connector a few years ago, it was necessary to manually configure the operating mode of the “screws,” which involved installing jumpers in certain positions.
Connecting using SATA connectors is much easier. All connectors on the new equipment are equipped with special partitions, so it is a priori impossible to connect a second hard drive incorrectly.
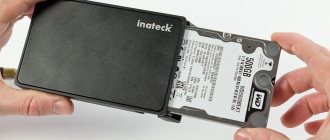
USB connection
There is another alternative method that provides absolutely easy connection of new disk space, while completely eliminating the need to disassemble the system unit case.
In this regard, many people want to know how to connect an additional hard drive to a computer without experiencing any additional difficulties. The answer is obvious; the second hard “screw” can be connected to an electronic computer using a USB device.
Such hard drives receive power via the USB connector to which it is directly connected. However, this is typical only for disks measuring 1.8 or 2.5 inches. More powerful ones, for example, starting from 3.5 inches, already require an additional power source.
External devices are very easy to connect, which is why they are preferred by a large number of users.
Hot swap
In parallel with SATA, eSATA was also formed. He became famous in 2004. Worked with connecting external devices and “hot swap” mode. This mode is the ability to disconnect or connect the device while the system is running without having to turn off the power.
The connectors have become more sophisticated, less fragile and resistant to repeated disconnection or connection. The modification is physically incompatible with regular SATA, but is signal synchronized, albeit with different signal levels. For connection, a data bus and a power cable are required. The option has become longer by a meter - 2 m. To ensure that the signal level remains the same, the transmission level has been increased.