Today, a webcam is a fairly popular tool for communicating with other people. It is accessible to everyone and quite easy to use, but problems can occur with any device that need to be corrected in a timely manner.
Reference! According to statistics, the equipment itself breaks down quite rarely; the problem lies in the incorrect operation of the drivers. First of all, the user must do all the steps related to bringing them back to normal.
The computer does not see the webcam via USB, what should I do?
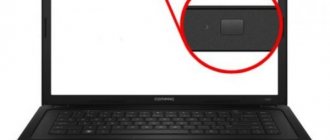
This device is built into laptops and netbooks by default; if you have an old PC, you need to check whether this camera is turned on. It is likely that it is turned off or blocked. This problem can be solved very simply. It is enough to press “Fn” + “F12” simultaneously. Instead of “F12”, you can use “F1” or other variations of “F”, since this key depends on the components of the computer, often on the version of the motherboard.
Press the “Fn” + “F12” keys simultaneously
Also, before you start fixing the drivers, it is important to remember all the actions that were performed before the problem. It is likely that the user updated the system to a more modern version, or there was mechanical damage. All these factors must be taken into account.
How to connect a webcam via USB
This is very simple to do: you need to take the cable and insert the connector into a special socket in the system unit. It usually looks the same as in the photo below.
We connect the cable with the USB connector to the USB port of the system unit or laptop
Reference! It is important to remember that cameras can be connected via either USB 2.0 or USB 3.0. This suggests that the first device will not conflict with any channel, but the second only needs the appropriate protocol. If there is no USB 3.0 support on the motherboard, you will not be able to connect.
Why might my computer not see my webcam?
The problem is either with the computer itself or with the webcam.
The only option for checking the serviceability of the latter is to try to connect it to another computer. As for computer malfunctions, if after checking the USB ports by connecting other gadgets it turns out that everything is fine with them, the problem most likely comes down to a lack of drivers. Note!
The instructions remain relevant for all currently popular versions of the operating system: from XP to Windows 10. Minor differences may only be present in the names of some navigation items.
The situation with drivers is as follows:
• the operating system initially contains many drivers for a wide variety of devices; • after connecting the webcam to the computer (the first, as you know, is a “plug and play” device), the system reads information about it and installs drivers on its own; • after successful installation of the drivers, the webcam starts working in normal mode.
However, in some situations the described “scenario” fails. This usually happens when a user tries to connect a webcam from a little-known manufacturer to a computer, or when problems are discovered in the system itself.
There is only one solution: you need to install the drivers yourself. To do this, you need to go to the official website of the device manufacturer, find the driver for the webcam in the support section (usually there is an individual number on the box or in the instructions that allows you to quickly search) and download the suggested files. If the webcam comes with a disc, you won't have to do any of this. The work is completed by installing the drivers. To do this, the user needs to either run the file downloaded from the official website, or insert the disk from the kit and follow further instructions from the system.
Helpful advice!
To prevent incompatibility issues, install drivers before connecting the webcam to your computer.
If installing the necessary software did not change the situation for the better, there is a high probability that the webcam is faulty. Preliminarily inspect its body for the presence of various switches and buttons - if there are any, turn them on and watch for changes. If this does not help, all that remains is to return the webcam for repairs or return it to the seller.
The computer does not see the camera, what should I do?
If we take statistics on problems with PCs, then users have a lot of questions when connecting various devices to the computer: flash drives, external hard drives, cameras, TVs, etc. The reasons why the computer does not recognize this or that device may be a lot of…
In this article I want to look in more detail at the reasons (which, by the way, I have often encountered myself) why the computer does not see the camera, as well as what to do and how to restore the functionality of the devices in one case or another. So, let's begin…
Connection wire and USB ports
The first and most important thing I recommend doing is checking 2 things:
1. USB cable with which you connect the camera to the computer;
2. USB port into which you insert the wire.
This is very easy to do: you can connect, for example, a flash drive to the USB port - and it will immediately become clear whether it works. The wire can be easily checked by connecting a telephone (or other device) through it. It often happens on desktop PCs that there are no USB ports connected on the front panel, so you need to connect the camera to the USB ports on the rear wall of the system unit.
In general, no matter how trivial this may sound, until you check and make sure that both are working, there is no point in “digging” further.
Camera battery/accumulator
When purchasing a new camera, the battery or accumulator included in the kit is not always charged. Many, by the way, when they turn on the camera for the first time (inserting a dead battery), they generally think that they bought a broken device, because... it won't turn on or work. An acquaintance who works with similar equipment regularly tells me about such cases.
If the camera does not turn on (it does not matter whether it is connected to the PC or not), check the battery charge. For example, Canon chargers even have special LEDs (light bulbs) - when you insert the battery and connect the device to the network, you will immediately see a red or green light (red - the battery is low, green - the battery is ready for use).
The battery charge can also be monitored on the display of the camera itself.
Enabling/disabling the device
If you connect a camera that is not turned on to a computer, then absolutely nothing will happen, it’s the same as simply inserting a wire into a USB port to which nothing is connected (by the way, some camera models allow you to work with them when connected and without additional actions).
So, before you connect your camera to the USB port of your computer, turn it on! Sometimes, when the computer does not see it, it is useful to turn it off and on again (with the wire connected to the USB port).
As a rule, Windows after such a procedure (when connecting a new device for the first time) will inform you that it will be configured (new versions of Windows 7/8 install drivers automatically in most cases). After setting up the equipment, Windows will also notify you about it - all you have to do is start using it...
Drivers for the camera
Not always and not all versions of Windows are able to automatically detect the model of your camera and configure drivers for it. For example, if Windows 8 automatically configures access to a new device, then Windows XP is not always able to select a driver, especially for new equipment.
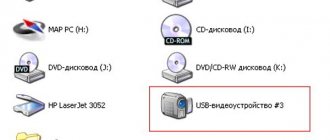
If your camera is connected to a computer, but the device is not displayed in “my computer” (as in the screenshot below), you need to go to the device manager and see if there are any yellow or red exclamation marks there.
How to access device manager?
1) Windows XP: Start—>Control Panel—>System. Next, select the “Hardware” section and click on the “Device Manager” button.
2) Windows 7/8: press the Win+X button combination, then select device manager from the list.
Carefully review all tabs in Device Manager. If you connected a camera, it should be displayed here! By the way, it is quite possible, just with a yellow icon (or red).
How to fix driver error?
The easiest way is to use the driver disk that came with your camera. If this is not the case, you can use the website of the manufacturer of your device.
Popular sites:
www.canon.ru/
www.nikon.ru/ru_RU/
www.sony.ru/
By the way, you might find driver update programs useful:
Viruses, antiviruses and file managers
Relatively recently, I myself encountered an unpleasant situation: the camera sees files (photos) on the SD card, but the computer, when you insert this flash card into the card reader, does not see it, as if there is not a single picture on it. What to do?
As it turned out later, it was a virus that blocked the display of files in Explorer. But the files could be viewed through some file commander (I use Total Commander - official website: wincmd.ru/)
In addition, it also happens that files on the camera’s SD card may simply be hidden (and such files are not displayed in Windows Explorer by default). To see hidden and system files in Total Commander you need to:
— click “configuration—>settings” in the top panel;
— then select the “Panel Contents” section and check the box next to “Show hidden/system files” (see screenshot below).
Antivirus and firewall may block the connection of the camera (sometimes this happens). I recommend turning them off during testing and setup. It would also be a good idea to disable the built-in firewall in Windows.
To disable the firewall, go to: Control Panel System and Security Windows Firewall, there is a disable function there, activate it.
And the last thing...
1) Check your computer with a third-party antivirus. For example, you can use my article about online antiviruses (no need to install anything):
2) To copy photos from a camera that cannot be seen by a PC, you can remove the SD card and connect it through the laptop/computer card reader (if you have one). If not, the price is several hundred rubles, it resembles an ordinary flash drive.
That's all for today, good luck to everyone!
Make sure your webcam is not disabled by other means
In the previous section, we looked at the main ways to disable a webcam on a computer device (personal computer, laptop, etc.) running the Windows 10 operating system.
.
In addition to the simple disabling options described, users can disable the webcam in the settings of the basic BIOS
or
UEFI
on some types of laptops.
This setting is more common in the system settings of business laptops because it allows enterprise system administrators to disable access to the webcam to improve security. And if the webcam in the system firmware “BIOS”
or
“UEFI”
was disabled, then you need to re-enable it in the corresponding section of the laptop system firmware settings.
It is also possible to disable the webcam in the Device Manager application.
.
Performing this operation will prevent the camera from fully functioning until the user turns it on again. If the user has disabled their webcam in this way, then they simply need to return to the “Device Manager”
and re-enable the video device.
Open the Device Manager
in
the Windows 10
you can do it in different ways.
For example, press the “Windows + X”
or right-click on the
“Start”
in the lower left corner of the desktop, and from the pop-up menu, select the
“Device Manager”
.
In the application window that opens, find the “Cameras”
, display a nested list of installed devices in the section (click on the black arrow to access the hidden list), right-click on the webcam name to open the context menu and select the
“Enable device”
.
The command will be executed instantly, the webcam will be turned on and completely ready for subsequent use.
Install or update webcam drivers
Service for installing and monitoring the performance of applications and connected devices of the Windows 10
tries to install drivers automatically whenever the user connects his device, and usually such actions are enough for its full functioning. But such an operation is not always successful and the device works properly. In some cases, you may need to download a new device driver installation package from the webcam manufacturer's official website and install it yourself.
First, the user can try to update existing camera drivers from the Device Manager application.
.
Use the algorithm described earlier and open the application, then right-click on the webcam and select the “Update driver”
.
If the problem persists, then go to the webcam manufacturer's website and download the latest driver package to update it manually. The manufacturer's website should also provide additional troubleshooting instructions for your specific webcam model.