Open the ISO file using standard Windows tools
Operating systems starting from versions 8.1 and 10 can open a file using standard tools, so you don’t need to use third-party utilities.
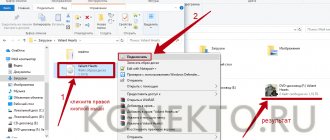
The procedure is as follows:
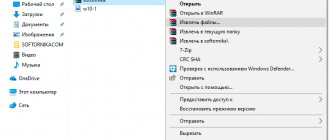
- Find the image in the folder;
- Right-click to open the context menu and select “Explorer”.
After this, the operating system will open the folder with the files that were placed in the Iso when mounted.
How is the program used?
The program also allows you to use images as separate virtual disks, optimize image structures to save space, create bootable disks, dual-mode bootable flash drives, and it is possible to extract sectors of floppy disks and hard disks. It’s easy to work with the program; the interface is organized in the style of Windows Explorer; even a novice user has no problems mastering the functionality. UltraISO is a file conversion, editing, file creation tool that allows you to directly edit image files on disks, extract folders and files from them, directly convert hard disk or DVD-ROM materials into ISO files. You can also work with downloadable ISO information to create your own downloadable DVDs. You can edit and create your own ISO files.
Using archivers
Archivers are programs for packaging and reading compressed files. They are typically used to reduce the size of data and to combine multiple files into one archive. But with their help you can also open the image. We will look at the two most popular and free archivers that are suitable for this task.
WinRAR
The program is easy to install and takes up almost no space on your hard drive.
It may even already be installed on your computer, since Winrar is often included in the initial package of operating system programs, as one of the most necessary. But if it is still not installed, you can download it from the official website. After installation you need to do the following:
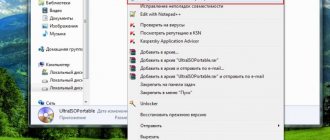
- Expand the context menu and select “Open in Winrar”.
- Find the installation file.
After unpacking the image through the archiver, you can see many files.
The file that will help you install a game or program is usually called “Setup” or “Launcher”. If this is not in the list, you need to find a file with the extension “.exe”. Using it you can already open the installation window. Download from the softportal: https://www.softportal.com/winrar.html
7-zip
This program has a simpler installation algorithm and integration than Winrar. It is not built into the operating system, so it can be easily removed if necessary. Here's how to open the image using 7-zip:
- In the context menu, select “7-zip”, and then “Open archive”;
- Find the installation file in the archive that opens.
Download from the softportal: https://www.softportal.com/7-zip.html
We use drive emulators
To open an ISO file on Windows, you can use emulators - programs that are specifically designed to create and read images. Let's look at the two most popular options with a free trial period that does not limit the necessary functionality for mounting.
Daemon Tools Lite
The program is one of the simplest but functional emulators.
We recommend using the “Lite” version, as it has a lightweight interface, but at the same time retains the necessary set of tools for work. The program can be downloaded for free from the developer's website. During installation, a section with settings and installation of new equipment may appear. We advise you to leave the default settings and be sure to agree to install drivers so that the program will work correctly in the future.
The algorithm is as follows:
- Open the program and find the “Disk Images” section;
- Select “Quick mount”;
- Add Iso;
- Complete the installation.
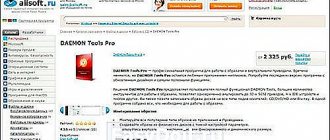
UltraIso
Some files have extensions other than ".iso" but are still images, such as ".mds" and ".isz".
The UltraIso utility is best suited for mounting such images. It has similar functionality to Daemon Tools, but works with many more extensions. The procedure is as follows:
- Open “Tools” in the top menu and select “Mount virtual drive”;
- Click on the icon with three dots;
- Open the desired image;
- Select “Mount”;
- Click on the magnifying glass icon;
- Find the installation file in the folder that opens.
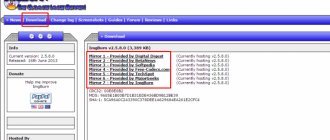
Download UltraISO for free
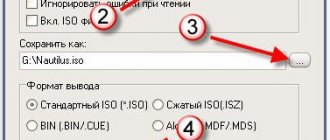
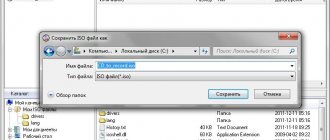
Download and install the program. In the UltraISO program, go to the “tools” section, select “create CD image”.
Then click the create button. A disk image with the operating system appears. From the created image we will make a bootable USB flash drive. Before creating a bootable flash drive, it must be formatted in FAT 32 format. The necessary data from the flash drive must be transferred before formatting. Go to the settings of the flash card and select the format section with the desired FAT 32.
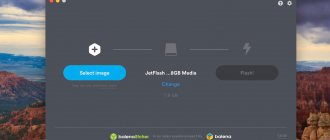
Then we select our flash drive, which we will make bootable. In the “image file” line, check again the path to the iso file. Click the “make” button.
The result is a bootable flash drive from the operating system, made using the UltraISO program. The flash drive can be used repeatedly to install the system.
This popular software allows users to work with ISO images. With its help, you can modify downloaded images of programs and operating systems, as well as create your own. Particularly convenient is the function of editing ISO without preliminary unpacking. This allows you to significantly save time spent working with files. This article describes how to use the UltraIso utility, as well as install and activate it.
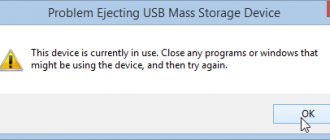
How to remove a virtual drive
After the image is mounted, the installation will continue as usual, as it does with any other programs.
However, if the mounting was done using emulators, after the installation is complete, the created virtual drive will remain, which will appear in the Computer folder. It can be removed via the emulator. For Daemon Tools:
- Open the program and go to “Disk Images”;
- Right-click on the image and select “Delete”.
For UltraIso:
- Run the utility as administrator;
- Open the “Options” tab and go to “Settings”;
- Select the “Virtual drive” tab;
- Specify “No” in the “Number of drives” section and click “Ok”.
It is not always necessary to remove a virtual drive. Some games and programs require an inserted disc. The virtual drive emulates its presence, so a program with such a requirement can work. If the program does not require a disk to operate, the drive can be removed without consequences.
Using UltraISO
The interface is quite simple. Click “File”, hover over the very first item – “New”. Please indicate the type of image you require. After this, you will be asked to select the files and folders that you want to zip.
Much more often, this utility is used to create bootable flash drives:
Instructions
Open the program by double-clicking on the shortcut. On the top panel of the program window there are buttons for working with disks: “Burn”, “Create an image”, “Save”, etc. To write files to disk using the UltraISO program, insert a disc of the required size into the disk drive.
The program is already running, all that remains is to select the necessary files. Click on the program menu “File” - “Open” and select the necessary files or open the folder where the necessary files are stored. Drag them with the mouse into the program window. The volume occupied by the files will be visible on the program panel. Make sure that the volume of recorded information does not exceed the capacity of the disc itself.
Click on the "Burn disc" button. A dialog box will open in which you can select the drive to write to, as well as the write speed. The settings will be set automatically, but you can set the recording speed to maximum or, conversely, reduce it. Click the "ok" button and wait for the disc to finish burning.
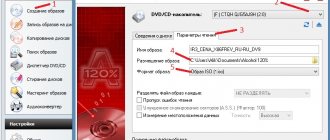
UltraISO allows you to create a disk image. This feature is useful when creating an image of boot disks, for example, taken during the game. To do this, insert the disk whose image you want to create into the drive. Click the “Create CD image” button on the program panel. In the “Create CD/DVD image” window that opens, select the folder in which you want to save the image and the image format. After the selected settings, click the “Make” button. Once the creation process is complete, the image will be located in the selected folder.
Next, you can burn the created image to disk. Add the image file to the window in a familiar way. Select the "Burn CD image..." button from the menu. The window that opens will display the following parameters: drive, image file address and writing speed. To successfully burn a disc, it is better not to select the maximum speed. But the waiting time will naturally increase. Click the "Record" button and wait for the result. Once the process is complete, the CD-ROM will automatically open and the program will notify you that the process has completed.
A very convenient feature of UltraISO is the ability to create a bootable Windows USB flash drive. To do this, use a familiar scheme to create an image of a Windows boot disk. Insert the flash drive into the USB port of your computer. Before recording, check the drive for unnecessary files and viruses. For this purpose, a 1 Gb flash drive is sufficient. Open the image file in the program and select “Boot” - “Burn hard disk” - “Burn” from the menu. The program will select a flash drive and write a Windows image to it. Then in the “Boot” menu, select “Burn hard disk” - “Burn”, the recording process will begin. The program itself will select the USB drive as the new Windows XP image media.
The UltraISO program will help you copy and burn CDs. With its help you can convert, edit directly, and create images. The program is compact and undemanding, compatible and functional. To use the program, you need to click “New”, add the necessary files and folders, select ISO images. You can, if necessary, directly change the location or content of folders and files in the image. In the tools for burning to disk, select “Burn image” and that’s it. To create a bootable USB flash drive in the program, you need an image of Windows and a boot disk. Having opened it in the program, inserted the USB flash drive, select hard disk entry in the boot menu. More detailed information about creating bootable disks and loading bootable flash drives is available in the program's help.