Features of creating a bootable USB flash drive using the UltraISO application
After installing the UltraISO program, the user can begin creating a bootable USB flash drive. This process will not cause difficulties even for beginners. The developer of the software product has done everything possible to make it clear how to create a bootable USB flash drive using UltraISO. For clarity, we will provide detailed instructions.
First, you need to run the application for the flash drive directly as an administrator.
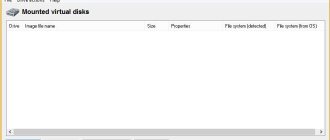
After completing this operation, use the Ctrl + O keys, or selecting File – Open, to open the Windows installation file image. We open exactly the image that needs to be mounted.
The next step is to specify the folder where the Windows image is located. To carry out this operation, select the image and click Open.
As a result, the following image should appear before the user’s eyes.
If everything is displayed correctly, then you can start recording the flash drive. You need to start this operation from the Bootstrap – Burn hard disk image option. The next screenshot shows everything.
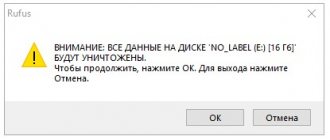
Please note that when recording from a USB flash drive in automatic mode, information will be deleted. If the data is important, it should be saved first. At this stage, the operation looks like this – USB-HDD + and click Write.
The Ultra ISO software will issue a warning that the information will be erased. If the data is not important or the user has already saved it, then click Yes.
Then everything depends on the technical characteristics of the computer equipment and HDD. The recording process usually takes a few minutes. When finished, the program will notify the user that the operation is complete.
How to make a bootable USB flash drive from a disk image using UltraISO
First, let's look at the most common option for creating bootable USB media for installing Windows, another operating system, or resuscitating a computer. In this example, we will look at each stage of creating a bootable USB flash drive for Windows 7, from which you can later install this OS on any computer.
As is clear from the context, we will need a bootable ISO image of Windows 7, 8 or Windows 10 (or another OS) in the form of an ISO file, the UltraISO program and a flash drive on which there is no important data (since all of them will be deleted). Let's get started.
1. Launch the UltraISO program, select “File” - “Open” in the program menu and specify the path to the operating system image file, then click “Open”.
Create a bootable USB flash drive in UltraISO
2. Once opened, you will see all the files that are included in the image in the main UltraISO window. In general, there is no particular point in looking at them, so let’s continue.
3. In the main menu of the program, select “Boot” - “Burn hard disk image” (in different versions of the translation of UltraISO into Russian there may be different options, but the meaning will be clear).
4. In the Disk Drive field, specify the path to the flash drive to which the recording will be made. Also in this window you can pre-format it. The image file will already be selected and listed in the window. It is best to leave the recording method as the default one - USB-HDD+. Click "Burn".
5. After this, a window will appear warning that all data on the flash drive will be erased, and then the bootable flash drive will begin burning from the ISO image, which will take a few minutes.
As a result of these steps, you will receive a ready-made bootable USB drive from which you can install Windows 10, 8 or Windows 7 on your laptop or computer. You can download UltraISO for free in Russian from the official website: https://ezbsystems.com/ultraiso/download.htm
In addition to the option described above, you can make a bootable USB flash drive not from an ISO image, but from an existing DVD or CD, as well as from a folder with Windows files, which is discussed further in the instructions.
Is it possible to make a bootable USB flash drive using a DVD disc and how to perform such a process
It became clear how to use the Ultra ISO program. Now you need to figure out what to do in situations where you have a licensed installation disk at hand, but no Windows image. Everything is very simple. In the third point, marked in the picture, you should mark the path to the disk drive. To do this, select “File”, and then “Open DVD”.
The rest of the actions take place as in the images presented just above.
Conclusion and some of my thoughts
We learned about the Hide Boot Partition item, which users pay attention to when creating an installation flash drive. I looked at the information on the Internet and everywhere I came across that in this paragraph it is necessary to indicate no.
By the way, not everyone knows, but I’ll write to you as a note. Always format the flash drive in NTFS - the file system is fault-resistant, reliable, and works stably even with large files.
And further. Do you know how to make a bootable USB flash drive with Windows 7? Or with Windows 10? Yes, you can use special programs for this, for example the same UltraISO... but.. not everyone knows that it is enough to format the flash drive in NTFS and extract all the contents of the installation image there. And that’s it – the bootable flash drive is ready! On more or less modern hardware, installation from such a flash drive will be no problem, I only use this option
That's all, good luck to you!
To home! 04.11.2018
Is it possible to create a multiboot flash drive using a folder with files
Yes, this option can also be made a reality. It is the optimal solution in situations where a digital licensed copy is located on a folder on computer equipment on disk. To complete the work, follow the following instructions:
We launch the Ultra ISO program to create a bootable flash drive. Select in order: “File”, “New”, “Bootable DVD image”.
In the window that appears on the screen, select the file called bootfix.bin. It is located in the boot folder.
The next step is to select the folder where the files are located. All files should be moved to the window located at the top.
In situations where the indicator on the right (as in the picture below) turns red, you need to click on it with the mouse and select 4.7.
Next, the user must be guided by points starting from No. 5, which are marked in the screenshots above. After completing all the operations, you can be sure that the autoboot flash drive is ready for further use.
Flash drive or CD?
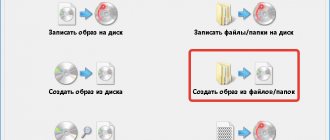
Of course, it is much easier to burn the system onto a laser disk, and such media will work 100% on any PC with a disk drive installed. To record such discs, Windows even has a built-in disc burning function.
To do this, after inserting the disc into the drive, select the type of use of the disc “With a CD/DVD player.” After that, in Explorer, select the desired ISO image on the HDD and right-click on it. In the context menu you need to select “Burn disk image”.
If this line is not in the context menu, then you have some kind of utility installed for working with images, for example, Daemon Tool, and it has replaced this entry. To put everything back in place, you will have to remove Daemon Tool from the system. After that everything should be seen. In the window that opens, select the laser disk drive and click OK. The process of mounting the image and burning the DVD will begin. If this was an installation image of the system, then this disk will be recorded as bootable.
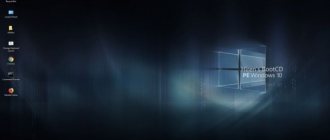
But what if your PC does not have a DVD writer or no drive at all? This situation is a common occurrence for modern laptops, which do not install a drive for the sake of a thin body. There is only one way out - use a USB flash drive as bootable media. But, in this case, you will not find utilities built into the system and you will have to use a third-party tool, for example, UltraISO.
The program is paid, but it can be used in test mode for 1 month. This should be enough to record the required number of images. Below we will tell you about ultraiso and how to create a bootable USB flash drive.
How to burn Windows 7 to a USB flash drive using Windows 7 USB/DVD Download Tool
This program is narrowly functional and is intended only for writing an ISO image of the operating system to a USB drive or optical disk. This product does not have any other capabilities, but in this situation we don’t need them.
To burn Windows 7 to a USB flash drive you will need:
- Installed Windows 7 USB/DVD Download Tool
- Windows 7 OS disk image in .iso format
- Flash drive with a minimum memory capacity of 4 GB
The program we will use is absolutely free. You can download it from this link. Installing this software product is no different from installing other programs and should not cause you any difficulties.
Insert the flash drive into your computer and run the pre-installed Windows 7 USB/DVD Download Tool. In the window that appears, click “Browse” to select the operating system distribution.
Select the desired Windows 7 image and click “Open”.
After you have selected the prepared operating system image, click “Next”.
At this step of recording Windows 7 to a flash drive, the program provides the user with a choice of media (“USB device” - recording will be made to a flash drive, “DVD” - to an optical disk). Select the “USB device” option.
In a special window, select the flash drive on which you want to burn Windows 7 and click the “Begin copying” button to start the process.
In the window that appears, confirm the need to erase the flash drive and click “Erase USB Device”.
After this, the recording procedure will begin. The percentage indicator will show the recording status.
After Windows 7 is finished recording to the USB flash drive, the message “Status: Backup completed” will appear under the percentage scale. Close the program and use the resulting bootable USB flash drive for your own purposes.
How to burn Windows 7 to a USB flash drive using UltraISO
This method is very popular among users. To use it you will need:
- UltraISO program
- Windows 7 disk image in .iso format
- Flash drive with a minimum memory capacity of 4 GB
- Perseverance and a little patience
Please note that the full version of the UltraISO program is paid. However, you can safely take advantage of the trial period, which lasts 30 days. During this time you can use all functions of the program absolutely free. After downloading, install the program on your computer; this process will not raise any questions for you.
Insert the USB flash drive into the computer and launch the UltraISO program. After launch, a welcome window should appear in which we need to select the “Trial period...” mode.
Next, click “File” -> “Open”.
Select the already prepared ISO image of Windows 7 and click “Open”.
After that, go to the “Boot” section and select “Burn Hard Disk Image...”.
In the “Recording method” field, you must select “USB-HDD”. Select our flash drive and click the “Format” button (note that this will delete all data from the drive).
After launching the formatting utility, a window will appear in which you need to select options for formatting the flash drive. In the “File system” item, select “NTFS” and click “Start”.
In the warning that appears, click “OK”.
After successful formatting, a corresponding window will appear.
We close the formatting window using the “Close” button and move on to directly solving the problem of how to write Windows 7 to a flash drive. To start recording, click the “Record” button.
The process of writing the operating system to the USB drive will begin. You will be able to track the recording speed, time remaining until the end of recording, and the total percentage of files already recorded.
After Windows 7 is finished recording to the USB flash drive, the message “Recording complete!” will appear. You can safely close the program and use a ready-made bootable flash drive to install the operating system on your computer.
Creating a bootable USB flash drive
1) After launching the UltraISO program, click on “file/open...” and indicate the location of our ISO file (OS installation disk image). By the way, to open the image, you can use the hotkeys Cntrl+O.
2) If the image was successfully opened (you will see file folders in the left column), you can start recording. Insert the flash drive into the USB connector (copy all the necessary files from it first) and click the function of recording a hard disk image. See screenshot below.
3) The main window will open in front of us, in which the basic parameters are set. Let's list them in order:
— Disk Drive: in this field, select the desired flash drive on which you will record the image;
— File image: this field indicates the location of the open image for recording (the one we opened in the very first step);
— Recording method: I recommend that you choose USB-HDD without any pros and cons. For example, this format works great for me, but with “+” it refuses...
— Hide Boot Partition — select “no” (we won’t hide anything).
After setting the parameters, click on the “record” button.
If the flash drive has not been previously cleaned, the UltraISO program will warn you that all information on the media will be destroyed. We agree if everything was copied in advance.
After some time, the flash drive should be ready. On average, the process takes about 3-5 minutes. Mainly depends on the size of your image being written to the flash drive.